|
|
and Plants |
and Tools |
Questions |
Donald L. McCracken, Jr. wrote:
I need information on how to make the deer hoof rattle. How to get the hoof from the foot to the final product.
Thanks,
Don
Don, I believe there is an article in the Society of Primitive Technology Bulletin #10 by Tamara Wilder on how to remove the deer hooves from the legs, but in a nutshell:
1. Acquire a dead deer.
2. Remove the lower legs.
3. If fresh, soak in hot (almost boiling) water for five minutes
(longer, if not).
4. Using pliers, or the like, twist one hoof off at a time (I
have the best luck twisting into the center).
5. While still wet, cut off the tip of the hoof down to where
it is hollow, leaving a hole (or let dry and cut on a bandsaw,
or drill into the side).
6. [one method for attaching the hooves] Tie one hoof to each
end of a 12 inch string. Repeat this process with another 12 inch
string until each hoof is attached to the ends of individual strings,
then fold all the strings in half and bind them up to make a handle.
7. [another method for attaching the hooves] Or take a piece of
buckskin about 6 inches wide and cut fringes, leaving a one inch
wide uncut band. Extend this band to make a length of 6 or 8 inches
to tie with. Insert a piece of fringe into each hoof and tie a
knot. Wrap the whole piece in a spiral fashion around a stick
(or bone) and secure the ends.
9. Shake it.
Hope this helps,
Norm
"Backwoodsman" wrote:
Mr. Kidder;
Wonderinig if you would be so kind to advise me as to the best
way to safely remove the deer hooves from the deer foot bone.
We have a reader who would like to make a rattle and could use
any information that you could give.
D. Sloan
Backwoodsman Magazine
Ms. Sloan;
Here is what I know about removing deer hooves. First, I've only
had luck with hooves that are either fresh or fresh frozen. Fresh
meaning still moist. Once they have dried, they stick to the toe
bone. My method for removal is to boil a pot of water, then take
from the fire and stick the deer legs into the hot water. Leave
for 5 to 10 minutes or so. Take out a leg, and with pliers, twist
each hoof inward, or which ever direction works. If they don't
come off fairly easily, I put them back in the hot water for a
few more minutes, but some just don't want to release, especially
if they aren't really fresh. Once removed, I cut the tip off of
the hoof with a knife and maul to expose the hollow so I can thread
it on the rattle. There is an article on this by Tamara Wilder
(the pictures are of me) and an illustration of two ways of making
a rattle in the book - "Primitive Technology, a Book of Earth
Skills", Dave Wescott, editor for the Society of Primitive
Technology, Gibbs Smith Publishers, Salt Lake City, 1999. Pages
239 -240. Hope this is helpful,
Norm Kidder
PS
Are you familiar with the Society of Primitive Technology? It
puts out the Bulletin of Primitive Technology twice a year including
articles as above, plus there are two compilations - the one cited
above and a second. Check the website at www.primitive.org.
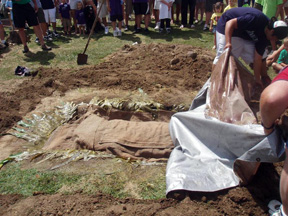
Dino;
I have been charged with making kalua pig in an imu for a family
reunion on the Mainland (central Wisconsin) this summer. I've
been involved in several 'backyard luau' imus when we lived in
Hawaii, always as a 'laborer' but never been the head luna [foreman] before.
I have never have been involved with one on the Mainland where
there is a need to substitute for some of the core materials.
Although I paid attention whenever I helped with an imu. I'm a
bit apprehensive about taking on full responsibilities myself,
however I do feel that I can do it. Your very detailed info on
the PrimitiveWays website (http://www.primitiveways.com/Imu1.html
) was an excellent find, and has given me more confidence. Thanks!
May I ask your advice on a Mainland imu?
Not sure if I can come up with lava rock in Wisconsin. What can I substitute for the lava rocks? I believe that any smooth river rock would work. Suggestions?
Banana stump & leaves. I have heard that corn stalks can
be substituted for the banana stump. If corn husks and leaves can
be substituted for the ti and banana leaves, I have access to
TONS of those in Wisconsin. What do you think? If not, do you
know of anyplace to get mail order banana stump and/or ti leaves?
Aloha,
Mike Warriner
Aloha Mike;
The ideal stones to use for imu cooking are igneous rocks. Stones
that are formed by the solidification of molten magma. I use vesicular
basalt rocks that I have found in Northeastern California. The
basalt stones retain a good amount of heat after they have been
fired. I don't know what type of river rocks you have in your
area, but I would not recommend sedimentary rocks. These stones
will break and may explode when heated. Sedimentary rocks do not
retain as much heat as igneous stones. Here is a test to see if
you have a type of sedimentary rock, like sandstone. Take a hammer
and whack the river rock. If it breaks easily, it might be sandstone.
If it is still in tact, then it MIGHT be useable for your imu.
Try testing a few stones by heating it up in a small fire. Blaze
the stones to see if it does not break or explode. Another alternative
to acquiring stones for imu cooking is to purchase them at landscaping
businesses that sell basalt rocks. Some contruction material stores
may also carry basalt stones.
You can substutite corn stalks, husks and leaves for the banana stump/leaves and ti leaves. Any plant material that will provide moisture, is not toxic and will not impart an unpleasant taste to your food will work. I have also gotten bags of lettuce scraps from the grocery store. Just talk to your local grocer and have them save up the lettuce scraps for your imu.
Good luck on your imu cooking.
Regards,
Dino Labiste
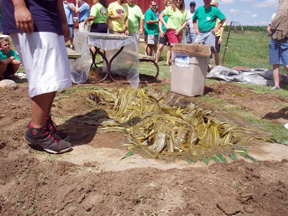
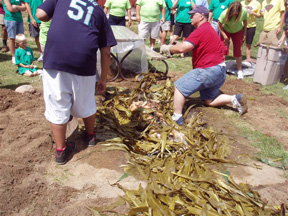
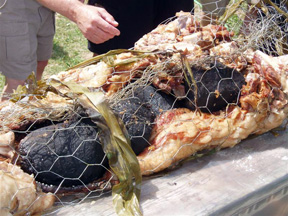
Aloha no, Dino!
I just wanted to touch bases with you to say 'tanks, eh' for your advice regarding my Mainland imu last summer. I was able to find plenty of good 'river rock' locally, and I took your advice and did a test fire to test our rocks the day before lighting the starting imu fire to weed out any bad rocks.
Substituting corn stalks for banana stumps and corn leaves for ti and banana leaves worked absolutely perfect. We used seasoned oak, which along with corn is abundant in Wisconsin, to heat things up and got an absolutely perfect result!
For some reason my plastic covering did not get as tight as I expected. Though there was plenty of heat and steam in the imu, it didn't balloon up and hold as taunt as I have seen it do in other imus that I helped out with. I had a great seal and the clay soil seemed perfect for holding in the pressure/steam. This caused me some concern overnight, as I wondered if my stones and coals were not hot enough, or I wondered if I was otherwise loosing heat somehow/somewhere. Though I am still puzzled as to why I didn't get that nice tight plastic cover, the 200 lb. pua'a [pig] come out absolutely perfect, and the rocks were still holding plenty of heat some 12 hours after we sealed up the imu.
We cooked another pig on a spit overnight, but the kalua pig was a huge hit, and was gone long before the spit roasted pig. Next reunion, I'm on the hook to do both pigs "Hawaiian Style", and I'm very much looking forward to it.
Thanks again for your excellent imu resource on PrimitiveWays, and for taking the time to answer my e-mail!
Alohas!
Mike
Hi -
I am the art teacher at a Montessori school. I have a third grade boy who wants very much to make a bead drill, the kind used by the Miwok (we have a drawing from a book). I have read that buckeye, or other hard wood was used for the drill (bit) part, but haven't come up with any other details to guide us. I came across your site and thought it worth asking if you might have a more specific plan/diagram/general tips for me and Ben.
Thanks!
Julie
Hello Julie,
Ask yourself "Just what is a third grade boy capable of doing?" There are all kinds of possibilities. He could drill some beads with equipment identical to that used by the Miwok. He could make a drill that works the same way but uses a steel cutting tool. He could make some beads that look like the originals but use modern tools. He could make a pump drill, a tool intorduced by the Spanish. He could learn just how time consuming this process would be. (A friend and amateur archaeologist from Illinois made and used a bow drill, all natural materials, to drill a hole in a Gulf of Mexico conch shell. I think it took almost ten hours.
I am passing this on to the rest of the PrimitiveWays gang to see if they have more suggestions.
Good luck,
Dick Baugh
Julie:
I think Dick's response is a good one, and speaks to the realities of bringing primitive technologies to a third grade classroom. I seriously doubt that a wooden bit, no matter what wood was used, would be effective for drilling beads with the possible exception of beads of steatite (soapstone), which it extremely soft material. I think making a drill with a metal bit or point would be your most practical and successful choice. As far as tool design goes, a length of dowel with an inserted nail in one end that's been flattened and filed to a point is one style I've seen, although it's not a replica of anything "primitive".
Hope this helps.
Ken Peek
I believe that some native Californians used poison oak resin as a true black in their baskets. The urushiol turns jet black when it polymerizes and dries; our family used to have some old inherited Miwok baskets decorated that way. We returned them to the family of the woman who had made them years ago, so I don't have samples.
Dan B.
Cornell University
Ithaca, NY 14853
Hi Dan;
Thank you for sharing the information.
Regards,
Dino Labistk
(pertaining to the article "Antler Handle Knife")
Sir,
I am constructing a knife with a steel tang and wish to use your method of natural adhesive to affix the blade I purchased, to the moose crown I have on hand. I was wondering . . . .
1) Will this work with a crown as it does with a tine?
2) If I cut small grooves into the sides of the tang would it increase or decrease the adhesion?
3) How should you seal the antler to prevent wear? Should it be sealed?
Thanks a Bunch,
John C. - from KC
Hi John;
> 1) Will this work with a crown as it does with a tine?
The crown area is solid on a mammal that has antlers. The tine of a deer has a bit of a pithy interior to mount the tang of a knife blade. Unless you drill and saw a slot for your tang on the moose crown, you can't mount and adhere your blade with my method.
> 2) If I cut small grooves into the sides of the tang would it increase or decrease the adhesion?
Cutting small grooves on the sides of the tang will increase more surface area for an adhesive to bond to the tang. Even creating small dimples will increase surface area. My method of mounting a blade does not use a secondary bonding agent (like commercial epoxy). When the pithy area solidifies again, it grips the tang in place. My blades have not loosened or slid out of the deer antler yet. That is not to say it will not happen. It might come out eventually.
> 3) How should you seal the antler to prevent wear? Should it be sealed?
I usually use mineral oil on my antler handles unless you want to seal it with commercial tung oil.
Regards,
Dino Labiste
Howdy,
I'm interested in making my own dugout canoe. It seems that at this point, obtaining the log is the most difficult step. I live in San Antonio, Texas, so finding a log of the appropriate size will be difficult. Would you happen to know where I could go about getting the right size/type log for making a canoe in Texas? Thanks.
Best Regards,
Jorge Garza
Hi Jorge;
Look along creeks or rivers. Drive in the county and look for a downed tree. Ask property owners permission to access their land and cut down a tree. Put an ad in the Craigslist.com website to see if someone has a downed tree on their property. Look for a wood easy to hollow out like cottonwood. Remember, it is hard to move a large log or dugout. It is best if it is cut right next to water.
Bob Gillis
Hi,
I stumbled on your website detailing the making of a dugout canoe and would like to add some pertinent information. I spent some ten years on an Indian Reservation in Central America. The population of around 50,000 lives mostly on several dozen small islands in an archipelago of over three hundred. Given the above, it is not surprising that the dugout canoe is the basis of all travel and communication between population centers. Nowadays, the outboard motor is used extensively, but sail is still common. The smaller boats are only paddled.
The canoes themselves range from maybe ten feet in length to over thirty, although the larger sizes are becoming rarer due to lack of large trees. The vessels are beautifully constructed and the better ones have quite thin shells. The technique used to achieve the thin shell without fatally penetrating the hull is simple and ingenious. The outside of the canoe is fully formed first, then the hollowing-out process undertaken. Adzes in various forms being the tool of choice. When the hollow is large enough that the risk of penetrating the hull with an over-enthusiastic adze stroke becomes a problem, a series of holes are bored in the hull. The holes are bored with a hand auger and are drilled completely through the hull. About an inch is the usual diameter, but most anything will serve. With the holes, the adze-man can finely judge just how much material to remove without fear of penetration. After the canoe is completed, dowels are hammered into the holes and cut off flush, rendering all watertight. An ongoing problem with all hollowed log vessels is eventual splitting at bow and stern. Most working canoes I have seen (Caribbean, Central America, and Pacific) have somewhat thickened and usually raised ends for this reason. The Carib canoe or "Gommier" in the West Indies has a distinctive underwater projection at bow and stern to help prevent splitting. It looks like an ancient Mediterranean war galley's bow. The so-called "Ram". The natives use pieces of white polystyrene which nowadays floats around all oceans. The polystyrene is dipped in gasoline, making an instant fast-setting caulk, which is applied to the crack, then a piece of any scrap tin-can nailed over to make a shingle. Quite ingenious!
Hope this is of interest.
Robin Pringle
Dino:
I read with interest your page on the Internet about making rattles from bull kelp "feet".
I live in Long Beach, Washington. We have had quite a bit of bull kelp come ashore with early storms in the last days. I walked the beach this afternoon and cut off two of the bulbs that tether the kelp to the sea floor. I left about 15 inches of stem and tried my best to fill each with beach sand. The problem was, the sand and everything else here is very wet after two or more weeks of rain. One bulb had a larger neck than the other, and I do think I got the sand to the bottom of it.
I realize now that you suggested a "small" bulb. The ones I brought back are not small. They must be 4-5 inches in diameter at least. I guess I wanted to do it in a big way.
I am a relative newcomer to the Northern Pacific coast, having lived here a bit over a year. I find the winter storms to be beautiful and energizing. What I dread is the summer tourist season.
I am wondering how long the kelp balls will take to dry? Should I put them in a warm and dry environment or allow them to dry more slowly in storage outside out of the elements? They are so wet and the sand packed in them is so wet that I can imagine proper drying will take weeks, if not months.
I don't know how much the material will shrink, so I guess I had best wait until I see the dried object before deciding how to seal the handle end. Your gourd idea was good, but I would not know what size gourd to get yet.
And then I will have to decide how to decorate my king size rattles and what to put in them to make the rattling noise.
I would like to decorate them with Native American symbols, but am no artist. I suppose after being completely dry and decorated, they could be covered with clear acrylic sealant, huh.
Thanks for the article.
Dixon H.
Hello Dixon;
Thank you for visiting PrimitiveWays.com.
Did you pour dry sand into the bullwhip kelp bulb? Wet sand does not work very well. Be sure to completely pack the sand into the bulb. If you leave any air pockets, the kelp bulb will shrivel and shrink into the empty space. The sand is the mold that will help the bulb retain it's shape as it dries.
> One bulb had a larger neck than the other, and I do think I got the sand to the bottom of it.
Take a stick smaller than the opening of the bulb stem and gently agitate and push the sand into the bottom. Be careful not to puncture the bulb with the stick. Shake the bulb to stuff the sand further into the bulb.
The fall and winter months may keep the kelp bulb wet longer. Also, Washington is a wet state. Having the bulb in the sun would definitely help to speed up the drying process.
> I am wondering how long the kelp balls will take to dry?
Drying time varies with the size of the bulb, how wet it was to begin with and the weather. You can dry the bulb faster if you keep it next to a heat source.
> Should I put them in a warm and dry environment or allow them to dry more slowly in storage outside out of the elements?
Keep the bulb in a warm and dry environment or if it is sunny outside, keep it out in the sun. Don't leave it outside overnight. The moisture in the morning or any fog will rehydrate the bulb.
> They are so wet and the sand packed in them is so wet that I can imagine proper drying will take weeks, if not months.
Pour out the wet sand and replace it with dry sand.
> I suppose after being completely dry and decorated, they could be covered with clear acrylic sealant, huh.
In your area, I would recommend putting a coating of sealant on your completed bullwhip kelp bulb rattle.
Have fun with your kelp project. Let me know how it turns out.
Regards,
Dino Labiste
Around here at this time I would have to go to a building materials place and purchase dry sand. I don't think anything will be dry here again until April or May. You know the Washington climate apparently.
I have plenty more kelp to work with on the beach. I may try again when I decide where to get dry sand.
If I get something together and decorated before spring, I'll send you a photo.
Thanks again.
Dixon H.
Hi Dixon;
Since sand is an inorganic material, it will dry faster in the open air. Pour out the wet sand and let it dry in a shallow pan near a heat source, outdoors or in the sun. Wind will also wick moisture from a wet object. To keep your kelp bulb from drying out without the sand inside, place the bulb in your refrigerator until the sand is dry and ready to be re-poured back into the bulb. Monitor your kelp bulb every now and then in the refrigerator to make sure it is not starting to shrivel or get moldy.
After you pour the dry sand back into the kelp bulb, try using your hair dryer in the "Hot" mode to help quicken the drying process of the bulb. It might take awhile, but every now and then use the dryer as the bulb is also drying naturally. I haven't done this before, but you might try using your oven at a low temperature to dry out the bulb. You'll have to experiment with the use of an oven and keep a close eye on the drying process. If it gets too hot, crack the oven door a bit to dissipate some heat. You don't want to cook the bulb. You can also dry the sand in your oven. Let the sand cool off before pouring it back into the kelp bulb.
Good luck.
Dino Labiste
Hello Norm,
I am looking for information regarding an artifact that has been passed to me from my mother. She was born in Prince Rupert, BC and had this item since she was a kid. The only thing she told me about it was that it was called a 'zonk' and it was native indian. Now, I have done internet searches like crazy on cooking / boiling stones of lava, pumice, basalt and other tools for not only West Coast Native Peoples but also around the globe and have come up with nothing that even looks remotely like it. ACK! Help!
I have enclosed pictures. Its 2.5 lbs, 5.75" in diameter, and 2" tall. It doesn't smell of anything in particular. And although the pictures appear like it is medium grey in color, it is actually more a slate black. It would be great to hear from you.
Regards,
Anne-Marie Jensen
Anne-Marie, thanks for the interesting question. On looking at the pictures, my thoughts were:
1. Cooking stone - there are some with holes, and many are vesicular basalt (the type of rock your artifact appears to be. The ones with holes are most often made of soap stone however, and the pictures of Northwest Coast cooking stones doesn't match, as you discovered.
2. Net sinker - many Northwest nets are held down with stones, including some with holes, however, all the pictures I could find show stones with rounder profiles, and holes off center.
3. Game piece / stone hoop. While checking on this possibility, I found a drawing that matches yours, with the following information: "Perforated lava disk, 5 inches in diameter and 1 3/8 inches thick. Collected in March, 1901, by Dr. C.F. Newcombe, who describes it, under the name of laua'iu, as used in a game: The Kwakuitl say that these stone disks are no longer used. According to Mr. George Hunt (the main Kwakiutl informant), they were originally rolled in sets of four of different sizes and were shot at with bows and arrows.
Dr. Franz Boas, in his Kwakiutl Texts, describes a game played with these stones between the birds of the upper world and the myth people, i.e. all the animals and all the birds. The four stones were called, respectively, the `mist-covered gambling stone,' the `rainbow gambling stone,' the `cloud-covered gambling stone,' and the `carrier of teh world.' The woodpecker and the other myth birds played on one side, and the Thunder bird and the birds of the upper world on the other, in two rows, thus. The gambling stones were thrown along the middle beetween the two tribes of birds, and they speared them with their beaks. The Thunder bird and the birds of the upper world were beaten in this contest. This myth is given as an explanation of the reason for playing the game with the gambling stones. They are called laelae."
This is from page 521 of Stewart Culin, Games of the North American Indians, Dover Press, 1975, based on publications dated to 1902-1903 at the Smithsonian. You said your mother is from Prince Rupert, which is in the territory of the Tsimshian tribe, which borders the Kwakiutl on the south. I can send you a copy of the page, with the drawing, which I'm sure you will agree is a match for your stone ring. I think it's also a much cooler explanation than a cooking rock! As to the term - zonk, this could be a non-Indian term, a Tsimshiam term or a translation of the Kwakiutl name for one of the specific stones. In any case, you have an object with some interesting history and cultural value, take good care of it.
Hope this answers your question.
Thanks again,
Norm
The puniu drum looks very cool (I want to hear what one sounds like being played), but is there a video someplace of someone playing one? I couldn't find anything on Youtube . . . . maybe you could post a few?
Here is video of a halau (hula school) performing for the Kahiko Competition. The event is the Merrie Monarch Festival on the island of Oahu. Continue watching the video and you'll see the wahine (women) performers attach the puniu drum to their thighs and strike a rhythmic beat to the dance movements, singing, chanting, and the pahu hula (dance drum). The hula school is Halau Hula Olana.
http://www.youtube.com/watch?v=_lcRahCmDX4
Enjoy the hula,
Dino Labiste
Dino;
I came across your website and read your article on doing a kalua
pig. I do a bit of smoking in my Weber bullet and I am thinking
of cooking a whole pig in my backyard with the Imu. Did you need
a fire permit to do this and did you have problems with embers?
My fear is that embers will fly into my neighbor's yard and start
a fire.
Steve
Hi Steven;
I would recommend getting a fire permit from your local fire department.
Burning firewood does create a lot of smoke. You don't want someone
reporting the smoke that is billowing from your backyard to the
fire department.
When I burned my firewood, I covered the entire pit with a fine, metal wire mesh to keep any embers from flying into the air. Get some tips from your fire department on how to control the embers. When you are burning wood, someone has to be constantly watching the fire at all times. Always have a shovel, bucket of water and even a water hose ready in case the fire gets out of control.
Talk to your neighbors. Inform them about your cooking project to build a fire for an imu. Discuss your safety plans to ensure the embers will not float into the air and ignite their property. At least it will ease their concerns about fire danger. I even invited my neighbors to the luau.
Good luck on your imu project,
Dino Labiste
(pertaining to Bob Gillis' article entitled, "How to Make a Rabbit Skin Banket". The response was answered by Sue Witmore.)
Hello;
I am an anthropology student at the University of North Dakota.
Your website on primitive technology is a very interesting and
enjoyable resource.
As a current side project of mine, a fellow student and I are hoping to better understand and recreate the technology of the rabbit skin blanket using whitetail jackrabbit hides (slightly bigger than the blacktail). I will obtain the hides myself.
I just have a few questions for you,
if you would oblige:
Have you ever made a blanket from "raw" pelts?
Do you find that your recreation differed greatly from the traditional
way described in the book on primitive technology of the Paiute,
as demonstrated by Jimmy? Particularly, I have read this portion
of the reference, and I see some differences in the manner in
which you are cutting the spiral strips. Probably just due to
you using hides prepared by others. This is not a critique, I
am just merely trying to understand this process better. And what
is your understanding of this part of the process in the book?
As I recall, the illustrations are fairly poor in the book in
some respects, leaving much up to the understanding of the verbal
description. Clear as it may be, a picture is worth a thousand
words. I do not have this reference handy just now, but it is
my understanding that the hide is not lain out flat, but is left
whole, having been pulled off the carcass from hind to head (much
like some of the more meticulous deer hunters do up here with
their kill). This leaves it more tubular, with the animal's eye
holes taking place of the slits you have cut in your strips, and
the spiral continueing around the "tube". I imagine
a more efficient way to use the hide, with little attention paid
towards cutting out the irregularities of the limbs and ears.
Again, I am very serious about accuracy and would appreciate your
interpretation.
Also, do you have any experience in rabbit trapping using the traditional Paiute method?
Thank you so much for your time. I am just starting this project and would appreciate any insight you may have. I would be willing to share photos of my reconstruction in process. Also, any referral to others who have done such a thing would be great.
Regards,
Michael P. Engelhart
Hello Michael;
Bob Gillis referred your email to me. I hope I can be of some
help.
I don't know why whitetail jackrabbits couldn't be used. The same method was used to create blankets from ground squirrels and a variety of other small game here in California.
I have made several rabbit skin blankets from commercial hides. However, I have never made a full sized blanket from raw pelts. I have made a sample rawhide blanket, twining a large blacktailed jackrabbit hide. There is more stiffness to the rawhide strips, but the flaring of the fur is more dramatic, and the blanket is quite light weight and luxurious. No, in case you are wondering, it does not smell.
Your Paiute reference should be a perfect way to make the blanket. The spiral cut is just a way in which a flat hide can be cut into long strips. It is not the best way to do it . . . it is the only way if the hide you have is not case skinned. With a case skinned hide the entire pelt can be used. The eye hole is tough and makes a perfect attachment area. My understanding is that only one eye hole is used, the other being at the wrong end of your spiral to be useful. The arse hole or a slit in the foot can make the second attachment hole. The best part of working with a raw case skinned hide is that the hair all points one way . . . much, much easier to get it to flair out as it is twisted. I also heard that the freshly killed rabbit was skinned by spiraling a one inch to one and one half inch strip from the eye. As the cut was made, a second person rotated the rabbit, unwinding the skin like peeling an apple in one piece. Then it was twisted into a long "fur boa". With this method, you have a skinned rabbit to cook, and the makings for a rabbit skin blanket. As you noted, the ears and other irregularies can be ignored. I understand that the ears were allowed to stay on the strips, but became stiff and brittle. They were twisted/broken off later, after the blanket was made.
The twining technique is pretty straight
forward, but if you haven't done any basketry or other twining
techniques, it probably doesn't make sense. The "fur boa"
is wound upward around two stakes set in
the ground, basically constructing the blanket between the two
stakes. If it needs to come indoors, just make a frame. The stakes'
distance from each other and the height of the spiraling boa correspond
with the dimensions of the finished blanket. The cordage (dogbane
in most of California) is twined across the weft of fur strips.
The cordage making will take more time than the rest, unless you
plan to use commercial twine. Twining implies a clockwise half
twist in the cordage between each fur strip. These rows of cordage
are what holds the thing together when you take it off the stakes.
Make your rows about every two inches.
Let me know if you need more clarification. Good luck on your rabbit skin blanket project. As for the trapping, sorry, advice from me would be of no help. In California, long nets of dogbane were used, and the hunts involved lots and lots of people.
Please let me know how it turns out!!
Sue Witmore
Hello Mr. Labiste,
I have been reading a lot of your articles on the society of primitive technology. I am blown away by all the knowledge that primitive skills has in abundance. I would like to say that it totaly opened me up to the reality of the skills that can be learned. I will be a truck driver in about a month, which is lucky for me because I can travel and learn all kinds of primitive skills. I have the time and money to actually practice them. I was wondering if you could help me because I see that there are so many skills to learn -- plants, scouting, medicine, etc., as well as different environments, such as desert, winter, etc. to employ them. What, in your opinion, would be a good way to map out my training? Such as, is there one school that can teach me the bulk of what I need? Should I go to different schools to specialize in certain skills? What schools are good?
Thank you for your time sir,
Gordon
P.S.
The thumb straps for the hand drill work wonders. Thanks for the help.
Hello Gordon;
Often times in our Western fast paced life, we tend to look for the shortest route to learning skills that take indigenous cultures a lifetime to master. Learning is the fun and important aspect of acquiring any skill. Not only do you experience and gain knowledge, but you also learn something about your abilities and yourself.
Ask yourself, why do I want to learn these skills? What am I going to get out of it in my life?
Find a skill that you feel passionate about. Find a teacher who is willing to guide you on that path to becoming proficient in that skill. Sometimes people specialize in one skill, while others learn many skills. My suggestion is to focus on one thing at a time, then, when you are ready, move on to something else (if you wish to do so). Take your time and smell the roses. You'll begin to appreciate what your ancient ancestors had to learn to live in a lifestyle before the age of metal.
There are good schools and terrible schools out there. Find one that has knowledgeable instructors by talking to the people who are coordinating the event or the school. There are too many survival, wilderness, primitive schools that have cropped up in the last few years due to the internet and the myriad of new schools. People will take a few classes or learn something via the internet, then they are off and running in starting a school or event on primitive technology. Get to know more about the instructors, their experience and how long they have been doing what they are doing. See their work. Get recommendations from other people. Talk to the instructors about their expertise, either in person or on the phone.
There are 2 events that I can suggest. The instuctors are excellent and the quality of the events are exceptional. They are Rabbitstick Rendezvous in Rexberg, Idaho and Winter Count in Maricopa, Arizona. Here is the webiste for the 2 events:
http://www.backtracks.net/
Check it out when you are in that area. Also, find a good instructor who will tutor you in certain skills. They are around. You'll have to do some research and ask around. Some of the instructors at the Rabbitstick Rendezvous and at Winter Count have schools. Attending the events will give you an opportunity to talk to the instructors in person.
Go slow and the quality of your skills will improve immensely. Do not try to learn so much in a short amount of time.
Regards,
Dino Labiste
Howdy,
I enjoyed your article about making shellfish hooks and just wanted to send some observations to you. I am a commercial fisherman in California and fish using longlines and up to 3,000 hooks at a time. All of my hooks are circle hooks, most fishermen gave up the traditional "J" hook years ago. Now, only sport fishermen use them. The small gap at the mouth of the hook you wrote about is very important, too large and the fish will fall off. Circle hooks are designed to rotate in the mouth of the fish as it turns and swims away with the bait. The line ends up in the corner of the mouth, and as the hook reaches the corner of the mouth, the hook slips around the lip. The small gap is just big enough for it fit at the corner of the mouth and to get bait on. Halibut fishermen using "J" hooks could expect two fish for 90 hooks in the old days. After switching to circle hooks, the numbers went up to the hundreds of fish and thousands of pounds. Mustad fishing supplies claims to have invented the circle hook, but as your article shows, they were not the first people making these great hooks.
Thanks for a great article.
Warren DeWolfe
Hello Warren,
What a great thing to hear about your first hand experience. I love to fish, but only have done sport fishing. Your description of how the circle hook works sound intriguing. I am sure the size and species of the fish is critical in determining the optimal hook size and hook gap. Can you give me any information on the size of your longline hooks as they apply to fish species and size caught? I'm particularly interested in the hook gap and if your hooks are offset at all. On my hooks, there is no offset. One is 2.7 cm diameter and the other two are 3.5 cm. The gap increases 0.6 cm on each of the 3 hooks even though one is smaller than the other two. I'm curious how they compare to your hooks, and if you see them as effective for any specific fish species.
I recently took the hooks I made out on a trip to the Farallons and only caught rock fish on my conventional J hooks (2-7 lb Strawberry cod spp). The Chumash hooks found by archeologists have a variety of gaps and sizes. I am thinking, my lack of success could be in the hook size, the hook gap, or the manner of attaching bait. Without a barb, baiting the shell hook is a challenge. Then too, perhaps I was pursuing the wrong fish species. Any ideas?
Thank you for taking the time to write, and for sharing your experience. Looking forward to hearing your thoughts.
Susan Labiste
Dear "Norm Kidder";
I ran across your cordage article on the 'PrimitiveWays' website. It brought back some memories.
Several years ago I was putting in a concrete foundation for a heavy equipment barn in the remote unexplored regions of Transmexico (that inland or upper area of South Texas between the Rio Grande and Nueces rivers). After working from before dawn till after dark, I would make rope. What was supposed to be a three day job turned out to be more like three months. There was a bit of tension. We barely even talked to each other.
One night, the old man who owned the ranch came over to me and said he couldn't believe a white man could do what I was doing. He thought that civilized white folk had lost the patience and concentration needed for such primitive skills. I told him that I might not be quite civilized or pure white. He wasn't a bigot, so I told him the truth.
When I was very young my family moved to the Caribbean. I learned many skills. Many of the local fishermen built their own boats and would trust only a rope they had made with their own hands. I learned to make rope from them.
The real trick of hand rope making is hundreds or thousands of hours of practice. After a while it becomes almost like breathing; a semiautomatic activity. You can think about something else while your hands work automatically; or, slip into a state of semiconsciousness.
Fred Brawner
Fred, you're lucky to have had that "primal" experience. Today's kids think primitive technology means Pacman or Frogger. I'm afraid the concept of patience (the most important primitive skill) is fast disappearing.
Thanks for the story,
Norm
Hello,
I read your article on "The Shade Tree Knife Mechanic" several times, and I'm fascinated by it! It gets me so excited to have the chance to make my own knives, because the way you lay it out seems simple and do-it-yourself yet effective. However, there were a couple questions I had.
How do you reach the desired thinness when using an old, worn out file? Those things are too thick it seems for a short knife blade. Do you need a hammer and anvil?
Also, what exactly do you mean by "medium red heat" in reference to the appropriate temperature for heat treating a blade? Could you email me a color so I could have something to reference?
Thanks for the help,
Stephen
Hello Stephen;
I am very pleased that you enjoyed reading my take on knife making.
How do you reach the desired thinness when using an old, worn out file? I must confess I’ve never used an old file for this purpose and I never pound on things because I have a pretty good supply of steel of the desired thickness. After annealing a file should be pretty easy to reduce in thickness. Buy Wayne Goddard’s $50 knife shop. It is an excellent book that covers the subject in much greater depth than my article.
Also, what exactly do you mean by "medium red heat" in reference to the appropriate temperature for heat treating a blade? Medium red is in the eye of the beholder. The old time bladesmiths did their heat treating by color. In order to learn that they served a lengthy apprenticeship with a master. I consider it to be an example of knowing how without knowing why. I don’t say that disrespectfully, but we’ve learned a lot about metallurgy in the last 100 years. In order to use color for judging temperature one must make sure that the ambient lighting is not too bright. A blade that is medium red hot in bright sunlight won’t appear the same as it would in the shade late in the evening. Consequently you should do as the famed Japanese swordsmiths do: heat treat in a dark place. Practice on a few scraps of the steel your blades are made from. It is best if you don’t overheat the metal. In other words get it hot enough to harden but not much hotter because that will promote grain growth and decarburizing. Heat a piece of scrap up to what you think is “medium red” and quench it in water. Try to scratch it with a file. If you can scratch it then it wasn’t hot enough and reheat it to a somewhat brighter color and try again.
Another method would be to borrow a pyrometer, an instrument that measures temperatures in this range.
Best of success,
Dick
Hi, I'm a friend of Hank Koerper. He brought me the flute he bought from you to see if I could play it. Can't get much from it. Wondered if you have instructions that would help?
Sherri Gust
Sheri;
First of all - good luck. Only about one person in seven to ten in a class gets a sound with me there helping them. Having played the modern flute may even be a disadvantage, as you need to unlearn your mouth position. The simple and ancient elderberry flute that you are trying to master can be played in a couple of ways, but the main one is to blow a very gentle stream of air against the far edge of the flute, holding it at about a 45% angle (I was told 42%) and slightly downward. What I tell students is to breath out rather that blowing, with your mouth in a whistle position only looser. Think of bending a candle flame instead of blowing it out. To place the flute, I have them hold their left index finger in the center of their mouth, and place the edge of the flute against it, then remove the finger. Cover the top two or three holes on the flute and move the flute back and forth, and in and out, while looking in a mirror. It took me about 20 minutes to get a sound, and about an hour before I could hold it. I think most people fail from trying too hard, so relax as much as possible while trying. If you do get it to sound consistantly, the final step is to hit the upper octive. This is done with a tighter, more intense burst of air. Again, good luck. A final note, if you can find someone who plays the flute (Hank's friend, Paul Campbell, knows someone), study what their lips look like and reproduce this in the mirror.
Again, good luck,
Norm Kidder
I was curious if you can harvest hazel and willow during the “second spring” like late summer months when the roses start blooming. I have heard of this before, but haven’t tried it. Do you have any suggestions of websites or books to do further research?
Julie Chouquette
Coquille Indian Tribe
Administration Assistant/Records Management Assistant
Hi Julie:
Thanks for the question regarding willow and hazel harvesting. I'm sure it can be done in late summer, but bark removal becomes more of an issue that time of year. I'm going to refer your question to my colleagues who are more knowledgeable regarding basketry materials. Also, you might try getting in touch with a fellow Oregonian by the name of Margaret Mathewson, who is really quite an expert on basketry materials, harvesting practices, etc. I'm sorry that I've forgotten where in Oregon she resides but I believe my fellow basketry fans can provide that information as well.
Thanks again, and best of luck.
Ken Peek
Dear Julie,
I am not an expert, nor am I Native American, so what I can offer you is limited.
My understanding is that hazel is usually gathered in the spring, during a narrow window of time when the sap is running and it can be stripped of bark in one motion. As it continues to mature two things happen. The little bends at each leaf bud become more pronounced, so the stick isn't really straight any more. It also can no longer be stripped easily. I know of a "second spring" for redbud, but this would be for redbud intended as a stripped white element, not a red one. As for willow, the wood tends to get soft as it grows in the summer, so I would think it might not be optimal to gather in the summer, even if you can strip it during a " second spring". If you are a traditional weaver, following the advice of elders or relearning an old art form, you may not want to deviate from your cultural norm. If you are trying to recover lost information, experiment a little. Plants are good teachers if you pay attention. If you care to share information, I would be interested in what you learn.
As Ken suggested, Margaret Mathewson is a good contact. She is very knowledgeable. Try this website: www.ancientartscenter.com
Susan Labiste
Hi,
I'm an anthropology student at the University of Wisconsin, Madison. I'm currently researching bone tool production in the Belize River Valley. For part of my project, I am doing some experimental archaeology, and I am attempting to recreate some of the bone tools we have found. Any advice on bone tool production is welcome, but I'm more specifically looking for information on how to clean bone that has been freshly butchered, and how to carve/shape using stone tools.
Thanks for your help,
Lizzy
Lizzy, you're the second student from UW to ask this question, so I'll copy you what I just sent off with a few additions.
In General, I prefer working with fresh bone when I can, but it needs to be free of rotting flesh. There are a few ways of cleaning it. What I do most often is to scrape off as much as possible, then let it dry (protected from scavengers) until the remaining dry flesh will scrape off. If I'm in a hurry, I boil the bones until the fleshy stuff separates. The only problem with boiling is that it removes the fat from the bone, which can leave it more brittle. If you want to remove the fatty residue from the bone, some folks also use bleach. If it has been boiled or bleached, it is good to oil up the finished product. My favorite is Walnut oil because it doesn't go rancid. Fresh dried bone is relatively easy to work with stone tools, and can even be knapped to some extent, speeding up the shaping process. Old weathered bones can be too brittle to break predictably, but are softer and abrade more easily.
To work the bone, I first use a burin to create a groove as deep as I can. If cutting across the bone, I may use a large stone with a good edge, held between my feet or buried in the ground and move the bone back and forth across it. Then I place the bone over a stone anvil and use an antler wedge and hammerstone to carefully crack the bone along the groove. Finally, I abrade the bone on a course rock, usually sandstone (cement works well too), until it is done, then polish it with a very fine grit held by soft leather, or a finer grained stone or use Equisetum (Scouring Rush) as sandpaper.
Hope this helps,
Norm Kidder
Hi,
Thanks so much for the information - you did get two emails from us in Wisconsin. I do zooarch on Maya sites (I'm a grad student) and have been helping Lizzie look at worked bone in the collection. The 1,300 year old site doesn't have very good preservation and we don't have many tools (mostly needles, awl-type implements, and some flute and decorative items). So this is the our first time really going through these pieces and how they were made.
Lizzie started to process the bone as you suggested and your advice was very helpful.
Thanks a lot,
Carolyn Freiwald
Department of Anthropology
University of Wisconsin - Madison
What do you use to sharpen the knife in your article on how to make knives?
Max M.
I start with a very coarse carborundum
stone, the type used for sharpening garden equipment. Then I
go from medium coarse to medium to medium fine to fine, all lubricated
with water, not oil. Then I use a Japanese water stone dry.
The last step is to burnish the edge with a piece of very smooth
glass rod.
Dick
Is the [rabbit skin] blanket washable, or cleanable in any way?
PJ Cooke
I would not wash it. You might wipe it with a damp rag were it might be soiled, but do not get it soaking wet.
Sincerely,
Bob Gillis
Hello Bill;
I have just read your account of tanning a pelt with interest. I am studying a creative writing degree at my university and I am in the process of writing a horror story for my next assignment. I intend for one of my characters to kill domestic cats and tan their pelts to be made up into coats. I wonder if you could answer a couple of questions for me?
1. Can you tell me why you cook up the brains and rub them into the pelt? Can you describe the smell?
2. Once the pelt has been smoked doesn’t it smell? – How would you get rid of the smell?
3. What sort of alcohol do you use?
4. Would there be any particular problems in skinning a cat?
I will be very grateful for any help you can give me and will mention
your website in my bibliography.
Regards,
Lin Whitehouse
Hello Lin;
I would be happy to answer your questions.
1. Can you tell me why you cook up the brains and rub them into the pelt?
As in handling any raw flesh, there is always a safety issue. Perhaps you have heard of people getting infections from raw chicken getting into cuts on their hands. Cooking raw flesh, or brains reduces that risk.
2. Can you describe the smell?
Not really, save to say it is kinda nasty. I like to soak my old smoking skirts in water and add a bit of that water to the brains while cooking them. Improves the smell, and seems to make the brains last a bit longer.
3. Once the pelt has been smoked doesn’t it smell?
Yes it does, but it is quite a good smell, sort of like barbequed meat. It is a huge improvement over the brain smell.
4. How would you get rid of the smell?
You don't. The smell does fade with age, but never goes away entirely. One of the advantages of smoked buckskin is it will mask human scent.
5. What sort of alcohol do you use?
I use denatured alcohol, or rubbing alcohol.
6. Would there be any particular problems in skinning a cat?
I skinned a bobcat once a long time ago. Don't recall any unusual problems. The small parts of any pelt, such as ears, toes, and tails are always harder to do than the large areas. If you are not going to use those parts, it will make your work easier, but a less interesting final result.
I would love to get a copy of your story. Give me a shout if you have any more questions.
Good luck,
Bill Scherer
Dear Dino,
I have been unable to find an explanation or illustration of how to roll, tie, and suspend a blanket pack from webbing as straps. This method is used by BOSS and others. If you know how to do this I would appreciate the information.
Best,
Bob
Hi Bob;
When you say "webbing", are you referring to a type of netting? I am unfamiliar with the method that the Boulder Outdoor Survival School (BOSS) is using.
I have create a netted bag that can be used as a backpack for carrying your gear. Everything is bundled in your blanket or a plastic tarp. The backpack is made out of a rectangular shaped net. A strap, like a long piece of leather or a long strip cut out of a blanket, is threaded through the top meshes of the net, then threaded through the bottom meshes of the net. The ends of the strap are tied together. This strap goes over your shoulders, like a regular backpack strap. Some type of padded cushion should be created to make the strap comfortable on your shoulders. The vertical length of the outer meshes of the net are threaded with a cordage to enclose the net around your bundled gear to form a bag. Unless you do this, it is not easy to visualize the explanation. Access the webpage below, to view a photo of the finished net backpack on my back. It was modified from a large, regular carrying net:
http://www.primitiveways.com/Kahiko_workshops4.html
I have also seen a blanket roll, with gear wrapped inside, carried on the back using a wide leather strap that is attached near the ends of the blanket roll. The leather strap is slung across the chest and shoulders. The ends of another leather strap is attached away from the middle of the blanket roll. This leather strap is slung across the forehead. So, two straps are taking the full load of the bundled blanket roll.
Regards,
Dino Labiste
By webbing I mean the 2" wide woven cotton strapping. It's my understanding that gear is folded in the blanket or tarp, and that bundle is tied up with cord. Then the webbing is threaded through the cord to create shoulder straps and a waist belt like a backpack.
Bob
Hi Bob;
Interesting idea. Even if you don't know the exact explanation of how it was done, I'm sure by experimenting with that concept, you can create something similar that works for your need.
Regards,
Dino Labiste
Hello,
I discovered your website while searching for an obsidian knife
image. Beautiful work you do!
I am designing an interpretive panel for the Bureau of Land Management in northern California, at Goose Lake, California. We are interpreting the Achumawi people (Pit River Tribe). I have been searching for a photo of a bow and arrow made of juniper that they might have made. Do you ever make bow and arrows like this? Do you have a photo of one?
Also we are looking for a photo of an obsidian knife blade they might have used . . . prior to European settlement.
I would need high resolution jpegs. Thanks for any help you can offer.
Caia Cupito
Ashland, Oregon
Hello Caia;
I don't have any photos, but here is some info on Achumawi bow
and arrows. The reference is from "Handbook of North American
Indians, Volume 8" by the Smithsonian Institution:
". . . . Although it is of limited distribution in Achumawi country, yew wood was considered the best wood for manufacture of bows by all Achumawi. Most bows were sinew-backed whether of yew, mahagony, or juniper. Arrowshafts were made of several materials -- wild rosewood, cane, serviceberry, and willow. When a foreshaft was added in arrow making, greasewood was used. Arrow points were most frequently made of obsidian or volcanic glass . . . . Crude implements were also made of cherts and chalcedony, occurring in the area . . . . Because of great quantities and excellent quality of pure obsidian at Little Glass Mountain and Glass Mountain near Medicine Lake on the north-central border of Achumawi land to which the Pit River Indians frequently traveled, obsidian for arrow points, spear points, knives, and scrapers was abundant throughout the Pit River Indian territory. Volcanic action also supplied the region with pumice stone, which was used for working arrow shafts. Colored minerals were also abundant in the area; designated paint by the Indians, pigments of black, blue, white, red, and yellow were collected and employed in decorating arrows, bows, skin clothing, gaming pieces, as well as people . . . ."
I hope this information helps.
Regards,
Dino Labiste
We live on a small peninsula on the Charles River (about 75' from a cove), Waltham, Mass. In our backyard, I found the attached photos . . . . the scat (?) is about 1/2"
thick and about 4" across. From what animal? In the area there may be a coyote, fisher cat, raccoon, water fowl (canadian geese, mallards, heron, cormorant).
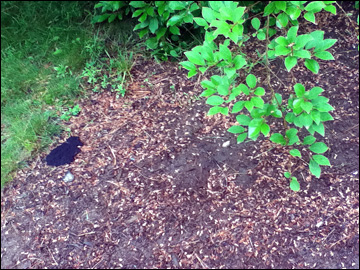
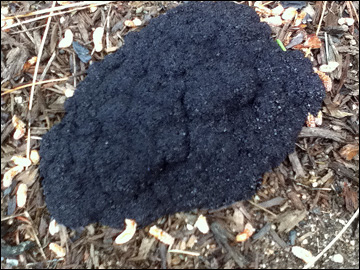

Perhaps you can assist?
Thanks in advance,
Bruce G.
Hi Bruce,
The thing about scat is that just because someone knowledgeable says it is from a certain animal, it might not be so . . . . after all, without sighting the animal in the act, or identifying the track, it's way too easy to rest on one's imagined laurels! It's safe to say I don't know what left its calling card in your backyard. With that said, I will make some suggestions regarding what to look for to help solve the mystery. It is great fun to try to figure it out, and to speculate a bit.
1. Rule out the geese and the other birds. Wrong shape, (should be more cheese Cheeto shape). Also there is no uric acid whitewash with it. (OK, that was true but not absolute. I've seen ducks leave nearly liquid brown scat... but I'm betting it isn't avian.)
2. It's not typical for any of the others you mention to have such unformed scat, but all those animals eat different things and their scat also varies depending on what was in transit. If you can screw up the courage to dissect it with a stick, try to figure out what the animal ate.
I've seen that dark coloration from two distinctly different foods . . . . blue or red colored fruit, and fresh red meat. Look for hair in the scat and look for berry seeds, pits, etc. to help figure that out. In the photo it looks like there are either seeds or beetle carapaces in the scat. If it contains fruit, you can probably rule out fisher or cat. If it contains insects, it may be a skunk . . . . pretty sure you have them. Skunks will eat fruit too, but aren't very good at climbing fruit trees or bushes. So, if it is seed from a fruit that grows high and hasn't fallen to the ground . . . . rule out skunk. If it has seeds, consider coyotes, foxes, and raccoons. They all will eat fruit in season as well as meat. Of those three, fox and raccoon seem more likely than coyote. I doubt it is a coyote . . . . the scat is a little small . . . . but if it also contains crushed bone particles and fur, I would reconsider that possibility. None of these usually leave a mushy pile of dung. But just like us, a high fruit diet or even illness can cause the runs! Another animal you didn't mention . . . . but may have is the opossum. These guys sometimes do leave mushy piles of scat, and they also like the fruit. Anyone's fruit trees being raided in the neighborhood. If the thief has been climbing . . . . think raccoon or opossum . . . . or the gray fox who is quite agile in trees.
If you live in a riparian corridor, you probably have all these critters using your backyard as night time highway . . . . and probably more. Even an otter isn't out of the question . . . . but they are less likely to leave scat very far from the river . . . . check for fish scales and if there are a lot of scales in the scat, consider the possibility an otter paid you a visit. The otter of course would not be eating berries, but their scat is often dark colored, and isn't usually well formed like the canids and the mustalids.
Have fun speculating . . . . wash those hands and avoid breathing dung dust!
Sue Labiste
Dear Bob;
I wanted to make that bone flute off of PrimitiveWays.com (loud
or shiny things make me happy). So, after Thanksgiving I picked
and cleaned off a few wing bones and all the other large bones
I could find. Now, when I was looking at the picture off of PrimitveWays.com,
I thought turkey wing bones were a little bigger then what I had.
So I pitched the long wing bones in favor of shorter and wider
leg bones (fished them out of a pile of turkey scraps. So I don't
know where they came from exactly.).
So the question is, "Can I make a flute out of very, very short hollow bones?" Is there a minimum length?
Thanks for all of the help,
Douglas
I am sure you can make a whistle, but if the bone is very short it can limit how many finger holes you put and how low the tone.
Sincerely,
Bob Gillis
You (at least one of you guys) mentioned on your website (Q&A
Misc.), in question 3, "As an alternative to commercial sandpaper,
I often use a cloth or piece of leather dampened then pressed
into a little fine sand or even dust to polish with."
Would you please explain this process further? I haven't
heard of this before. Thank you.
Jay Klika
Springfield, MO
Hi Jay;
Thanks for your inquiry. The cloth or leather is used in the same
way as paper when using sand paper. Rather than having the abrasive
glued to leather cloth or paper, the dampness holds it. I will
usually take the damped cloth or leather, wrap it around my index
finger then dip the tip of my covered fingertip into the abrasive
I am planning on using then rub the object to be polished with
the wrapped fingertip, applying pressure and moving in circular
motion. Depending how the abrasive is sticking to the cloth or
leather, repeat the process. Dip the wrapped fingertip
into the water, then into the abrasive, rub. Repeat as needed.
To make a variety of abrasive grits from
course to super-extra-fine, clean off a strip of smooth concrete
or lay out a smooth plastic tarp then, with the help of a gentle
breeze, sprinkle any dry dirt or sand strait down and let the
breeze blow the dirt into ever finer grits. The course materials
will drop quickly with the fine material drifting down wind. If
the breeze is really light you can try tossing the dirt or sand
higher into the air, giving the lighter material a better chance
to drift.
When working with antler and bone you can increase the surface
hardness of the bone by lightly scorching it over an open flame.
It also produces a nice light tan to dark brown color. The main
result though is that now the bone or antler will take a high
polish. It seems for me a final polish on levi jean fabric gives
it a final luster.
Softer material like soapstone (steatite)
and other softer porous stones, are not hard enough to hold a
mechanical polish. In order to achieve any appreciable shine,
you will need to use an oil or wax. Sometimes you will need to
apply multiple coats as the oil or wax will soak into the material
and the shine will disappear. To shorten or possibly eliminate
multiple coats I often heat up the stone a little. This allows
the wax or oil to soak in faster and deeper the first time. Lots
of times after shaping a soapstone bead, I will simply rub
it along the crease of my nose or on my forehead for the natural
skin oil. If you have ever worn any soapstone or other porous
material, it will become very dark from soaking up your skin oil.
I hope this info helps.
Regards,
Chuck Kritzon
Hello,
My name is Michael and I'm 9-years-old. I'm doing a project on Indians. I need to make a deer hoof rattle. Do you have any suggestions on what to use besides deer hoofs.
Thank you,
Michael
Michael;
One possible substitute would be metal cones, which you can buy from www.tandyleatherfactory.com (10 for $2). You can also make your own by using the metal tops and bottoms of cans (soup can size) that you take off with a can opener. Next, use a hammer and nail to punch a hole in the center of each. Then, using metal cutters (tin snips), make a cut to the center hole of each piece, then bend it into a cone and stick a sting through the nail hole Tie a big knot in the end or tie it around a bead. This kind of thing was used by many Indians during more modern times.
Good Luck,
Norm Kidder
Aloha kaua Dino:
My name is Kaipolani and I am with Halau Hula Na Meakanu O Laka
O Hawaii. My Kumu is Rolanda Reese. Do you know Kumu Patrick Makuakane
from the San Francisco area?
Anyway, I am writing to you because I was researching on the internet
on how to make a water carrying gourd. Our halau is going on a
study tour to Maui in Oct. 2004. As a ho'okupu gift, I wanted
to attempt at making a water carrying gourd for the purpose of
holding the water to be used in an awa ceremony.
I would be so ever grateful if you could enlighten me on how to go about making this water gourd and also the type of knots used to make the sling to carry the gourd.
My experience on working with ipu (gourds), is I have made my own ipu heke and pa ipu, made simple bowls. With the assistance from a cousin who has a garage full of tools to clean out the gourds.
I would be so ever thankful to you for your assistance.
Mahalo nui loa,
Kaipolani
Hello Kaipolani;
Thank you for your interest in the Hawaian huewai. Below is a
very simplified explanation:
1. Acquire either a globular gourd with a conical neck or the
hour glass form.
2. Cut off the top and clean out the seeds and dry, papery membrane
inside the gourd.
3. Place a few rough pebbles into the gourd and rotate the pebbles
to smooth out the interior. Be careful not to bang the pebbles
back and forth or you will develop cracks in your gourd. Go slowly,
empty out the gourd, do it again until the gourd is clean.
4. Leach out the gourd first with salt water from the ocean. Then
leach out the gourd with fresh water until the bitter taste is
no longer there.
5. Create the cord support and add the shell stopper.
For more details on creating a huewai and the cord support, get a hold of the book entitled, "Arts and Crafts of Hawaii - Food" by Te Rangi Hiroa. This is an excellant publication by the Bishop Museum.
Like any traditional skill, it is best learned by being with a teacher. Reading on how to do it can help, but like learning the art of hula, seek out someone in your local area who can guide you in person.
Sincerely,
Dino Labiste
Hi Norm;
My name is Matt and I live in Sheffield, England. I have just
started working on an elder flute, as I have discovered that it
grows all around me. I was wondering what tools you used to clear
out the bore and whether you have any ideas for clearing out longer
bores of up to 24"
All the best,
Matt
Matt, glad to hear someone else is making an elder flute. Are you making the ancient form, with only a beveled edge mouthpiece, or are you doing the more modern version with a `fipple' mouthpiece? Also, how are you going to place the holes?
As to cleaning out the pithy core, the best tool is hardwood dowel with one end cut with a double bevel, and the middle of the dowel cut back so that it has two points, or tines. Twist this into the soft material and then tap out the crumbled pith. Avoid jamming it in too tightly, or it will compact the pith, making it harder to get out. Once the pith has been largely removed, use a square cut dowel end to clean out the remaining pithy material. Keep at it until it is polished inside. The other tool I use is a flat head screw driver with an extra long shaft. A three foot dowel should be able to clean out a 24 inch flute, especially if you go in from both ends. Let me know how it turns out, and if you are doing the ancient type, if you need suggestions for getting a tone.
Norm
Sir;
I got a hold of some used reciprocating saw blades. Will
they be any good for making just some basic utility knives (i.e.
wood marking knives or linoleum cutter knives)?
Thanks,
Matt Bray
Hello Matt,
They should work pretty well if they are plain carbon steel. Be
cautious. Make sure the steel is heat treatable before you
go to all the effort of making a knife. Heat a small sample
until red hot and quench in either water or oil. Test the
hardness of the quenched steel. It should be impossible
to scratch it with a file. If you make a knife out of an old saw
blade without heat treating, it will probably not stay sharp.
Good luck and don't hesitate to ask for more information.
Dick Baugh
(pertaining to the article entitled, Imu - Hawaiian Underground
Oven)
Dino,
Where can I buy ti leaves?
What rocks would be a good substitute for lava rocks and where
could I obtain them?
Gary Nakamoto
Hello Gary;
If you are living in an area that does not have ti plants growing
wild, another alternative for obtaining ti leaves is your local
florist. Inform the florist that you will be using the ti leaves
for cooking purposes. You want to buy ti leaves that are food
safe and have not been sprayed with any chemicals. The prices
for ti leaves will vary amongst the floral shops. It can get very
expensive if you are buying a lot of leaves through the florist.
Also, do an internet search. There are some retail companies in
Hawaii that will ship bulk ti leaves at a reasonble price to your
location.
Igneous rocks or volcanic rocks are good for imu cooking. Check the geology of your area. Was there any volcanic activity from your locale's past history? If so, I'm sure you'll be able to find adequate rocks for the underground oven. Also, check with businesses that sell various rocks for construction and landscaping.
Aloha,
Dino Labiste
Dear Norm;
Can you please tell me more about making a clapper stick? Do you
have to soak the wood first? I love your webpage with the tule
house!
Thanks very much,
Susan Morley
Susan, thanks for the kind words. As to making a clapper stick, I prefer to make them from dry elderberry wood, although it's now considered traditional to make them from bamboo as well. I choose a piece of elderberry about an inch and a half in diameter and from one to two feet long. I try and cut it so that there is a leaf scar four inches up from the end that will be the handle, this helps stop the split from running the full length of the piece. I split carefully by tapping a knife blade into the end and tapping on the point sticking past the wood until I have it split to the leaf scar. Elderberry has leaf scars that are opposite each other and then rotate 90 degrees. I start the split so that I will go between the first set of scars and stop against the second. Once split, I look to see if one side is thinner and weaker than the other (ideally the split is centered). I further weaken this side until it flexes just a little. Next I ream out the pithy center of the clapper end using first a knife in from the sides, then a long stick with a chisel shaped end. Once the inside is cleaned out, I do the final weakening of the weak side until it snaps properly, or plays well when hit against my leg. The weakening is done by whittling away a two inch section parallel to the split. This eventually opens up into the hollow center part of the stem. I am careful to evenly scrap away wood so that there is an even section an inch and a half long. If this is not done carefully, the weak side will break off. What you want is a flexible hinge section so that the weak side will move away from the rigid side and snap back against it when playing. Lastly, I sand it smooth and decorate it, finishing by rubbing it with oil (I prefer Walnut oil). I hope this gives you enough information. If not, let me know.
Good luck,
Norm
(pertaining to the article entitled, "Antler Handle Knife")
For the antler hilted knives, is it necesary to use creek or rain water? There's not many bodies of water where I'm from.
Matt
Hi Matt;
The reason for creek or rain water is to have bacterial activity in the water. The bacteria starts to decompose organic material. In the case of the antler, the bacteria starts to soften the pithy portion of the antler. In my area, our drinking water is treated with chlorine, which inhibits bacteria.
You can still use tap water. Just put some dirt in the water. The dirt will add all the bacteria you will need to complete the process of softening the pithy area of the antler.
A word of advice: When attaching the tang portion of the knife blade to the antler, go slow and don't rush the process. Sometimes people are too anxious to get the job done quickly and tend to force the tang into the antler by bending the tang from side to side. You will either break the tang or bend the blade. Be aware of what you want to accomplish and don't let your anger control what you want to do. If the tang is not going into the antler, analyze the problem and don't deal with it emotionally. The reason I am telling you this, is that people have broken their knife blade due to bad judgement during the insertion process. "Go slow and think about what you are going to do before you do it". Also, be sure the pithy area is soft enough to accept the tang. I've given people "words of advice" in the article to be aware of any possible problems.
Good luck on your knife project.
Regards,
Dino Labiste
I have found a big hunk of flint, about
5 X 6 X 5, roughly. I want to use it to make flint fire starters,
but don't know where to start, other than getting a sledgehammer
to it.
Can you help?
JoAnne Brown
Hello JoAnne;
Take a rock and knock off a small piece of flint that will have
an edge to it. Take a piece of HIGH CARBON steel (e.g. file) and
strike the steel along side the edge of the flint. The flint will
shave off tiny slivers of high carbon steel from the steel source.
The impact will create enough force to ignite the slivers of high
carbon steel.
You won't get a lighted coal unless you
have some char cloth material under the flying sparks. To make
the char cloth:
1. Find a small tin box (mint candy will sometimes come in a tin
box or find a metal band-aide container). Puncture a single, small
nail hole on the center of the top lid.
2. Cut up strips from an old pair of jeans. The strip should be
1 inch wide. Start with a strip about a foot long. Roll up the
strip into a coil.
3. Place the coil of jeans cloth in the metal container, close
the lid, and place over a small flame. You may use your stove
burner or place it on top of some hot coals.
4. The cloth will turn black and char (hence, char cloth). How
long do you leave it in the container? As long as it takes to
char the cloth. Check it after 15 minutes. If the cloth has not
blackened, leave it longer on the heat source. Pay attention to
this process so that you don't leave the cloth in the metal container
longer that necessary. You don't want the char cloth to completely
fall apart when handled.
Give it a try and make sure your steel is of high carbon content.
Sincerely,
Dino Labiste
Bryant Gipson wrote:
Hello, my name is Bryant Gipson and I'd like to start by saying
I love your site. I had no idea a place like this existed on the
Internet.
Anyhow, my question is about a "semi-primitive" technology.
Specifically I've been looking to try to make glass from beach
sand/other readily obtainable elements, but have no idea where
to start. Most of the sites and articles on the web detail modern
glass making processes which require kilns and furnaces capable
of several thousand degrees.
Obviously cultures world wide were making glass items of various
clarities for many years before acetylene torches and high-pressure
environments existed. I suppose my question reduces to three elements.
How does one make a "primitve" kiln, or at least a fire
hot enough to melt silicates?
What was used as a crucible for holding the glass?
What kind of clarity can I expect to find in glass made in this
way?
Sorry if this question is a bit too modern, but I'm really not
sure where to look for resources of this kind. (I'm also interested
in smelting basic metals from ore for instance.)
Thanks,
Bryant
Hello Bryant,
Quartz sand, which is silicon dioxide, has a VERY HIGH melting
point. In order to get something which melts at a lower temperature
you mix quartz sand with sodium carbonate and limestone. You can
probably get a hot enough fire with a blacksmith's forge. Use
a fire clay crucible to hold the ingredients. Clarity will depend
on how pure the quartz sand is. Manganese dioxide was added to
remove the color due to iron impurities. Colors can be obtained
by adding iron, copper, or other minerals. Look in the encyclopedia
for more information.
Get busy!
Dick
What is the name of the oven pictured on your website [PrimitiveWays Homepage] to the left of the "Fire Making & Primitive Cooking" articles?
The photo is an overview of a Dakota Fire as mentioned in the primitive cooking article. In the photo, there is a clay pot over the cooking hole and you are looking into the fire feeding hole.
Hi, how long must acorns be left to dry in the sun before storing them?
Elaine C.
Hi Elaine;
Here is a good test to determine when the acorns are dry for storage:
After drying them in the sun, shake the acorn . . . . if it rattles,
then the acorn is dry enough for storing.
Note: Not all species of acorn will rattle when it is dry. Dry your acorns for at least 3 weeks in the sun.
Regards,
Dino Labiste
My name is Sebastian, and I have a question concerning your article "Was Agriculture a Good Idea, or an Act of Desperation?".
I wonder where you found this info, if there is a particular book, or other sources, and if you could recommend me some book(s) or the like. The subject is interesting.
Thanks,
Sebastian
Sebastian,
I have been reading about the evolution of human behavior since
high school in the `60s. In the article I make reference to dig
at Koster, which I read about in a book called "Koster -
Americans in search of their prehistoric past", by Stuart
Struever and Felicia Antonelli Holton. (A Signet Book, New American
Library - paperback) Doubleday, New York, 1979. Try Amazon.com.
If you haven't already read them, read Jared Diamond's books:
"The Third Chimpanzee" and "Guns, Germs and Steel".
The first includes a chapter on Agriculture (page 180) and it's
dubious value in a book on human evolution. The second book looks
at the growth of civilization. Traditional wisdom assumes that
agriculture was either an 'invention' to make life easier, or
a necessary adaptation to a shrinking food supply. It seems more
real to me that agriculture grew out of the needs created by the
success of the hunter/gatherer groups and their growing population.
Overpopulation leads to degradation of the resources gathered,
requiring the increase in agriculture to supplement the food supply,
gradually growing in importance. This is born out by the studies
that show that large, permanent settlements are found shortly
before agriculture shows up. Another fun theory is based on the
oldest recipe yet found, which was for beer. One writer suggested
that the only reason humans would switch from hunting and gathering
to agriculture was to garuntee a supply of grain for beer. Have
fun reading. If you want a longer list, get back to me and I'll
put together a bibliography of books on human social evoluton.
Norm
Hey Dino;
Your technique of soaking the bull whip kelp bulb in fresh water
to reduce salt content, then flash drying in hot sun, worked like
a charm for making a rattle. But, do you know of any ethnographic
evidence that bull whip kelp was used for this purpose? I haven't
found anything.
Thanks,
Steve Edwards
Botonical Gardens
Hi Stephen;
Good to hear you had success with drying the bull whip kelp. I
have not found any ethnographic report or evidence of bull whip
kelp being used as a rattle. In the article about bull whip kelp,
on PrimitiveWays.com, I made no mention of the bull whip kelp
being made into a rattle by any indigenous group. At the end of
the article I wanted to say that the bull whip kelp could also
be made into musical instruments, like a rattle. The musical instrument
is more of a comtemporary idea than an ethnographic use for a
musical instrument.
I hope you still find the bull whip kelp rattle entertaining.
Regards,
Dino Labiste
Hi,
I just stumbled over your website and found it very helpful
concerning coconuts.
However, I recently had to open and clean several coconuts.
Taking out the meat was quite a struggle until someone recommended
to let the nut sit for a while (overnight), so that the meat would
start to dry. As the coconut meat is shrinking, it comes loose
and can be taken out much more easily.
I use the coconut shells for crafting.
Greets from Berlin,
Sabine
Hi Bob & Judy Gillis;
First off, thank you for posting your information on making a
primitive rabbit skin blanket on the web! I am considering trying
to make one myself, and have a few questions for you.
Did you use a pattern to cut the hides in one inch strips?
No, just eyeball it.
What type of cotton cordage did you use?
1/16" cordage.
I plan to go to a sewing materials store, but thought I'd ask
if there was a certain "type" that was better than others.
We got it from a hardware store and dyed
it brown.
If you have come up with any other "hints" since
you made the blanket last year, please share them with me. I'd
welcome the advice!
Do not make your twining too tight or you
will loose some of the loft of the fur.
Again, thank you for the information you posted. I have always
wanted to make a primitive fur blanket, and your instruction has
given me the confidence to try it.
We love our blanket.
Best Regards,
Mark Erhardt
First of all, please don't think I'm bossing you around, I'm
just telling you something you may or may not already know:
The knives you make are tempered down the spine to a dark blue
colour, the blue colour telling us that the blade has been tempered
when tempered to the blue ranges, steel is at its most flexible,
and can bend quite far without breaking, so, like your article
on the primitive ways website says: it does make a stronger blade.
But, I think you've made a small mistake. By keeping the edge
of the blade cool, you're not tempering it, and one of the tempering
phases makes the steel harder, and therefore better able to keep
an edge. The tempering colour for this hard temper is yellow.
By tempering the edge of the blade to a bright yellow colour,
you are making it harder and more durable. You can then go on
to temper the back of the blade to its normal blue colour, being
careful not to temper the edge any more.
The Japanese make their good blades by selective hardening, as mentioned on your article. This is easier (theoretically) than it sounds. All you need to do is build up a layer of insulating material on the bits of the blade thay you want to be soft and springy. I use a clay mix made up of a very small amount of powdered limestone, some common or garden clay and some plaster, mixed with water 'till it's wet enough to stick to the blade, but solid enough to dry fairly quickly, and then heat treat the blade. for a more complete overview of this, I'd suggest www.waltersorrells.com/blades, there's a video uploaded recently that should be of some help.
I hope you can get something useful out of my sketchy ideas.
Nicholas Steele
Hello Nicholas;
It is always pleasing to find out that someone actually read something
I wrote, whether they agree or not. Sometimes it's the disagreements
that cause us to dig even deeper
Why I don't do differential tempering any more? I
used to do differential tempering on knives, but I don't do it
any longer. The theory behind differential tempering is that in
the very hard, as-quenched state the steel is very hard but brittle.
Tempering (heating the hardened steel up to some appropriate temperature)
causes it to be less brittle but also less hard. If you can keep
the edge of a knife in the hard, brittle state and the remainder
in the tempered, tough state then theoretically you have the best
of both worlds. You also get something that looks good. Lets look
at some of the details cited in the data sheet that came with
the 1095 (0.95 % carbon by weight) steel from Precision Steel.
They indicate the hardness and tensile strength versus tempering
temperature. The Rockwell C number represents the hardness of
the steel, Rc 62 is pretty darn hard, appropriate for high quality
wood carving knives and Rc 58 is what you get in most stainless
steel knives. As quenched the hardness is Rc 66, very hard and
brittle. Tempered at 400 F you get Rc 62 and a tensile strength
of 320,000 pounds/square inch (psi). That value of tensile strength
indicates that you can stretch the steel about 1.0 % before it
breaks. What if you temper it at 600 F? The hardness drops to
Rc 55 and the tensile strength drops to 270,000 psi. This says
that the steel is strongest if you temper the entire blade at
400 F and don't do additional tempering on the back of the blade.
I disagree with you that tempering the edge to a straw color makes
it harder. It does, however, probably reduce the internal stress
in the blade caused by quenching. Quenching forces carbon atoms
into places in the iron lattice where they normally wouldn't fit.
This causes severe stretching of the iron crystal lattice. If
the quenching is not done uniformly parts of the blade may be
strained to the point of cracking..
I have not yet been successful in doing differential tempering
by adding a clay insulating layer. I would love to make blades
with a hamon line indicating the transition from very hard steel
to tempered steel. My sources of information tell me that the
best clay tempered blades are made from 1050 steel (0.5 % carbon).
My attempt used the same 1095 steel plus an insulating backing
of furnace cement. The edge hardened but also developed a bunch
of small cracks perpendicular to the edge. The 1095 steel that
I use also contains a small amount of vanadium. The vanadium makes
it possible to harden the steel by quenching at a slower rate.
This is desirable if you want to harden a very thick piece but
is probably not so good for differential tempering with a clay
back. The theory behind the clay back is that it is supposed to
reduce the hardness by slowing down the rate of cooling.
Tempering to color versus tempering to a specific temperature.
The village smithy working under the spreading chestnut tree two
hundred years ago did his tempering by watching the colors in
the steel because that's what he learned from his father and furthermore
he had neither an optical pyrometer, a thermocouple temperature
gauge, a wife with a thermostatically controlled kitchen oven
or even a degree in material science. What he did have, however,
was a lengthy apprenticeship with a master workman. I am hoping
that a little bit of instrumentation plus a little bit of book
knowledge regarding heat treating can replace those years of apprenticeship.
Warmest regards,
Dick Baugh
Hello,
I'm not sure if you have cooked a pig this way, but if you have I was wondering if the pig will cook just the same if it has been skinned?
Jon
Hi Jon;
> . . . . wondering if the pig will cook just the same if it has been skinned?
Yes.
Regards,
Dino Labiste
Wow!
Thanks for the quick reply. This is my first time trying anything like this. I live in Pa. I'm going to dig a hole and cook a 50 pound pig in it. Any tips or tricks? What should I use to season the pig if anything. What should I wrap it in since I don't have access to banana leaves? I really appreciate your response because I can't find someone who I can dialogue with that knows what they are doing.
Blessings,
Jon
Hello Jon;
Read my article again on Hawaiian Imu cooking. I tried to cover as much information as I could think of. If you have any specific quesions, e-mail me and I'll try to answer them.
> What should I use to season the pig, if anything?
You don't have to season the pig with anything, unless you want a certain flavor or sauce on the pig. My suggestion is to cook the pig without any seasoning. You can always add seasoning, like salt and /or pepper, after the pig is cooked.
> What should I wrap it in since I don't have access to banana leaves?
Keep in mind, the wrapping is to keep the meat clean of any dirt that might fall into the pit when uncovering the imu. Also, the wrapping allows you to take out the pig from the imu after it is cooked. You can cut up the pig and place it in clean burlap bags. Or you can surround the pig with clean burlap bags that have been opened up to create sheets of burlap. Cover the pig with the sheets of burlap and use cordage or a strong string to tie everything together. Improvise, while keeping the 2 reasons for wrappng the pig in mind.
Regards,
Dino Labiste
I have some pelts that have a oily dog odor. What do I do to
clean and remove the smell, which I believe is a natural oil smell?
Gary Wesolowski
Burlington, CT
Hi Gary;
If you have already fleshed out the meat and fat, you can degrease
an oily hide by rubbing it with an old rag that has been dabbed
with denatured alcohol. Use the denatured alcohol only on the
fleshed side of the hide and not on the hair side.
If you are only looking to get rid of the odor, just wash the hide with soap and water.
Dino Labiste
Hello Norm;
I'm a graduate student in archaeology and recently have been looking
at the PrimitiveWays webpage. Very impressive!!
I've been working on a archaeological site in Tuolumne, California
and have found some stones that have a hole "ground"
into them and there is some confusion as to exactly what they
are. Some don't think they are fishing weights because they are
not found on the coast, some think they might be some sort of
shaft straightener. From the research that I've done points to
them being old fishing net weights. Attached is a photo of two
of the artifacts; if you could help in identifying exactly what
these are would help greatly.
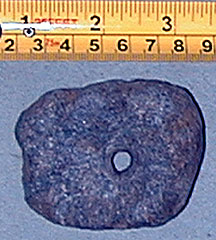
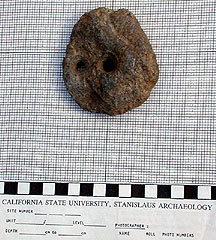
Sincerely,
Jared M. Norman
Assistant Curator, Archivist
Institute for Cultural Resources
California State University, Stanislaus
Department of Anthropology/Geography
Jared, glad you like the site. In the
most recent issue of the Bulletin of Primitive Technology, I wrote
a short piece encouraging this sort of interaction between University
researchers and field practitioners.
Looking at photos is not as good as holding the artifacts and
feeling for wear etc., but the holes appear to be about 1/4 -
5/16 inches in diameter, with the whole piece about 3 inches across?
Is this correct? What type of rock are they made from? The browner
colored one appears to have two holes? What type of site are they
from and where relative to major rivers? Any age estimate? Tuolumne
seems to be up in the pine belt? Are there lakes or marshes nearby?
There are antler pieces listed as shaft straighteners, but they
have larger, smoother holes, and a lever shaped handle, so I would
think they were that. The other type of shaft straightener has
a long groove, not a hole. Some game pieces have a hole in a stone,
but they are rounded for rolling. The dilemna is that the location
doesn't seem to match that large a sinker stone either. Other
possiblities could include use as a pumpdrill flywheel or drop
spindle flywheel, which would mean a recent time frame. If they
were made from a material like soapstone, they could be stone
boiling rocks. I've heard of such from the South Eastern US, The
hole allows them to be retrieved with a stick.
I look forward to hearing more details, meanwhile, I'll cogitate
on them.
Norm Kidder
Dear Mr. Labiste;
My name is Christian and I am a fourth grader at Maunawili Elementary
School in Kailua, HI (Oahu). Fourth grade is the Hawaiian Studies
year and I have decided to do my research study on the pump drill.
As a part of the study, I need to make the pump drill with as
much original kind of material as possible. I saw your workshop
site on the internet and was wondering if you might be able to
send me more information on making the pump drill. Your workshop
sounds great, but I'm a little far away!
Thank you for helping me with my project.
Mahalo,
Christian Riggs
Hello Christian;
I've enclosed an attachment file of a Hawaiian pump drill. Look
at the painting and see if you can recreate the pump drill that
the kahuna kalai wa'a (master canoe designer) is holding. The
painting reference came from a book entitled, "Ancient Hawai'i"
by Herb Kane.
In my opinion, the pump drill that the kahuna kalai wa'a is holding was a post European tool. The invention was probably an European tool that was adopted by the Hawaiians after contact. Most of the holes on the older ornaments and canoes were usually square or rectangular. Contact the Bishop Museum or access their website to talk to or e-mail someone who can help you determine if the pump drill was a Hawaiian invention or adopted from an European invention.
I would suspect the wood used might have been kauila, a dark, hard indigenous wood. The cordage was probably olona or hau cordage. If the pump drill was an European invention, then the drill bit was made of iron. The lashing was probably fiber cordage.
I hope this helps your Hawaiian studies project,
Sincerely,.
Dino Labiste
Hello Norm;
I am looking to get info on the book "The Ohlone Way".
I have been told by a Park Ranger friend that it isn't accurate
in its descriptions of traditional Ohlone life. I know that it
is presented in the first person as a fictional slice of life
story, but what exactly is wrong with the infornation? Did the
author interview any Ohlone people? What do they think about it?
Is there any real anthropological value in it? I have found no
criticisms of the book on the internet,. In fact, it has gotten
a lot of praise. Thanks for any light you can shed on the subject.
Roger Lundgren Jr.
Roger,
"The Ohlone Way" is basically a good book, but does
have some flaws (as do most). Malcolm Margolin, the author, did
a lot of research and found that there was not enough known at
the time to be as complete in his story as he wished. His solution,
like many of us was to look around at other cultures that were
better known to fill in the gaps. One of the problems for serious
researchers is that the book is not footnoted, so you don't know
when you read it if something is from local sources or not. The
biggest problem seems to be a description of face flattening.
I don't know where that came from, and it influenced to illustrations,
making the people look overly brutish. I provided the descriptions
of the landscape and village scene, so, naturally, I think they
are acurrate.
So, basically it's a good book, but is a general picture. It is not meant to be used by universities, but by elementary school students to get a more human picture of Ohlone (or other Central California) people before the Missions. Other books, or materials that have tried to accomplish the same thing are "People at the Edge of the World" by Betty Morrow Bacon (aimed at 3rd graders), and Whispers of the First Californians" by Faber and Lasagna, more of a workbook than a story.
Hope this answers your question.
Norm
Hi Dino;
This may be a strange question for you, but my 5-year-old wants
to know how Native Americans traditionally cared for their teeth,
prior to modern toothbrushes and toothpaste. Was there a special
plant or animal part that they used in keeping their teeth clean?
If you can't answer this, any leads on other resources would be
great.
Thank you,
Melissa Frey
Hello Melissa;
Such an interesting question. I would suspect that not much was
done to clean the teeth as oppose to the way we use toothbrushes,
toothpaste, and dental floss today. Contemporary practitioners
of primitive skills will sometimes chew up the end of a twig to
expose the fibers to use as a toothbrush. I remember seeing someone
put salt or ashes on their finger and rubbed it against their
teeth to clean it. Just rinsing out your mouth with water will
get rid of most of the food particles clinging to your teeth.
Toothpicks can be made from thin twigs and slivers from a piece
of wood to dislodge any food stuck between your teeth.
I think the cause of most of our tooth decay comes from our diet. Most of the foods we eat today contain too much sugar and additives. The traditional diet of Native Americans of the past consisted mostly of wild plants and animals, very low in sugar and no refined foods.
Just my thoughts on the subject,
Dino Labiste
I have plenty of old auto and trailer leaf springs around here
as raw material. Would that be usable for knife making?
Love the web site.
David Parsons
Hello David;
Auto and truck leaf springs are the preferred knife material in
many third world countries. They have the proper alloy and carbon
content. I don't use them simply because I have a good supply
of 1095 and crosscut saw blades. Another reason I don't use leaf
springs is that I don't have a forge and blacksmithing tools.
If you have the tools, by all means use lesf spring stuff. I would
be cautious and make something small and simple first.
Regards,
Dick
Dino;
Hope you are well. I'm a producer for a Bay Area television show
called The Great Outdoors, with Tom Steinstra, the SF Chronicle
Outdoor's writer.
We are currently producing a piece on the Fish Traps. Do you know of any old black and white photos, or any research document that we might use for our piece? We can give you promotional consideration at the end of the show. If not, do you have any suggestions on where I might find some?
Thanks,
Kyle Noone
Producer, Great Outdoors
Hello Kyle;
Check out these 2 websites for information on the Ahjumawi fish
traps at Ahjumawi Lava Springs State Park:
Article written by John W. Foster
http://www.parks.ca.gov/?page_id=23153
Ahjumawi fish trap images
http://www.parks.ca.gov/default.asp?page_id=23127
I hope these websites are of help to you.
Regards,
Dino Labiste
Hi Norm Kidder;
On reading your article [Bare-Handed Basket], I was wondering how you managed to harvest without damaging the tree? I look forward to hearing from you.
Anthea Naylor
Anthea, harvesting by hand takes a little practice, and a quick snapping motion to minimize damage to the plant. The willows I harvest from are in the winter flood zone, and take a much worse battering from the creek in flood. Local Native people also cultivated willow by cutting it back after harvest (copicing) or by burning, so harvest damage wouldn't have been a consideration. The bare-handed harvest method somewhat limits the selection, but doesn't add significantly to the time involved. As much as anything, I enjoy the feeling of direct connection to the process, whithout the need for tools. I use both methods of harvest depending on local conditions at the time. Also, the larger shoots that come up from the root system directly have to be cut. I've done it with a stone tool to see how that works, but normally use clippers.
Norm
Hi, my name is Willie. I went to your site and I am trying to make a knife. The blacksmith said to demagnetize the blade. But what I would like to know is do you check it while it is in the burner or when you take it out of the burner. When my blade reaches a white yellowish color, I put the magnet in the burner and the metal won't stick. But when I pull it out and it cools, the magnet sticks to the metal. What am I doing wrong?
Wilfredo Flores
Hello Willie;
In order to harden a carbon steel knife blade it must be heated
up to a fairly high temperature and then quickly quenched ( immersed
in a cooling bath such as oil or water. If the initial temperature
is not high enough it will not harden. If the blade is cooled
too slowly it will not harden. If there is not sufficient carbon
in the steel it will not harden.
There are at least three ways to test the temperature of the blade.
If you do your heating in the shade where the ambient light is
not too bright you can judge the temperature by the color of the
blade. Dull red is about 1300 F, too low. Medium red is about
1500 F, appropriate for quenching. Bright yellowish red is over
1600 F and too hot. Keeping the blade at a bright red temperature
for a long period of time will cause loss of carbon content and
grain growth, both undesirable. The old blacksmiths used the color
to judge the proper temperature before quenching. Today in a modern
heat treating shop they use a thermocouple gauge or optical pyrometer
for very accurate temperature measurement and control. The method
you are using with a magnet is one I have never used but many
authorities mention it. Wayne Goddard's book "The 50 dollar
knife shop" discusses it. You should not heat the magnet
because that will ruin it.
If your blade is reaching a "white yellowish color"
it is getting too hot. You don't want to put the magnet in the
burner because that will ruin the magnet. I would suggest the
following:
1. In a darkened room heat the blade to a medium red color. Observe
carefully the color and remember it.
2. Quickly pull the blade out, test it with a magnet and if the
magnet doesn't stick, then plunge it into the cooling liquid.
3. Test the hardness by trying to scratch it with a file. If a
file will not scratch it, then it had been properly hardened.
The next step is temper the blade by heating it up to around 400
F. If the file can scratch the blade, then you did not get it
hot enough. Heat it again to a somewhat brighter (hotter) color
and quench again.
?Prefieres charlar en español?
Dick Baugh
Hi Bob & Judy;
I just read through the page on making a woven rabbit skin blanket. One
question I've never had answered is about the functional lifetime
of such a blanket when they were made and used in Neolithic times. If
I still lived in Minnesota, and wanted to stay warm through the
winter, would the blankets be a once a year item for each family
member? Or monthly?
Thanks,
Jeff Smith, aka Ironmule
It the one we have made is any indication, my guess is they would last multiple years, as ours is quite durable.
Bob Gillis
Bob;
I first read about weaving them years ago, but have wondered since
about longevity compared to a wool blanket. I've got a "Wilde"
hand woven wool blanket that is clearly going to last for years
of hard use, and wondered about the effort versus longevity equation
for a Native American in Neolithic times.
I suspect time was not the same issue back then as now. And
of course they had no wool. A rabbit blanket is surprisingly warm,
being about 1" thick rather than a wool blanket, which is
often thin. Warmth in thickness.
A matter I've never seen addressed, is the practical side
in terms of warmth and longevity; of the pre-contact "rabbit-blankets/hides"
versus post contact wool blankets. The Native Americans survived,
so they had
the situation worked out, clearly, but I've no feel for how much
more labor per year might be invloved in staying warm with pre-contact
methods compared to woven wool. An interesting
equation, hunting hours versus shepherding hours. Both critters
taste good.
Neither a rabbit blanket nor a tanned deer hide would handle
rain like a well fulled woven wool blanket, and they'd take a
lot longer to dry out afterwards as well. Virgin wool can keep
you warm enough to survive even when wet.
Have you slept out in the woods in cold conditions with rabbit
blankets?
Jeff Smith
Not yet, but I have spent a night in a buffalo robe with comfort. The big advantage of the rabbit skin blanket is the weight and compactablity, if transport was needed. My guess is if it was cold enough, we would clump together with family and if necessary, friends, and then cover all with what warm materials we had as a group. Warmth in numbers.
I believe most would choose a rabbit
skin blanket over a wool blanket if cold was an issue.
Bob Gillis
Hello, I just wanted to thank you for the steam bending article.
I also wanted to ask you a simple question. If I steam bend a
piece of wood, whats to stop it from returning to its original
shape or close to it if subjected to a warm wet atmosphere?
Thank you,
George
P.S.
Can you suggest a good hardwood that can be used for an axe handle?
George;
Yes, steam bent wood can return to shape. One approach is to scorch
the outside of the bend, which seems to prevent this. Another
solution is to oil the wood to prevent moisture from soaking in.
This works best if the oil is heated in for maximum penetration.
The recommended wood for axe handles is hickory, the same as baseball
bats.
Thanks for the kind words,
Norm
I have a question for you, sir [Dick Baugh]. How do you shape the blade when you are trying to use a file to make the blade out of. Do you put it on the grinder? Are blades made from files a good source of steel? Please respond back.
Thanks,
Phillip Ibsen
Hello Phillip,
Old files shoud be an excellent source of high carbon steel for
knife blades. I have never made a knife from an old file but if
I did I would first anneal it ( heat it red hot and then let it
cool slowly). This should make the steel soft enough to cut with
a hacksaw and bevel with a file. After the blade is shaped to
your liking you must harden it. Heat it medium red hot and quench
in oil. Wash the oil off with soap and water and then heat it
in an oven to 400 degrees F for about 20 minutes.
If you start with an old file it will be in a very hard condition.
In order to shape it in the very hard condition you must grind
very slowly to avoid overheating. Overheating will ruin the hardness
of the blade.
Suggestion: Next time you send someone an email letter, please
include a subject. I almost erased this before reading it because
my computer thought it was junk mail.
Regards,
Dick Baugh
Hi Dino,
Thanks for maintaining your awesome PrimitiveWays website. I recently returned from Alaska where many of the natives were selling "eskimo yo-yo's" as a child's game. After departing, I realized that one of the elders had been explaining traditional hunting to me and discussed the use of bola's for the taking of water fowl. In retrospect, the child's game looked a lot like the hunting version, and I'm curious to know if they're related?
Also, now I've been inspired to make a set of bolas, but am curious to know if you or anyone else has any information about the specific process.
I've heard that you can make them by putting rocks in a rawhide sack, or by tying directly onto the rocks.
Some questions I have are:
1. How long are the cordage sections? Are they offset in length?
2. How big of rocks do you use?
3. How many rocks is traditional?
4. What specific game was taken traditionally?
5. Does anyone have tips for throwing techniques?
Also, when I was searching for "bolas" on the internet, I received information on Hawaiin fire dancing. Is there a relationship between fire dancing and the hunting weapon? If bolas were used traditionally in Hawaii, I'd also be curious to learn about those specifics.
Any help would be greatly appreciated.
Thanks,
Darren Cooke
Hi Darren;
I don't have any specific info on Inuit or Eskimo bolas, but maybe these websites might help:
http://www.flight-toys.com/bola/bola_eskimo2.html
http://www.flight-toys.com/bola/bola_eskimo3.jpg
http://www.flight-toys.com/bola/bola_eskimo1.html
http://www.flight-toys.com/bolas.htm
> Is there a relationship between fire dancing and the hunting weapon?
>
If bolas were used traditionally in Hawaii,
>
I'd also be curious to learn about those specifics.
"Hawaiian fire dancing" is more of a tourist origin. Traditional Hawaiian dancing did not have any fire dancing.
There is a Hawaiian weapon called pikoi, which consisted of a wooden or stone weight, with or without a handle, to which a long cord was attached. It has been likened to the South American bola. The weighted rope was thrown at an opponent's legs to trip him. It may be assumed that a successful throw was speedily followed up with some other weapon to complete the job. This weapon appears to have been peculiar to Hawaii, as there is no record of it from any other part of Polynesia.
Hope this helps,
Dino Labiste
pertaining to the article entitled, "Folding Saw")
Bob,
I really liked your folding pocket saw using the jigsaw blade. What
did you use to make the handle?
Patrick
Hi Patrick;
It is a great saw, which being small and light, can be carried
easy in the pocket. The cut out in the handle allows the opening
of the saw and when in use the index finger grips the handle at
this point.
The handle is made from Delron, a type of tough nylon plastic. Other tough hard materials such as antler or iron wood most likely would also work.
If you make one, send us a photo and tell us how it works for you.
Sincerely,
Robert Gillis
Aloha, my name is Micah Kaleikaumaka Hood. I leave tomorrow for Kamehameha School's Kulia ika pono, leadership camp. During this camp I have to teach 4-6 other students a craft or skill. I chose to teach how to make Puniu Drums. In my research your article was the only history and description of these drums in the whole entire internet. It was extremely helpful for me in learning the tradional style of making these drums.
I hope you don't mind, I printed out seven copies of this article to use in my presentation to the other Leadership Camp students that I will be teaching. I know it will give them a greater appreciation for the history of the drum and be very helpful for me in teaching this class.
Thank you very much for the time and effort that you put in to publish this article. Your reaserch has helped to preserve the history of this ancient instrument for students and interested people such as myself.
Once agian, I hope you don't mind me using your article in this way.
Mahalo,
Micah Hood
Class of 2009 Kohala High School
Hello Micah;
No problem on the use of the puniu article for Kamehameha School's
Kulia ika pono, leadership camp. Perpetuating Hawaiian tradition
is always good for the culture.
Please, in the future, if you ever decide to reproduce any other articles from the PrimitiveWays website, contact the author first for permission. Just out of common courtesy to the author. Thanks.
Have fun with your project.
Aloha,
Dino Labiste
Hi, my name is Jeremy and I am15 years old, and an avid hunter and primitive skills guru. I just wanted to know how you make bamboo cordage out of bamboo stalks. I've seen it used in purses and stuff, but I've never figured out how to make it. Can you please send me step-by-step instructions on how to make it?
Thank You!
Jeremy
Hello;
I have seen bamboo cordage used in Nepal to carry loads of firewood.
As I remember, it was skinny green bamboo without much taper.
It looked like the user simply smashed it and then wrapped it
around the bundle of firewood. Instead of tying a knot, the two
ends were twisted around each other and tucked into the bundle.
The bundle was carried with a tump line. You might experiment
and see what kind of bamboo works best for this use.
Dick Baugh
Hello Jeremy;
I have seen thin strips of the outer skin of the bamboo braided
into cordage on bamboo baskets. The bamboo carrying straps were
flexible and very strong.
Dino Labiste
I currently reside in Long Island, New York. We have a deck in the back, and we bought a cast iron Chimmena. We do not use this to cook. Our main goal is to have heat, and lots of it when we are on the deck next to our jacuzzi.
What we've noticed is that in order to feel the heat, we have
to stand right next to the chimmenea, which really isn't that
enjoyable. Ive read on some sites, that hardwood, like hickory
and oak, burn the hottest. Do you agree with this? Should I have
gotten a clay chimmena instead? What we're looking to do is create
an outdoor fireplace that burns VERY HOT, so we can go in the
jacuzzi, and walk around on the deck and feel the heat from the
chinmmena. What do you recommend we do? Remember, it's VERY COLD
HERE ..
Thanks,
Gary
Greetings, from the relative warmth of California. First, chiminea are from Mexico, which isn't as hot as Long Island. Secondly, yes, oak and hickory are among the hottest burning woods. Fruit trees are also pretty hot. To get your chiminea to throw off more heat, you need to find a way to control air flow, as in indoor fireplace inserts. You need to let in only enough air to keep the fire burning, but not enough to carry away the heat. To do this, you'll need to fashion a door for the front, and a flue for the top. You'll want to leave the door and flue open until the fire is burning well, then close them down until the fire smokes, then open it up just enough to stop the smoking. If you are getting a hot burn, it should heat the cast iron up to pretty much red hot. If it is windy, much of the heat will still be carried away, but this is the best you'll get. Be very careful not to touch the hot metal. Remember, though, that heat rises, so the radiant heat from the stove will never get very far from it in an outdoor setting, but you may get it hot enough for your purposes. If you can create some kind of reflector system, your backs won't get cold while your fronts are toasty. A fairly tight seal will also save you a lot of firewood.
Good luck,
Norm
(E-mail statement concerning the article entitled "Bamboo Rice Cooker")
Did you know that sweetened rice with coconut milk, cooked in about a1 to 1 1/4" by 12" bamboo tube is a common desert in Thailand and Vietnam? My wife is from the latter, and I had an exchange high school student from the former. While in one of the very large Asian supermarkets in the Asian sector of Sacramento, California, we found them in the freezer section. We brought a few home and steamed (or just microwaved) them. Delicious!! There was an intact bamboo tube, open at one end and plugged with a piece of banana stem covered with a bamboo leaf. The other end was plugged with the node. Just cook, split, and eat. The fine film or tissue lining the bamboo stem is also edible. Amazing what is on the internet!!
Ed Rocker
I will look for them the next time I am in an Asian market. Thanks for the feedback.
Bob Gillis
Is it true that the custom of wearing leis comes directly from
the worship of demon gods of the islands? Also the original people
of the islands made leis and placed them around the statues of
their gods to appease them, hoping to prevent their demands for
human sacrifices?
Bernie
Miami, Florida
Hello Bernie;
I'd like to give you a few excerpts from a book entitled, "Ka
Lei", by Marie A. McDonald:
"In every part of the world where man has lived and lives,
he has made himself a lei, a necklace, a crown of various materials
to adorn his body, to ward off evil spirits, to bring good fortune,
to please his gods, to denote rank among men, to give as tokens
of love, and for pure and simple enjoyment. It is true that these
leis have a common character, but it is also true that the common
character was enhanced by each culture that produce them.
Leis, in Hawai'i, started on the Asian continent and as people migrated west to the Mediterranean region and north to the temperate zone, and east to Malay to the easternmost part of Polynesia, and from the Society Islands to Hawai'i, they took with them the lei itself or the idea of the lei. The original idea is probably lost to the ages, however, the outgrowths still thrive. The early Hawaiians used the lei in the healing rites of the kahuna lapa'au, the healing priest; it appeared in the fields with the farmer when he invoked the blessing of the gods upon his fields and crops; it was a necessary ornament for the dancer; it was worn by the nursing mother. It was the mark of chiefly rank. It was offered to the gods. It was a symbol of love and love-making. It belonged to the festivals and it brightened up the routine of daily life as well. Children made them. Men and women made them. Gods and goddesses favored them. The poets sang their praises.
A greater and richer variety of leis was made in Hawai'i than in any other Polynesian group. Some of the leis were of a more permanent nature while others were made only to endure a short period of time. The permanent leis included those that were made of such materials as feathers, shells, seeds, ivory, and teeth of various animals. The temporary leis was made from flowers, leaves, and fruits. Most of the natural fresh materials of the temporary leis were selected because they were beautifully scented. Other materials were selected for color and still others were selected for mobility. Some were selected for healing powers. The lasting quality of the material was least important. The beauty of each type of lei, whether permanent or temporary, was no less beautiful than the other. They were valued more for what they represented."
I hope this answers your question.
Sincerely,
Dino Labiste
P.S.
Your wording of the Hawaiian akua (gods) as "demon"
gods connote the idea of bad or evil. Many of the Polynesian deities
rendered spiritual and supernatural help in the needs and activities
of early Hawaiian life.
Dear Sir;
I am hoping that you will help me. I live in the hill country
in Center Point, Texas. I have always been extremely interested
in the ancient ones history. I am a novice at making arrowheads
and different flint implements. I would greatly appreciate it
if you would share some information with me. I know that sinew
was a big factor in the ancient ones affixing fletching.to their
arrowheads and other weapons and tools. I just am not sure how
you cure the sinew in order to use it. I have access to plenty
of critters to obtain the sinew. I am just not real clear on how
you prepare it for use. Would you please reply and give me some
sort of idea about how to do so. Your help would greatly be appreciated.
I am not looking to go into any business or anything. I am retired
and just enjoy doing some of the things I have always studied
and read about.
Respectfully,
Roy Hoffman
Hello Roy;
Curing the tendons for sinew is easy. Just cut them out, scrape
off as much fat as you can and put them in a warm dry place to
dry. Once dry they can be shredded. I pound them with a wooden
mallet rather than a steel or stone hammer because I don't want
to crush the fibers. Then I use two pair of pliers or my hands
to pull the fibers apart.
IMPORTANT: Tendons from the body of a
critter don't work. You must use the long tendons in the lower
part of the leg or else back strap tendon. Many years ago I was
delighted to get a large bag of buffalo tendon. Unfortunately
it was all body tendon. When I tried to shred it by pounding,
it shattered like a piece of plastic.
Best wishes,
Dick
Hi Chuck,
My three young daughters love crafts and the outdoors. We are
trying to think of local natural materials - - pretty easy to
gather and prepare - - that we could string to make necklaces
and other adornments.
1) Someone told me that madrone berries can be dried to a nice
dark red and strung.
Hi Rhona, Great to hear from you.
I am not familiar with madrone berries but it sounds like they
should work. Most any nut or seed once dry can be drilled to make
beads. Bright colors and interesting textures are always preferred
of course. A common bead used by California Indians were cedar
berries. It is interesting how some indians hollowed them out.
After gathering fresh cedar berries in the fall, they would find
an anthill and place the berries next to the hole. The ants would
take the berries into their nest to feed on the fruit inside the
berries during the winter. When spring came they would take the
dry hollow berries back out to the surface as they were now just
trash, ready to be re-gathered by the person who had placed them
there. Using insects as a tool! I love that story! If you ever
visit Western Canada another berry used was from the Wolf Willow.
It is a conifer so I don't know why it is called a "willow".
It produces small gray seeds that are gathered in the summer,
that shrink into a wonderful star shape and are almost silver
in color.
Another little known seed used for beads by some California Indians was from the California Manroot or Wild Cucumber (Marah fabaceus). The dried seed was used by the Chumash Indians both in its natural color and also dyed bright red.
2) We have thought of apple seeds, sea shells, eucalyptus nuts, and pine nuts.
I have seen apple seeds used, but you will have to be very careful drilling them. You may even be able to string them just using a needle when they are fresh. I'm not sure if they would split after they dried though. I believe I have seen eucalyptus seed pods used as an ornament but have no first hand experience with them.
Nuts from the Gray Pine (Pinus sabiniana) also called Digger Pine, Ghost Pine and Yellow Pine, were a commonly used and traded bead in California Native Culture. They are also easy to make. You simply abrade off the ends on sandstone or piece of concrete, then using a straightened paper clip (you can use a whittled down wooden stick), poke the nutmeat out the opposite end. Save the nutmeat to either eat as a snack while making the beads or as an oil to polish the beads when you are finished. I actually prefer the taste of gray pine nuts to Pinion pine although the shells are much tougher to open.
Sea shells were also a much used bead source by the California Indians. Olivella shells (Olivella biblicata) are the most numerous, used whole or broken and ground into tiny disk shapes or more often squares drilled with a central hole. These squares were often used to inlay other art or ceremonial objects held in place with asphaltum along the south coast or in the rest of California, with pine sap mixed with ground charcoal to make pitch. The white shells would really contrast with the black adhesives. Again, to make a basic easy to sting olivella shell bead is quite simple. Using the same stone or concrete used to abrade the pine nuts, gently sand the tip of the spiral to form a whole. Once the hole is started it will get big really fast so go slowly. Sometimes you will have to poke out the remains of the creature that called the shell home, but it usually crumbles and comes out easily. Blowing through the hole will usually get out anything that remains so a string will now thread through.
3) Is there a way to prepare chicken bones so that they are whiter or shinier or otherwise more attractive?
I have found that the best way to whiten bones is to let ants clean them and the sun bleach them. But if you want to quickly whiten bones, a mild chlorine solution works well. Check online sources for a mixture that would work best for you. To make bones shiny depends on a couple variables. A hard dry bone that has not started to degrade will take a polish by only sanding and smoothing by a mechanical means. Softer bones cannot physically hold a smooth finish and would require an oil or liquid polish to keep it shiny. Stick with nut or seed oils (pine nuts!) rather than animal fats or oils. Vegetable oils do get stale but old animal oils really smell bad!
To smooth and polish hard materials is pretty much like working with wood. Use a rough stone or sandpaper for initial smoothing of rough areas, then move to progressively finer sandpaper or horsetail fern (Equisetum sp.) for next to final polishing. As an alternative to commercial sandpaper, I often use a cloth or piece of leather dampened then pressed into a little fine sand or even dust to polish with. For the last step I usually rub what I am polishing on the jeans I am wearing or a piece of buckskin or leather. Any leather will work as long as it has a nap to it. Another method for a final polish is to use a very smooth, slick small stone to actually burnish the surface of wood or bone. The slick surface of the stone will actually compress the microscopic fibers down into themselves and produce a shiny hard surface. Sometimes, this is the only step you need to perform. Here is one last trick when working with a finished bone bead or carving that will give it another level of depth, age and beauty. I will often use a hot flame or coal (a small propane torch when in my shop) to brown or scorch the surface of the bone. This will usually highlight carved areas of the bone by scorching and darkening the edges of a cut where there is less mass before it begins to darken the surrounding bone. Another advantage to using this technique is that the burned or scorched area has become harder and will take a high polish! Burned bone does smell bad to most people so be prepared.
We thought we could also incise them and rub the incisions with charcoal powder from our charcoal grill for contrast.
Incising is a traditional method of decorating, but not as easy as it looks. The real trick, if there is one, is that the surface has to be very smooth, shiny is best, or sealed. What happens when you rub in the color fill material (soot, pigment etc.), and the surface is not smooth, the color will seep into the entire surface of the naturally porous bone. I have some California Native friends who replicate traditional elkhorn purses and incise them. They usually use a very fine pen or x-acto blade to add the color to the incised area. Incising and engraving has obviously been done for thousands of years and many tricks and subtleties can be found with further study.
4) We know it is possible to buy some natural supplies. We know about nocbay.com, which sells powwow costume supplies, and about Moscow Hide and Fur, which may sell claws, teeth, etc. Possibly Michael's even has some stuff. Maybe even abalone, which we all like.
I have had good luck with many online suppliers. Shop around though, some suppliers can be quite a bit more expensive for the same items, If you are looking for something in particular, please let me know. I have several good suppliers that are hard to find on line. I have found some materials at Michael's; coconut shell beads, wooden beads, feathers, small narrow bamboo sections. Other places to look are thrift stores and flea markets and recycle old beaded curtains, macramé beads, 50's and 60' necklaces and such.
Abalone (Haliotis sp.) is a wonderful material to work with and very available in California. Caution must be used when working with abalone though. It contains several nasty toxins that can cause severe problems and long term complications. If the proper caution is used though, abalone can be worked with safely. The first thing you want to avoid is the dust created from cutting or polishing abalone. The best way to do this is to always work with the abalone wet or even better under water in a shallow pan. Abalone is not very hard and can be broken apart with a stone or hammer then shaped and polished on a sandstone. A pump drill works well with abalone but if you wish to drill it with a power tool make sure to keep it wet or under water.
Many other shells can and were used by the Native Californians including dentalium or tusk shells that were traded from British Columbia. The Chumash supplied much of the trade in olivella shells to the interior. A source for hard to find olivellas is http://www.theshellstore.com/craft.htm then page 6. Or along much of the California coast south of Santa Cruz.
5) Someone else recommended to me a Dremel
drill for putting holes through stones, etc. I'm not sure, though,
how I hold the stone still while I drill it. A vise? You can tell
that we have enthusiasm but are clueless. Can you help us get
started?
Thanks for any tips you might have!!
Rhona
A Dremel tool is handy for a lot of different projects. Depending of what material you are trying to make a hole in would determine if a Dremel were the best tool. Harder stones require diamond coated drill bits and a drill press to make holes and there can be alot of breakage. For shells, seeds, and soapstone a dremel or even a good pumpdrill would work fine.
Most stones that you may find will be to hard to drill through without commercial equipment. Some native stone is soft enough to work by hand. Alabaster and especially soapstone (steatite) were used extensively by California Native People and were easily shaped and perforated.
The California Native People used a couple of different techniques for drilling holes in beads. The most common method was to haft a stone bit onto a strait, arrow-size shaft and either use 2 hands to twirl the drill as if you were trying to make a fire. A similar technique using the same hafted bit is to hold the bead in one hand and roll the shaft of the drill back and forth along the top of your thigh while pressing the bead against the twirling bit. A pump drill, although not native, is a great marriage of tradition and technology.
As for holding the bead steady, which ever technique you choose to drill the hole, there are a few options for holding the bead. One ethnographic report stated that the Indians just placed the bead in a shallow depression of the surface of the drilling surface it would rest on. If this were a piece of sandstone with a little depression pecked into it, the bead would sit very secure. Another method is to make a simple vise. Start with a 6"-8" long section of a fairly sturdy wooden branch or dowel (old broomstick or rake handle) approximately 1/2" to 3/4" diameter, split lengthwise. Save a 3"-4" long piece of the same branch or dowel. With the 2 halves held in their un-split positions, bind them together at the center loosely, but with a strong material, leather, a metal ring, etc. Next, with the saved branch piece, carve or saw it into a long wedge shape. This part can vary and should be fit with the bead you want to drill. It works by placing the bead to be drilled in the "jaws" of one end of the vise and then using the wedge slipped between the 2 halves and forced tightly into the opposite end, which will put pressure on the jaw / bead end. A simple vice as this can be adjusted to fit different diameter beads by sliding the center binding closer or further from the "jaw" end to accommodate different diameter beads. Small notches can be cut into the area of the vice where the bead will actually rest so it won't want to go shooting out as you force in the wedge to tighten it.
Misc.: Many different feathers were used by California Native People. Unfortunately, today most feathers are illegal to posses. Be aware of your local laws.
Chuck Kritzon
I was hoping for info on how to grow my ti plant that I recently purchased while on the Big Island. There were no instructions in the package. I put the ti plant in a pot horizontally and continue to water the plant. My plumerias are doing fine but nothing is growing on the ti plant. Thanks for any help you can give me.
Cheri Clow
Hello Cheri;
There are 2 methods for planting ti cuttings. One is planting
the ti upright at a slight angle with the nodes above the surface
of the ground and the other method is to lay it flat on the ground.
Do not totally cover the plant stalk with dirt when using the
flat method. Half of it should be above the ground. The latter
method will produce a denser growth. Ti plants like moist, well
drained soil, with partial shade.
Good luck,
Dino Labiste
Hey Bill;
I'm writing because I'm doing a sweat lodge for my brother this
weekend and wanted to know where I can get stones that won't explode.
What is the name of the type of stone used. I would appreciate
any information that you might have about this. Thank you for
your help.
Jeff Bernstein
Hello Jeff;
The most important thing about the stones is "NO SUBMERGED
ROCKS! The water contained inside the rocks will expand during
the heating process causing them to explode. Collect your rocks
where they have been high and dry for awhile. If you are using
nice rounded, submerged rocks, let them dry out in the sun for
a couple of weeks. My parents collected some sauna rocks
from Lake Superior, and they work fine, after being dried out
for a month.
The vesicular, basalt rocks that we have in the "Primitive Sauna" photos are the same rocks that we use for stone boiling our morning coffee. You might have to experiment a bit with your local rocks before you use them in a sweat. Put the rocks in a hot fire and then stand back. When the stones are really hot, you can get sparks off them by banging a shovel on the rocks. Toss them into some water (from a distance) and see which ones survive.
Let me know how it works out.
Bill Scherer
Dino -
This might be too modern for you, but do you know what a man used
to light his cigar / cigarette when out in the field? I have read
references of a machero.
I have a living history program at the San Pasqual Battlefield
near Escondido, CA. During the battle they could not fire their
cannon as the slow match was not ready, so a Lt. fired the cannon
using his machero. Time period 1846.
Any information would be appreciated.
Leroy Ross
Hello Leroy;
The machero (also referred to as "mechero vesca") was
a fire making tool used during California's Spanish / Mexican
era. It consisted of a serrated high carbon steel wheel that rotated
over a mounted flint stone. The sparks created by the wheel ignited
the cord on the device causing it to smolder. The lighted cord
was used for igniting fires or "firing" a gun or cannon,
its original use.
This website has pictures of the mechero vesca:
http://www.livinghistory.co.uk/1500-1600/articles/xw_172.html
Sincerely,
Dino Labiste
Hi Bill;
I like your idea. Does it hold up well? How thick of leather should
I use for a 5 inch blade? How do I get the basic shape? Does the
knife stay in well?
Mark Parsons
Greetings Mark;
Are you refering to the no stitch sheath on the primitiveways
website? I got the idea from a friend who had a similar one, who
got the idea from somebody else. Since then, I have seen the same
idea on pistol holsters, so I think the idea had been around for
a long time.
Have a look at the diagram at the bottom of the article for the basic shape. Make a paper sheath first, so you have all the measurements right before cutting into leather. Leather thickness is not as important as leather stiffness. I have make one out of birchbark, works well although a bit fragile. Once someone wrote that they were going to make one out of rawhide. The two sheaths seen in the picture are fairly stiff, about 1/8th inch thick leather. The knife stays secure as long as you have something to secure the handle. That is why the sheath handle is slightly shorter than the knife handle. I wear the sheath around my neck. The leather neck cord goes through the folded sheath and then over the knife handle. The top sheath in the photo, in my article, shows the knife assembled sheath with the cord holding the knife. The bottom sheath shows the unfolded sheath, with the neck cord/handle holder looping around the handle.
If you are going to wear it at the belt, add some sort of handle securing strap that can be snapped or tied over the handle.
Hope this helps,
Bill Scherer
Dear Sir;
I am a primary school teacher, who is trying desperately to find
a supplier for withes. If you know of anyone or of an establishment
that supplies withes for sculpture work in school, I would be
most grateful.
Thanks again
Becky Cowell
Teacher
Hello Becky;
Contact Margaret Mathewson at e-mail: margaret@peak.org
She sells willow withes that might fit your needs. Just tell her
what you are looking for. Margaret Mathewson lives in Alsea, Oregon,
United States.
I hope this information helps you.
Sincerely,
Dino Labiste
(E-mail statement concerning the article entitled "Bamboo Rice Cooker")
Bob,
Learned how to do it from the Negritos in the Phillipines during
JEST (Jungle evasion and survival training). Get a section of
bamboo12-18 inches long closed at both ends. Make two cuts in
the middle of the top of the cylinder about 2-3 inches apart with
each cut angling down 50-60 degrees towards the cylinder end.
Use your knife to connect the ends of the cuts and remove the
resulting wedge sideways. Add rice and water, replace wedge -
set on coals - cook - remove wedge and eat. Neat thing is the
cooking container can be used to carry the uneaten rice. The Negritos
could make one in less than a minute with their handmade machete's.
Thanks,
Mickey
Hi, Bill:
Thank you for your excellent knot page on the PrimitiveWays website.
My lack of memory of what I used to know about birds is only overshadowed
by my lack of memory of what I never really got about knots in
the first place. My question is, you have what you are calling
a "Highwayman's knot" on your page. Do you know the
falcolner's knot? Are they the same knot?
Thank you!
Leha Carpenter
Hello Leha;
Thank you for checking out our site. To tell the truth, I've never
heard of the falconer's knot before. A quick search of the net
found this site http://www.falconryinscotland.com/knot.html. From
what I can make out of the rather small pictures, it is not the
same knot. The text mentions that it can be tied and untied with
one hand. I don't think the Highwayman hitch can be tied with
one hand, although it is designded to be untied with a quick jerk
of one hand. The falconers hitch appears to be designed to be
a quick release as well. I will do a bit of research, and hopefully
come up with a better answer for you.
Bill Scherer
Hi Bill;
I have a drawing of the Falconer's knot. Last year, I did some
volunteer work at the Sulfur Creek Nature Center in Hayward. It's
a rehabilitation center for injured wild animals. They nurse the
animals back to health, then release them back to the wild. If
the animals cannot survive in the wild due to their injuries,
they are cared for at the center. The animals become part of the
educational programs about wildlife and nature.
Anyway, the volunteers were trained and taught to use the Falconer's
knot when handling the raptors (hawks, falcons, and owls). If
Lela is still interested in the knot, I can scan the drawing and
do the knot itself, then forward it to you or to her.
Dino Labiste
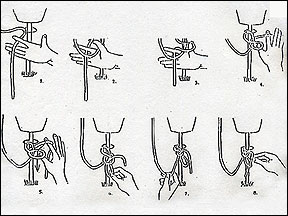
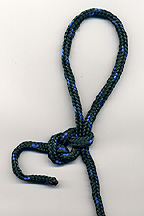
Hi, Bill and Dino:
Thank you so much - yes, this is the knot, and it is done with
one hand. I recognized it once I saw it, although I might have
a hard time remembering how to do it based on the tiny pictures.
I can try blowing them up in a graphics program and see if I can
figure it out.
These pictures are great! You guys are terrific. Thanks again!
Leha
(Question pertaining to the article entitled, "Four Hour Kayak")
From L. Alverio:
I have trouble finding willow in Puerto Rico.
1. What alternative material can or has been used instead of willow?
You can use any slender saplings. Look near creeks. Make sure you can bend at least some of them into ovals for the ribs of the boat.
2. Can tie-wraps be used instead of cord?
Yes
3. Which of the Grip Clips models is the one used for the kayak?
General Purpose
Sincerely,
Bob Gillis
Bill;
I enjoyed your knot illustrations. I would like to offer the opinion
that the knot you call the "trucker hitch" is not secure
when started with a slipknot, as both knots can act as pulleys
and loosen with prolonged tugging of the load. I have friends
who tie it as you have drawn it, and no one has complained, but
in principle the knots can slide and loosen.
This liability is avoided by making the starting loop any of several
fixed loops. I used to use a simple overhand loop, but now I prefer
the fisherman's loop because the ropes exit the knot in opposite
directions, compatible with the loading on it, and it is easier
to untie when I am though with it. One could also use a figure
eight loop, it doesn't really matter. The important thing is that
it be a fixed loop that can't shrink and provide slack.
Another variation that could help in preventing the pulleying
effect is to finish up with a series of half hitches, alternating
them above and below the point of the loop, the way one would
belay onto a cleat. This tends to lock up the lower portion of
the loop, essentially fixing it. I have cinched down many a load
with these techniques, and never lost a knot, much less a crate.
Best Wishes
Eric
Hello Eric;
Thank you for responding to the PrimitiveWays knots article. The
piece was written a few years ago. Your point is well taken. There
are several versions of the truckers hitch. The one that I use
these days uses a figure eight loop. As you point out, it makes
a more secure hitch.
Best regards,
Bill Scherer
Dear Mr. Baugh,
I still remember your visit to my second grade class at Walter
Hays Elementary and the bows and stone tools you brought with
you. I just came across your Primitiveways website while searching
for information on using yucca stalks as firedrill spindles. It's
great to know that there are groups of people in our culture still
striving to learn and teach the gathering of resources and fashioning
of useful items directly tied to the rhythms of nature, as well
as trying to learn about the world views of other cultures. Do
you have any information on attempts to fish with bone or shell
hooks? Also, do you have experience using agave stalks to make
didjeridoos? Do you have any information on didjeridoo making
posted online?
Thanks,
Ashok Sadrozinski
Hello Ashok,
It's always gratifying to find out that someone remembered what
I did and even better, is interested in learning more.
I know very little about bone and shell fishhooks. I have, however, made and played lots of didgeridoos. I have heard some excellent agave didj's. The key to success is to hollow out the stalk, get it nice and smooth and then seal it inside and out with resin. For good strong, bright sound, the wall of the didj should be smooth and hard. Peter Spoecker's web site has stuff on making didj's (or can steer you to another site which has details). Another site which I found today is www.navaching.com/shaku/didge.html. I don't know if it is any good because I haven't read it yet. The only didj' analysis I have done is not yet online.
Dick Baugh
Hi,
Around 1998 I bought, at Sorensen's Lodge (Alpine County), a tule
decoy by Davin George (Washo?). I just saw at Univeristy of California
Berkeley's PA Hearst Museum a duck decoy by DAVID George, son
of the famous Northern Paiutes, Wuzzie & Jimmy. Was Davin
the son of David? Any information you have would be most appreciated,
since I want to keep my collection properly documented.
Many thanks,
Dean A. Silvers
Dean,
My information is that yes, David George is the son of Wuzzie
and Davin is the son of David. I assume they are all Paiute. I
have a David George decoy on loan in my collection, and Coyote
Hills Regional Park, where I used to work has two Davin George
samples (one full size, one small) purchased in the late '80's
or early 90's. As compared to the illustrations in the book entitled,
"Survival Arts of the Primitive Paiutes", the David
and Davin samples look made for sale. They are neater, and use
a pre-made head and neck where the book shows a cruder body and
the duck skin with skull intact and the neck stuffed, then the
whole thing pinned onto the body. Models from Lovelock cave are
somewhat like the for sale models, so both are probably authentic.
Hope this is what you need. You might also try Bev Ortiz at Coyote
Hills Regional Park, as she purchased the Davin George ducks.
Norm
Hello;
Looking at your website, I had a couple of questions for you that
I was hoping you would take the time to answer. When making the
quail call, should I use bone or wood
I used wood.
and how deep should the dip in the middle be?
About 1/8" on each side of the band.
Also, when making the reed flute, do you have any drawings
of any kind on the making of it (to give me some kind of a diagram
to follow)?
I don't have a diagram.
Just copy the photo and see if it works for you. If not, make
another until you get it to work. Have someone who plays the flute
try to get a sound out of yours, as blowing is critical to getting
it to work.
Bob Gillis
Thank you very much.
Sincerely,
Anthony Arva
Hi Bill!
I live in northern B.C Canada. Lots of wild critters up here!!! I will be trying your method of tanning this winter. I am glad you posted it! I was wondering if you might have a pattern to make a fox hat with the face on the front and the tail out the back? Looks like a coonskin hat but with a face. Do your hides turn out very soft or are they a little stiff
Best Wishes!
Michelle
Hello Michelle;
Glad to hear from another tanner. I just spent this morning working
on a beaver pelt. I want to get 4 to 6 of them tanned and sewn
together for a sleeping robe. It will be quite a project. I expect
it to take awhile.
Go to www.braintan.com and click on their "Traditional Tanner's Supply". They have patterns for hats and other things. The one labeled "Classic Fur Hat" is probably the one you want. It can be made with or without the critter's face. I have never found a pattern for the cape style hat. I think I am going to experiment with some cloth models before I make another hat.
Braintanned furs, are by their nature,
will never be quite as soft as the same hide would be if it was
turned into leather without the fur. Two reasons:
1. Fur can only be worked on the flesh side.
2.The epidermis is left on a fur pelt, as opposed to removing
the epidermis on leather.
That being said, the furs are still quite soft. The degree of softness depends on the type of critter and the amount of work the tanner wants to put into his furs. I tend to leave the face a bit bit stiffer that the rest of the pelt, because I don't care for a floppy face. If you are not satisfied with the softness, you can always give them another session of braining and softening.
Keep in touch, let me know how your hat turns out.
Bill Scherer
Hi Norm,
This was a very interesting article! We are trying to bend balsa
wood into an arch. We are trying to do this to build a bridge
with an arch for a science fair project.
The wood is a 1/4 inch by 1/4 inch stick. The book we were using
said to soak it for 2 days and it would bend. It is not working
- it breaks when we try to make the arch. The stick for the arch
is 16 inches long. The base we need to glue it to is 12 inches
and the supporting piece that goes in the middle of the arch is
4 1/2 inches.
Do you have any ideas?
Thanks!
Shari Rhodes
Shari, balsa wood is pretty weak stuff,
but it might respond to boiling. If you have a shallow pan long
enough, try boiling the stick for about 20 minutes. When you bend
it, use a form, maybe a coffee can or large soup can, and form
the stick over it while holding it tight against the can wit oven
mits. Go fairly slowly, a bit at a time. That might keep it from
breaking. Keep pressure at the top of the curve until the wood
cools completely.
Good luck, let me know how it worked.
Norm
Hi Dino,
I really enjoyed your article on shark hide tanning.
I live in a coastal town in South Africa, and sharks are processed
here but the skins are thrown away and thus wasted.
I am looking for data on tanning sharkskins using modern methods
and I would like to market the skins - there seems to be lots
of potential in that line here.
Can you guide me to where I can find sharkskin tanning methods?
Any ideas as to marketing possibilities?
Regards,
Gletwyn Rubidge
Hello Gletwyn;
Thank you for visiting our website. I don't have any data on modern
tanning techniques. You'll have to do some research on that matter.
Try contacting Tom Delohre at Delohre
Shark Skin Leather Goods. His website is:
http://www.lohre.com/delohre/
He may be able to help you in marketing your shark skins.
Hope this info helps,
Dino Labiste
"Cchea Nugent" wrote:
My tribe is from South Louisiana and we have found reference to
a flute/whistle in our writings called an akt. It is described
as a reed instrument curved into a hook.
Have you ever seen or heard of anything like this?
I've never run into an instrument such as you describe. You might try a source closer to Louisiana (we are in California) - abotech.com has a bulletin board and is in the south. Mediaprehistoria@yahoo.com should put you in touch with Scott Jones in Georgia, and he might be able to help you.
Good luck,
Norm
I recently read your article on shark skin tanning, and I thought it was really interesting. I'm going to try it. I'll also be trying to make a primitive bow. I'm also going to try to make my own quiver, like the one you had pictured. I have never done anything like this before. I was wondering if you had any advise on the matter, both the skin tanning and the quiver making.
I love your webpage. It is very educational. I am recommending it to my friends. Any help you give I'd be very glad to recieve. Thank you for your assistance.
Leonard Ortega
Hello Leonard;
Thank you for visiting our website.
As far as the shark skin tanning is concerned, the article on the website only pertains to turning the skin into rawhide. It does not describe how to tan the shark skin. You will have to do your own research on that subject.
For the quiver, I used a section of bamboo that was wide and long enough to hold about 8 arrows. To get rid of the nodes on the inside of the bamboo, knock them out with a wooden dowel and a hammer. Place the dowel inside of the bamboo and punch out as much of the node section as possible. Do not remove the last node on the bottom of the bamboo. Bind the outside of the bamboo with waxed cordage around each node area. The cordage whipping should be at least 1/2 inch wide. This will keep the bamboo from splitting further if it happens to crack. Attach either a wide strip of leather or braided plant cordage around the bamboo for a carrying strap.
Good luck on your projects,
Dino Labiste
PrimitiveWays;
I've just been reading your page about coppicing. Although
you are correct in saying that the English practiced coppice management
in the 11th century, they also practiced it before and since.
Indeed, most British ancient woodlands have been managed either
as pure coppice or "coppice with standards", a system
where the coppice "understory" was grown together with
15-20 standard or maiden trees of varying ages and heights per
hectare. Up until the 19th century, woodlands were valued
far more for their coppice wood than their timber apart from the
woodlands in the shipbuilding areas which required large timber.
Although coppicing went into serious decline from the start of
the 20th century with the advent of plastics and mechanisation
of woodworking, there has been a revival since the 1990s and many
ancient coppice woodlands are being returned to management.
If you need further information about coppicing in the UK, I would
refer you to Oliver Rackham's books: "History of the English
Countryside" and "Trees and Woodlands in the English
Landscape".
Cheers,
Jake Haynes
Bob;
I really enjoyed your site. I have a question. Do the bone flutes
or whistles have a plug in the lower end? I have not tried to
make one yet, but was just wondering if being plugged would make
the tone more proper. Thanks in advance.
Regards,
Kris Tuomala
The ends are open. All flutes to my knowledge are open. Some whistles are open such as the penny whistle and some are closed. Pan pipes are closed.
Bob Gillis
Norm,
Advice for steaming 40mm x 50mm kiln dried oak. We made a steam
box which works very well, but our problem arises when we put
the dried oak to the former and tried to bend (it won't budge).
We steamed it for 2 hours.
Thank you,
Steve from Cornwall
Steve, I've never tried a piece like you describe, but I've heard from friends who have. My suggestions would be to soak the wood first (for a day or so), and to maintain the steam longer.
Good luck,
Norm
I can't wait to try one of these simple flutes.
Just wanted to caution you and any readers that supposedly
( I haven't really researched this) bone dust is toxic to the
lungs. Wouldn't want any one to get sick. I've used bone and antler
for knife handles but my poor lungs have been exposed to many
nasty things over the years. I thought you would be interested.
Sorry, I can't remember where I got this info.
Good luck.
Ray DePriest
Good point; thanks. We will add your commits to our site.
Bob Gillis
Any type of fine dust is toxic to the lungs. Always work in a well ventilated area when working on bone or antler to minimize dust inhalation. If the dust becomes a problem, wear a dust mask or even better, an air filter mask to cut down on the health hazard.
Additional comments by Dino Labiste
"Mound Builders" wrote:
Great Photos! I wish you folks lived closer to Ohio. I've been
looking for skilled, motivated people such as yourselves. I host
several primitive events in central Ohio at Flint Ridge State
Memorial. Lots of flint knappers, not many basket weavers, potters,
bone tools makers, and shelter constructers. So much more to life
than war and hunting. Thanks, for sharing info!
Hapi, Education Specialist
Ohio Historical Society
P.S. If any of you come to Ohio, call or e-mail me and I'll show
you 2,000 year old Hopewell earthen
monuments in Newark at The Newark Earthworks. Breathtaking!
Dear sir;
I'm trying to steam bend some 1 by 1 strips of wood and have questions.
I have a oval glass that fits into a entrance door. I need to
replace the moulding around this glass. I'm using oak wood. I
have made a plywood template to bend the wood around. The steam
box we are using is plywood. It is fueled by propane hooked to
a burner with a stainless steel tank on it. My problem is that
when I bend at the sharpest point, my wood fails. I have tried
to soak the wood for up to five days. I seem to get more flexablity
when I soak ,but still fails. I have soaked it, then steamed it
and seems to lose some of it's flexiablity. Tell me if I'm not
steaming long enough or too long. Hour per inch when I steam.
Please give me some ideas.
Thank you,
Winthrop Gregor
I've thought about your problem and have a few thoughts. Look for molding pieces with the straightest grain (running parallel) so there is the least weakness to start a splinter. If you soak the wood for five days, you might be weakening it, soak it less time - overnight, then use dry heat to soften it - I use a hot air gun. If all this fails, try making a series of curf cuts on the inside of the curve. When it is bent, you can fill any open spaces in the curfs with wood putty or wax before painting or staining it. (Curf cuts are saw cuts from the inside of the curve and can go two thirds of the way through the molding. They are more effective if slightly pie shaped in the area of greatest bend.).
Good luck,
Norm
Bob,
I saw your bit on crystals on the primitive ways homepage. I had
a couple of questions: how long/hard do you rub the crystals together?
(I know, 'til they glow, right?) Really how long does it take.
You need to push the crystals together hard
and then rub them back and forth vigorously. They should start
glowing immediately. When you stop rubbing them the light goes
out. Also, you need two pieces each with at least one smooth side.
They should be reasonability flat.
Can this be a polished stone from a flowerchild shop?
No, unless it is quartz.
Do you know where to get quartz in 'the wild'?
Melody
Quartz is found in many areas. I have found
it in the mountains and in creeks. It can be crystals or cobbles.
They are clear or translucent.
Bob Gillis
Dino:
I build furniture and have been interested for some time now in
designing a writing desk with an inlaid shagreen writing surface.
Where might I purchase the skins for this project?
Bryan Van Horn
Hello Bryon;
Check out this website. They don't sell shark skin rawhide, but
processed shark skin leather. I can't vouch for the company because
I haven't ordered anything from them, but take a look at their
website.
http://www.motherofpearl.net/
Sincerely,
Dino Labiste
From: Robert Guntren
Dear Sir:
I found you on the net. I am in the process of replacing the wood
on a l4 feet Larson row boat, I need to bent the strips of wood
to conform to the hull of the boat. The wood that I intend to
use is white oak, straight grained and approximately l-l/4 x 3/4
by l5 feet. Could you suggest a plan for me to use to bent this
wood. I thought I would take a 2 inch pipe and cap it on one end
and then slip the wood as mentioned above into the pipe and heat
to boiling. Will this work? I do not have access to a boiler.
Sure would appreciate your help.
Thanks
Robert, greetings.
How you go about bending wood for your rowboat project depends
a bit on how much you need to bend it. The method you propose
- of inserting the wood strip into a 2" diam. pipe and boiling
the water inside is similar to what a friend of mine did to make
bent wood rocking chairs, but he had to bend the wood alot. The
other option for making bends that are of relatively minor arc
is to soak the wood overnight, then heat it and bend it over a
piece of 3" pipe which is heated from the inside by a propane
torch. If this piece of pipe is securely mounted, you can run
the wet wood back and forth over it until it is hot enough to
bend. This method is especially handy if you only need to heat
bend part of the piece, as might be the case with a boat. If you
use the long tube method, you will of course have to tilt up the
open end so that steam doesn't build up pressure, but keeping
the whole length of pipe boiling will require several heating
units. The other way is to find a large tea kettle and place the
open end of the pipe over the spout and fill the tube with steam.
Good luck, let me know how it turns out,
Norm Kidder
p.s. - if you are interested in old ways of doing things, check out the Society of Primitive Technology at primitive.org.
(E-mail pertaining to the article, "Can You Name These Plants?")
Guesses:
1) ?
2) Smilacina (False Solomon Seal)
3) Thalictrum (Meadow Rue)
4) Actea Rubra (Baneberry)
5) ?
6) Rubus of some sort
7) Oxalis (sorrel)
Best of luck,
Josh and David
Hi my name is Margaret Rizzo, I am in the process of making a healing wand and I was wondering where I might be able to purchase some sinew in order to tie it together. Is this at all possible? Is it manageable and easy to work with? I read some of the article on your website and appreciated the store list, but I do not know which of the retailers would have it - if they would at all. I am slightly pressed for time so I would appreciate it if someone could get back to me asap.
Marg
Hello Marg;
Michael Foltmer is a very reliable source and I would recommend him to anyone who is looking for raw resources like rawhide, braintain buckskin, porcupine quills as well as sinew. He sells deer or elk sinew. The cheapest price for his deer backstrap sinew (12" to 17") is $2.50 ($2.00 shipping & handling and 15 cents on each additional strip). Contact him for other price quotes:
Michael Foltmer
1330 Brantner Rd.
Evans, Colorado 80620
(970) 339-5608
The other alternative for sinew is The 3 Rivers Archery website (www.3riversarchery.com). Here is a link to their supply of sinew:
http://www.bowsite2.com/acb/showdetl.cfm?&User_ID=252170&St=7925&St2=-36317887&St3=66488762&DS_ID=8&Product_ID=3465&DID=15
For your project, what you want is the
backstrap sinew, which is longer than the leg tendon sinew. To
process the backstrap sinew, all you have to do is smoosh the
sinew between your hands to seperate the thin threads of sinew.
Seperate as many threads of sinew for your use. Soak the sinew
threads in water to soften it. Then pat dry the sinew before applying
the hide glue. To adhere the sinew to something, go to your local
hardware store and purchase an adhesive product called Franklin's
Hide Glue (if you don't have your own home-made hide glue. Also,
3 Rivers Archery sells hide glue in dried form). Squeeze out a
few drops of hide glue from the Franklin Hide Glue plastic container
onto your thumb and forefinger fingertips. Run the thread of sinew
between your fingers, then apply the sinew to your project.
To use the sinew for sewing, you must first soak it in water,
pat it dry, then roll or twist the sinew into 1-ply thread. Give
it a good tug to set the twist, then use it as sewing thread (don't
apply hide glue for making sewing thread). During the old days,
the sinew was just placed in the mouth, lightly chewed and the
saliva in the mouth softened the sinew. Now, you don't know how
the sinew was processed and dried if you bought it. Unfortunately,
putting it into your mouth may not be wise.
Good luck on your project,
Dino Labiste
Hello "Norm".
Enjoyed your article on steam bending. I am a Timber framer with
an interesting challenge coming up. Our firm has been asked to
make a timber roof truss system, with a twist or should I say
"a bend". The bottom chord is to be bent or cambered.
The specs call for solid (not laminated) timbers. The dimensions
are 8" x 10" x 24'. This is bending on a different scale!
The bend depth is 24" and the species is most likely Douglas
Fir. Your input would be most appreciated.
Jason Beamish
Jason, whew, what a challenge. Your project is way beyond anything I've ever attempted. Actually bending the beam you describe would require a jig of NASA proportions and would probably split out on the top of the curve. If you have beams to experiment on, you could try drilling 1/4 inch holes to allow better steam penetration, which would close up with the bending. My only other suggestion is to laminate only the end you are bending, assuming the bend is close to one end. Use a really good bandsaw to slice the beam into something like 1" slats, steam that (a challenge in itself), bend it around a jig and clamp it. After it sets, glue it. You'll need to measure it from the top, as you'll pobably have to cut off the slats that slide down when bending. The rest of the beam will still meet specs. That's all I can think of
Good luck
Norm
Dear creators of Primitive Ways:
Well, I realy enjoy your site. It is full filled with interesting
photos, and very simple text explanation, which is the most for
a 'electronic device' to show a 'primitive way'. I'm from Argentina,
actually develop an IT support office (a.k.a MIS) for a multinational
corporation.
It's sad to me been so far away from the place where you develop
your courses and training, but I hope to be again in US with enough
time to take one of the courses, if not all!!!
Well, that's it. Just a 'good job and keep working' from a down-south place.
Regards,
Marcelo Ferrarotti
IT Support
Advent International Corporation
Latin America
Bob;
Saw the bone flutes on the PrimitiveWays webpage. Is the end opposite
the blowing end a closed end?
No, it is open.
I assume it is played held straight out like a clarinet and not
held sidewise.
Yes.
Sincerely,
Bob Gillis
Thanks,
Dranu
Hi Norm;
In reading "The Ohlone Way", I was surprised at the
absence of the blue oak acorn from the section discussing acorn
desirability and gathering. I checked out my "Oaks of California"
book, and in the section that covered Indian acorn preferences,
the blue was missing again - what's up about the blue as food?
Verle Craven
The blue oak is in the white oak family as is the valley oak. The valley oak is prone to molding because of its water content. But it is big and abundant. The live oak and black oak (and tanoak) all have a higher tannin content, so keep better, and have more flavor (and are also more nutritious). My guess is that the blue oak lacks both size and keeping quality. It would only be used if no other acorns were available. I haven't tried pounding it into flour, but that could also be the problem. Gold cup oak (a.k.a. canyon live oak) doesn't make good flour. My suggestion is to try it out and see for yourself (then let me know).
Norm
Hello. I am Mechoopda, Chico Rancheria, and a student at CSU-Chico.
I very much enjoyed this page [Native California Fall Gathering
at San Luis Reservoir State Recreation Area]. For my Exhibit Research
and Design class, I am preparing a display case depicting an aspect
of cultural anthropology. I would like to use one of the pictures
demonstrating the soaproot hairbrush. May I? I would give proper
credit to your website and organization.
If you could let me know in the next couple days, it would be
much appreciated.
Thank you,
Arlene Ward
Hello Arlene,
Thank you for asking permission to use one of the pictures demonstrating
the soaproot hairbrush. Yes, you can use the photo for your Exhibit
Research and Design class.
> I would give proper credit to your website and organization.
Thank you for doing that.
Good luck on your display case,
Dino Labiste
Hey, man. I totally support your website and your views on
modern technology. I am an Anarcho-primitivist (no doubt you heard
about us taking on downtown Seattle, DC, LA, etc.). We basically
'subscribe' to the thinking of Ted Kaczysnki in that technology
takes away our autonomy, our happiness and our ability to be fulfilled
by work that has a direct effect on our physical well-being. I
was just wondering what your opinions are
on Anarcho-primitivism and Ted Kaczynski. Thanks!
NiK
NiK, greetings. I'm glad to hear you like our site. Your e-mail gave me an excuse to re-read the article you mention. As to anarcho-primitivism and Ted Kazinski, there are some ideas of his that I may have some sympathy for, but his methods for dealing with the problems was counterproductive as well as personally destructive. The problems created by technology appear at this time to be terminal, but there is a very real race on to find real solutions, so I try to keep an open mind, and not put all my eggs in any one basket. We are all part of a very interesting transitional time, and putting too much stock in anyone ism makes you non-adaptable. As in life, diversity of cultures, beliefs, and behavior offers the best chance that there will be one lifestlye that can survive. In the meantime, we each pick and choose among all the available technologies and lifestyles ( we're both communicating by computer). Some go all out high tech, others to low tech. It may be in the future there will be permanent cultures of technos, the unwilling poor, and the intentional poor (primitives) serving roles similar to carnivores, herbivores and scavengers in a natural system. Time will tell, in the meantime, find a more productive way to push your ideas than Ted did. Revenge only feels good for the time it takes to realize that it didn't change anything. During the anti-vietnam war days, I saw many of my friends fall victim to the desire to be dramatic (egoistic) rather than do what was affective. I found teaching to be more affective - Gandi was the true radical.
Keep thinking and growing,
Norm
Hey, my name is Chase and I am going to start customizing my first knife pretty soon. I have already come across a small damascus blade that I will be using and (being a hunter/outdoorsman) I have plenty of antlers at my disposal.
Before I start though, I have a couple of questions to ask. My first question is about fittings. What kind of fittings should I use on my antler blade and how do I know that it is going to fit right unless I fabricate it myself? Another is about the color of antler. Is there any way of dying the antler to a different shade? It might be the light, but it seems as though on your knife that the antler is actually bluish. One last one, as to not waste your time with my amateur questions, how long would it take to dry a small piece of antler that is going to go on my 2 1/2" blade?
Hello Chase;
Thank you for visiting the PrimitiveWays website. Here are the
responses to your questions:
My first question is about fittings.
What kind of fittings should I use on my antler blade and how
do I know that it is going to fit right unless I fabricate it
myself?
I don't normally use any metal fittings on my antler handle knife.
If you want to add fittings, then you'll either have to purchase
fittings that will fit your antler precisely, you create your
own customize fitting, or you have to shape the antler to fit
an existing fitting.
Sometimes, I will create my own wooden fitting by splitting a
small piece of hardwood, glue (or epoxy) it to the area where
the antler and knife meets and carve it to the desired size and
shape.
Another is about the color of antler.
Is there any way of dying the antler to a different shade? It
might be the light but it seems as though on your knife that the
antler is actually bluish.
Check out the webpage on black dyeing on the PrimitiveWays website.
Access the webpage below:
http://primitiveways.com/black_dye.html
If you want to dye your antler black, then follow the instructions
on the mentioned webpage.
The blueish color that you had seen on the antler handle knife
webpage could have been a color problem on your screen. The antler
is actually a creamy, white color.
Also, check out the store called Tandy Leather (or find their
website on the internet). They might sell dyes that may color
antler.
. . . how long would it take to dry
a small piece of antler that is going to go on my 2 1/2"
blade?
If you mean "dry", like when the outer surface of the
antler will not be wet, then the answer would be immediately.
All you have to do is either wipe it with a cloth or let it dry
in the sun. If you are referring to the inner core being wet,
then one day of drying out in the sun on a hot day will suffice.
If it is still moist, then let it dry longer.
Sincerely,
Dino Labiste
Amanda, Bob Gillis referred your question
about the movie to me. The Gods Must Be Crazy is a film made in
South Africa many years ago that stirred up a bit of controversy
in its depiction of Black Africans. Basically, the movie makes
fun of civilized folk of all types and contrasts them to the pure
logic of the unspoiled Bushmen. It deals with the events that
evolve from a pilot dropping a coke bottle into an area where
there are Bushmen unaware of civilization (oh, that there really
were!) After they find many uses for the bottle, which they think
was sent to them by the gods, they decide that it is actually
evil and destructive to their social order, so their leader sets
off to throw it off the edge of the world. On the way he encounters
a group of whites who are having their own adventures and gets
involved in an incident with revolutionaries and so on. The film
contrasts his purity and basic understanding and skills, with
the complex, nonsensical dealings of the modern world. It has
some great humor and scenery shots, and portrays some good hunter/gatherer
skills. Its a low budget sort of film but I love it.
Norm Kidder
I have a copy of the Gods Must Be Crazy,
its one of my favorite movies. I've seen the Edge, interesting,
but not as fun (pretty intense) and of course there is Cast Away,
largely influenced by the Society of Primitive Technology. Steve
Watts started calling a volleyball Wilson after he, Dave Wescott
and Dave Holiday found it on the beach while they were training
the screenwriter in survival skills. If I get any time (ha), I'll
try and write up something longer on the first and last of these.
Other possiblities are Iceman, Quest For Fire, Clan of the Cave
Bear.
Norm
Hello Norm;
I saw the article about your work in the San Francisco Chronicle
newspaper today, and looked up your website. As you're the one
posting the article on making cordage, I thought I'd share this
-- before the Spanish brought sheep to the New World, the Native
Americans spun dog hair. It's somewhat more difficult than spinning
sheep wool, but it can then be used for weaving or other crafts
such as knitting and crochet. The drop spindle is another example
of an ancient tool that's fairly easy to make.
The best information I know of for spinning either dog or cat hair is "Knitting with Dog Hair" by Kendall Crolius and Anne Montgomery. It's a small, inexpensive paperback published in 1994, very easy to understand and includes preparing the hair, a spinning tutorial and patterns.
Another book on hand spinning I find helpful is "Hands On Spinning" by Lee Raven -1987. She shows how to make a very simple beginners "spindle" out of a piece of clothes hanger wire. There are many other books on hand spinning. Both books have patterns for making your own drop spindles.
Just my 2 cents!
Susan Penner
Saki Yoshisada wrote:
I like your organization. It's helping me a lot in constructing
weapons for amtgard. If you don't know what amtgard is, just type
it in on the web search and click on the amtgard web site. . .
. In any event, do you know any websites that tell how to make
a Japanese Basket Hat? If so please tell me where to go. I appreciate
your efforts.
Are you referring to the basket hats that were worn by the Zen Buddhist sect called the komuso (priests of emptiness and nothingness). If so, then try doing a search on "komuso". It might lead you to a link on how to make the basket hats. Or try searching the word "tengai". The komuso were identified by the large baskets (tengai) which they wore over their heads to symbolize their detachment from the world.
Sincerely,
Dino Labiste
Just wanted to say that I am very impressed with the site. First time I have ever been on it. Have been making self bows for 8 years and have gotten more and more into the associated technologies every year. Have done cordage, fire, tanning, arrows, knapping and tools.
Have taken 2 deers with primitive equipment. Only thing I haven't done yet is made a good bowstring. Chicken to put one on a good hard earned osage bow. It is on the agenda for this winter. Will then have the complete package.
Really appreciate all your research and hard work. I have picked up a bunch of articles and not through with all the articles yet. Keep up the good work.
Alan Warner
(Lonely Primitive Technologist in the land of corn and cows)
Casey, Iowa
Hi Norm,
I enjoyed your presentation to the docents at Pt. Lobos recently.
I was disappointed that you did not have enough time to describe
the items on the table up front.
Question 1. What was the bunch of walnut shells with a black solid
matrix with inclusions in it?
Question 2. What material is used as tinder when using the spindle
for starting a fire?
Question 3. At Pt. Lobos there are middens scattered around in
many spots. They are usually on high bluffs with darkened soil
indicating charcoal from fires and many shellfish shells. Why
would they bring the food up to these high spots instead of having
a 'picnic' on the beach? Again I want to thank you for your excellent
presentation. I wish we had had more time.
Jim McCammon.
Jim, good to hear from you. There's never
enough time to answer all the questions.
1. The Walnut shells are Calififornia Black Walnuts filled with
tar and abalone shell. Natural tar seeps near Santa Barbara provided
`asphaltum' for trade. The shells were used as dice in games.
Typically eight dice were thrown onto a flat, round basket and
the number face up were counted to get a number. Different scoring
systems were used to win points in games.
2. The fire tinder that I used at the talk was the outer fibers
from soaproot bulbs - Chlorogalum pomeridianum. I also
use shredded live oak or cottonwood inner bark, or fine dried
grass, or any other dry, finely divided plant material.
3. At Coyote Hills Regional Park in Fremont, there are large midden
sites with large quantities of shell also. They did 'picnic' some
at the collecting sites, where pure shell mounds can still be
found, but they also brought back most of the shellfish to the
main village, where the shell is mixed in with all the other village
debris. My assumption as to why all the shellfish were not eaten
at the collecting spot would be that not all members of the family
were involved in gathering, so the harvest was brought home, probably
by the women to be included in meal for the whole family group.
The collecting sites were varying distances from suitable village
locations, which were typically located by reliable water sources,
rather than by food. Collecting trips at any distance from the
village typically would involve both onsight eating and returning
with a storable quantiy of food when possible. I believe it is
likely that the Native folk lived most days off of stored food,
with periodic harvesting trips, not daily foraging as some books
have suggested.
Hope this answers your questions,
Norm
Where is the sinew in a deer? I always hear it's in the legs and the back. Is that sinew covering the backstrap?
Thanks for your time,
Ray
Hello Ray,
The two locations for "useful" tendon are the two you
mentioned. Body tendons do not have the correct elastic fiber
properties.
Dick
Helen, I was forwarded your e-mail regarding
mistakes in the movie Quest For Fire. It's been quite a while
since I've watched it, but from what I remember, the biggest problem
was in the variety of different stages of evolution being portrayed
at the same time. In one of the early scenes the principle tribe
is attacked by hairy apemen who don't really resemble any stage
in human or ape development that I'm aware of - they are too big
for Australopithecenes and too apelike for anything later. The
only concurrent apes would be proto-gorillas in Africa and Gigantopithecus
in Asia, but the movie version doesn't fit even these very well.
The main group appears to be based on either Neanderthals or possibly
Homo erectus. They encounter at the end of the movie a group of
totally modern people. In so doing, they are spanning too many
millenia. They also show the more primitive group as using only
chimp like language (done very well as coached by Desmond Morris).
Current evidence suggests that even the early versions of Homo
had the capacity for speech. The other problem I remember noting
at the time was the ease with which the primitive group was able
to take up atlatls with immediate accuracy. Also, their atlatl
darts were very short and poorly made. They didn't look like they
would work at all. Other than these problems, the fire making
sequence was real, and lots of other aspects well portrayed. Hope
this has been useful.
Norm Kidder
Bob,
Saw the piece on reed flutes at primitiveways.com. Was wondering
how can you keep the holes you drill in the flute from splitting.
If the reed is seasoned there is no need to reinforce the holes.
I used a knife to cut the holes. If you use a drill bit make sure
it is sharp and drill the holes slow. You can also burn the holes
with a large nail held in a vise grip and heated red hot with
fire or a propane torch.
The picture seems to show some type of reinforcement added around
the circumference of each hole, what is this material?
You are seeing the edge of the holes (since the holes were knife
cut).
Bob Gillis
Thanks in advance for your reply.
Lance Stewart
Primitiveways;
I represent the National Paleolithic Society, Inc. We are about
to embark on a national membership drive via the web. I can't
tell you how much I enjoyed my visit to your site. I would really
like to speak to you about reprinting some of your stuff. Would
you please send me a phone number at which you can be reached
or give me a call on our toll free line at (888) 828-6188. You
can check us out at http://www.natlpaleo.org. There isn't much
in the way of content out there yet, but there is enough information
to at least give you an idea what we are about. I think our "articles"
link will be of particular interest to you. Hope to hear from
you soon.
Ken Jensen
Sir:
What kind of crystals do you use to create the light as described
on the web site. I am currently stationed at Eagle Base in Bosnia.
They are quartz.
Bob Gillis
Hello, William!
I just read your article on saunas in the Primitive Ways website.
It was fun to read, especially since I am Finnish.
Let me introduce myself: I'm Tuukka Kumpulainen, a primitive skills-enthusiast who lives in Tampere, Finland. I am the vice-president of the Finnish Society of Primitive Skills, a small group of people who strive to keep prehistorical skills and knowledge alive here in northern Europe.
I know a lot of Minnesotans are of Finnish origin, Are you one of them?
There was an error in your informative article that I thought you'd like to know: The old Finnish proverb about the sauna being the poor man's pharmacy was spelled really wrong; no one here in Finland would understand what "saun on koha apteet" means. It should be: sauna on koyhan apteekki. There are double dots (umlaut) on top of both the O and the A in the "koyhan"-word, I don't know if American keyboards have those letters.
Yours, Tuukka Kumpulainen
Finland
Terve Tuukka;
Thank you for checking out our primitiveways website. I was hoping
some native Finnish speakers would respond to the sauna article,
especially on my attempt with the Finnish words. I will see if
I can get the corrections made soon, and you are right about the
umlauts and American keyboards.
The people I know who speak Finnish learned from their grandparents. My brother recently hosted a Finnish exchange student who said the local folks really don't speak Finnish very well.
The community I grew up in was settled in the early part of the century by Finnish immigrants. Most of the kids I went to school with where 2nd generation Finnish-Americans. My own origin is a mixture of German, French, Polish, Austrian, and Luxenborger. (We have been in this country for a long time) Two of my brothers are married to Finnish-American girls, so now my family is partly Finnish.
The community has tried to preserve some parts of its heritage. There is an Annual Finnish Festival held every June. The Sisu Heritage foundation is trying to preserve some of the immigrants old homesteads. Check out the website http://www.embarrass.org/
I am so glad to hear there are people like yourself in Finland trying to keep the old prehistoric skills alive. I find great joy in learning and practicing the old ways. Can you tell me what is the Finnish word for birch bark crafts? A friend of my father gave us a woven birch bark back pack that his parents had made. Since then I have seen a few other woven birch bark items that I am told are Finnish in origin. I am planning on trying to replicate some of them.
Nakermiin
(Hope I got the greetings right!)
Bill Scherer
Well, Bill, you didn't get the greeting right, it's näkemiin, again with an umlaut ;-) I guess the Finnish language has evolved on its own in the US . . . that's cool!
The Finnish word for birch bark crafts is tuohityöt (an umlaut in the last 0, I'm starting to realize how weird our language really is) . Tuohi means birch bark and työt means 'works' or 'crafts'.
Cheers,
Tuukka
Hei!
"The Primitive Sauna" . . . . your story is interesting.
(Kertomuksesi on hyvin kiinnostava.) Do you speak Finnish?
Kalervo
Finland, Tampere
Terve;
Thank you for visiting the PrimitiveWays website. It is particularly
nice to know that real northern European Finns have checked out
the sauna article. Most of the details in there are from my own
memories and experiences growing up in a community of first and
second generation Finnish-Americans. Do you have the folk tale
of the famer and the devil there, or is that an Finnish-American
story?
I only know a few words of Finnish. The few remainding folks who
speak Finnish in my community are now quite elderly. Three years
ago my brother hosted a Finnish exchange student. He said the
locals did not speak Finnish very good.
The Finnish culture survives here in the customs, foods, the names
of places and people, and of course, the sauna. We have an annual
"Finnish-American Finnish Festival" every year. Check
out this website http://www.embarrass.org/
näkemiin
Bill Scherer
Greetings Norm;
I got your contact information from Dave Westcott. I have
plans to replicate Lovelock Cave-style tule duck decoys and he
said you would be a person to talk to. What I have done so far
is harvest tules and make a couple of prototypes based on your
instructions in both the Bulletin of Primitive Technology
and on the nativetech.org website. I figure I
will need to make about 10 before they come out well. Anyway,
I was wondering if I could telephone you some time to get additional
pointers and other insights into their construction.
I think these things are works of art and I would like to create
one for the shelf and possibly to give away for Christmas
gifts. I might even try hunting with them. I find
folks really like this primitive technoloy stuff and all my friends
want me to make them Basketmaker style atlatls now (I got into
making them last year).
By the way, I used to live in Kayenta, AZ where I worked
as a biologist and actually visited Broken Roof
Cave and Kin Biko before I knew their significance in Kidder
and Guernsey's work (are you related?).
Take care,
Chuck LaRue
Chuck, thanks for the inquiry, glad to
know there are folks out there who are taking advantage of the
website articles. You can call me at work. The duck
decoys do seem to be popular as decorations.
You ask if I'm related to A.V. Kidder, the noted archaeologist
of the Southwest. I've read of him, and seen photos, and
we do bear a family resemblance, but I checked his geneology and
we are both descended from James Kidder, who married in 1649 in
the Mass. Bay colony, but we are the spawn of different sons of
James. So the relationship is very distant, though
we share the same interests.
Look forward to talking to you, Norm
p.s. are you aware of the Winter Count Primitive Skills
Gathering in Arizona, the 3rd week of February? Dave Wescott
puts it on - about an hour south of Phoenix near Casa Grande.
I'll be there.
Hi,
I found your interesting website. The information is fantastic.
My son needs to make a fish trap like the kind they used in the
mid-west or western pioneer days in streams. In the Laura Ingalls
Wilder book they are studying, there is one they talk about that
they put under the waterfall to catch the larger fish. Anyway,
do you have any info on steps and materials to use to make a fish
trap like that? I did find one that is basket-like but no info
on how to make it.
Thank you very much,
Hildi
Hello Hildi;
There are a number of possible trap styles that could be used
at a waterfall. If you could send me the quote from the book,
I might be able to narrow it down. Otherwise, see if you can find
the book - "Indian Fishing, Early Methods on the Northwest
Coast", by Hilary Stewart, Univ of Washington Press, 1977.
Page113 has a picture of a trap below a waterfall. It catches
fish that try to jump up the fall, then fall back onto a stick
platform raised above the water. The trap is two sections of open
lattice set in a V shape so the fish can't get out. Each piece
of lattice is made from about 10 long straight sticks lashed to
3 or 4 cross pieces, each about 3 feet long. The long axis of
the V is across the stream. This is the trap most specific to
waterfalls.
Hope this helps,
Norm Kidder
|
|
and Plants |
and Tools |
Questions |
We hope the information on the PrimitiveWays website is both instructional and enjoyable. Understand that no warranty or guarantee is included. We expect adults to act responsibly and children to be supervised by a responsible adult. If you use the information on this site to create your own projects or if you try techniques described on PrimitiveWays, behave in accordance with applicable laws, and think about the sustainability of natural resources. Using tools or techniques described on PrimitiveWays can be dangerous with exposure to heavy, sharp or pointed objects, fire, stone tools and hazards present in outdoor settings. Without proper care and caution, or if done incorrectly, there is a risk of property damage, personal injury or even death. So, be advised: Anyone using any information provided on the PrimitiveWays website assumes responsibility for using proper care and caution to protect property, the life, health and safety of himself or herself and all others. He or she expressly assumes all risk of harm or damage to all persons or property proximately caused by the use of this information.
© PrimitiveWays 2016