|
|
and Plants |
and Tools |
|
Hey Dino!
I was reading your website on removing deer hooves: http://www.primitiveways.com/Removing_Deer_Hooves.html
I was wondering if it mattered how old the deer was. Does it need to dry out, or be fresh? My friend owns a deer processing place and could collect feet for me if I don't need them fresh.
I tried to remove hooves from a deer I found dead, and one came off easy, but those other wouldn't come off and tore. I was just wondering what your experience is on when to try to pull them off after death, and what your success rate was. How many get messed up vs how many come off correctly?
Thanks!!
Jehle F.
Hi Jehle;
Deer hooves are like your fingernail, in that it is held to your finger by connective tissue. When those tissues dry out, it will act like glue to hold the hooves onto the toe bone. It is best to remove the hooves when they are fresh and not when the deer legs have dried. You can try re-hydrating the dry deer legs in a bucket of water from the faucet for a few days. It might still take a lot of work removing the hooves even after you re-hydrate them, but it can be done. Or leave the dry deer legs in a bucket of creek or rain water for a few weeks. The deer legs will start to smell due to the decomposition process. This might loosen the deer hooves and make it easier to remove.
An alternative option is to have your friend freeze the deer legs for you. It's easier to thaw out frozen deer legs than trying to re-hydrate dried deer legs.
I suspect you could not remove the deer hooves from the dead deer because the legs started to dry out. Maybe, the one hoof that came off easily was still moist or the combination of moisture, bacteria and decomposition loosened the hoof from the toe bone.
Stay feral,
Dino Labiste
Wonderful response! Thank you so much for your time and insight!
Jehle F.
(Dino's response in blue, along with Roger's additional comments afterwards in italic)
Hi Dino,
I enjoyed the article called "The Miracle of Fire-by-Friction" on the PrimitiveWays website.
I have also pondered at length on the physical principles surrounding fire-by-friction. Here in Australia, Eucalypt species are endemic. There are some 1,000 of them, and you would be hard-pressed to find a landscape anywhere on our 7 million square kilometres that does not contain eucalypt.
Unfortunately, eucalypt (and I can’t claim to have tried all 1,000 species) does not cooperate with the friction fire-maker. The Australian aboriginal is reputed to have used eucalypt (using a eucalypt woomera on a crack in a fallen eucalypt log filled with dried kangaroo dung for instance). A woomera is a spear throwing device with a sharp edge, about 3 feet long.
I can't visualize twirling a 3 feet long eucalypt woomera in a crack of an eucalypt log. Was it the dart that was used instead? If yes, I also can't visualize twirling a long dart as a spindle.
I should have mentioned that the technique they used was the fire saw method. The size and weight of the woomera added to the power level that could be applied to the small contact area, and perhaps two people could apply the required downwards force and speed required. This produced a lot of heat, and although the eucalypt is uncooperative vis-a-vis producing suitable ember material, the kangaroo dung itself would “ember-up”.
But eucalypt (ie “gum” tree) forms a toffee-like char that will not ignite.
It's probably because of the aromatic oils that are found in eucalyptus trees. It's not quite the best characteristic for an ideal firing making wood. I believe the timber is also quite hard.
That is indeed the case.
The standard aboriginal method (they’ve been here 60,000 years) appeared to be the hand-drill method with a piece of Xanthorrhoea. (Australian Grass-Tree plant). That works a treat. The aboriginals were not familiar with the bow-drill method. Xanthorrhoea is a nice soft “classic” wood. There are other timbers that will work, but they tend to be few and far between for much of the Australian continent. If the goal was to enter any Australian landscape and produce stone-tooled fire, eucalypt needs to be factored in.
There is a reason why native (indigenous) people constantly used a certain wood or woods for fire making. After many generations of discovery and success, why switch to other woods that are too difficult to start a fire. I believe that western concepts of bushcraft and wilderness survival skills tend to be more on the idealistic concept of fire making, especially for fire-by-friction. The notion that "Anywhere I go, I should be able to make fire using any wood available." is not true. The indigenous concept was that fire making was part of everyday life. It wasn't meant for entertainment or to prove how fast you can create a fire in less than a minute. Indigenous fire kits were meticulously prepared ahead of time. Embers from camp fires were usually kept burning in native communities or villages of the past. Traditional fire making woods were sometime gathered along a trip and taken with them. Every wood is not a good fire making material. The various Australian aborigine groups have been in Australia for around 50,000 years and they have always had fire using their traditional fire making woods.
I agree completely. Like all societies, as they develop and advance, the accepted wisdom is the behaviour the masses follow. Xanthorrhoea wood (and a few others) would have been traded over hundreds of kilometres, and the “standard method” would have become almost a religious practice. In fact, the Aboriginal people are extremely spiritual, and codified every behaviour. As the longest continuous culture on Earth, it would have been a serious “sin” to break with accepted methods and behaviours. But somewhere along the track, someone did sin.
It intrigues me is that some genius somewhere, sometime, was the first to create the stunning innovation of fire-by-friction. He was probably killed for his trouble, or made a god. It is this spirit, the spirit of that innovator, that I respect, not those that follow rules previously lain down.
It seems to me that not much research has been done on fire-by-friction techniques in the modern era. As you say, there is any amount of material on the web demonstrating the techniques as currently understood. But we are surrounded in any environment with heaps of carboniferous material. And we know that friction (between two woods of any type) will produce high temperature. Wouldn’t it be great to be able to put those two aspects together in some new way, and indeed to be able to "Create fire anywhere from any wood available”?
It depends on how much energy you can expend, how much time you have and how much reliable material you can find.
So the Holy Grail for Australian friction-fire makers would be to develop a reliable method of producing an ember with eucalypt
(Or other woods)
I always believe in experimentation. Humans are a creative species and I welcome any new modern theories or methods on fire making.
Such a method would perhaps also work for any timber, anywhere in the world. But this requires a deeper understanding of the physics of ember production than I currently have.
I have noticed:
· Eucalypt dried at 60 degrees C for 7 days still will not produce an ember with the bow-drill.
· The punk from this process will take a flame with a cigarette lighter, but when extinguished, does not form an ember.
· Under x20 microscope, the char is conical spirals of burnt toffee.
· Persistence with the drill-press will ultimately produce an ember from eucalypt, but I would be dead before I could produce an ember in the field.
I have had the idea therefore to manufacture punk from a mixture of eucalypt wood powder and powdered eucalypt charcoal, use this punk to form the ember, but use the traditional methods (say the bow drill) to produce the heat required to ignite this punk material into an ember.
I have found that a 3:1 ratio of eucalypt dust to eucalypt charcoal (ignited by cigarette lighter, then the flame gently extinguished) formed a nice ember that grew enthusiastically. The ember burnt relatively cool, and was very sticky. (Charcoal alone is hopeless, it forms a hot ember and falls apart.)
If you are interested, I will keep you informed on how these experiments go. After 60,000 years, it would be satisfying to come up with a “general solution” that applied to pretty much any carboniferous material!
Yes, keep me informed on your findings.
For the bow-drill cordage, btw, I use a leaf from our indigenous cabbage-tree palm. It works great. Bend a green branch about the thickness of a finger slowly so as to produce a longitudinal split for an inch or so. Then break the stick from the bush. Post the knotted end of the leaf through the split. The other end of the leaf is also knotted, to help hold the leaf between the pinky and the ring finger. Then the thumb, and the first and second fingers are spare, and can be used to regulate the tension in the cordage. So, this end is not tied to the bow at all. The reason for all this jiggery-pokery is to minimize the need for length in the cordage (the leaves are only about 20” long), and to eliminate the need to tie cordage onto the bow, and at the “correct” tension.
Kind Regards,
Roger Y.
Hello, I found your contact information online at PrimitiveWays. I am working on a new exhibit opening at the Presidio in San Francisco next fall, 2014. Part of the exhibit will feature a display of the different building materials used by different people who have lived at the Presidio. We would like to display a bunch of tule as an example of how the local Native Americans made their homes and boats. I have collected a bunch of reeds and am now in the process of drying them out, but, I wanted to check in with you to ask if you have any suggestions on how to best dry the stems? They are now laid flat, individual stalks separated by an inch or so, indoors in a building that has heating most of the day but gets cold at night. The idea will be when they are dry to tie them in a bundle and display them in a large case.
I appreciate any suggestions you can offer about the drying process.
Thanks for your time and I look forward to hearing from you soon.
sincerely,
Rosemary H.
Hello Rosemary;
You are doing the drying process right. There should be some space between each tule stem. Do not dry them bundled up or bunched together. The inner tule in a bundle will not dry properly and will begin to mold. Be sure to completeley dry the tule before placing them in your exhibit to avoid mold.
Drying them indoors, even with indoor heating, might take some time. If you have a deadline, I would recommend drying the tule outdoors when the sun is out. Take the tule back indoors at night to keep it from getting wet due to the morning dew or fog.
Be aware that when the tule is completely dry, it can be brittle. When tying your tule into a bundle for your exhibit, do not cinch your wrap around the tule bundle too tight or you will bend and crack your tule. Go slow and tie your bundle tight enough so that it will not crimp your tule.
I hope this information is helpful.
Regards,
Dino Labiste
Hi Norm,
I'm wanting to make some instruments with kids. I've heard you make some elderberry flutes and such, and wondered if you had any tutorials or tips on working specifically with elderberry. How do you make the mouth piece, sound hole, etc? I've made some willow whistles by removing and replacing the bark before but haven't come up with a simple solution for elderberry yet. I know to use dead, dry elderberry and have a supply of that.
Appreciate your input,
Charles N.
Hi Charles,
Yes I do make elderberry whistles. I looked up an article I did many years ago, but it is not very complete (see www.primitiveways.com - California Indian Musical Instruments).
Briefly:
1. Check the cut end of the elderberry to make sure there is about 1/16th inch of wood around a larger pithy core. I use sticks about 3/8th to 1/2 inch in diameter and 3 to 6 inches long. Too little wood makes a fragile whistle, too much wood makes it hard to get to work.
2. Cut a "V" notch half way through the stick and about 1/3rd of the way down the stick, or at a leaf node if there is one.
3. With a sharp, thin knife blade, extend each 45 deg. cut down into the soft pithy core, being careful not to cut into the wood.
4. Using a stick with a double bevelled end or a slotted screw driver, remove the soft pithy core from each end, up to the knife cuts you made. Be very careful not to remove the pith under the V notch. Clean out the hollow ends until there is no soft material left. Bamboo skewers work pretty well for this. I measure from the end of the stick to the "V" notch hole, then hold the skewer so that I can't go in past the hole.
5. Once clean, I test by blowing into the whistle from each end, first uncovered, then with my finger over the other end. Sometimes a whistle works from all four positions, more often from one only if any. If a whistle works from one end when the other is covered, I heat some tar, and roll the end of the whistle in it until it is covered to make a permanent seal. If none of the options work, I go back and check the hole (called a fipple). The wood should be a cut of about 45 deg, and clean of pith. One common problem is that the inside tubes are not clean. The other issue is the angle of the remaining pith under the hole. It needs to direct the air flow so that it splits in half as it crosses the cut edge of wood. This usually means that the bump needs to be lowered a bit until the whistle works. The trickiest part of whistle making is this final tuning. If all the pith ends up being removed, I add some hot tar and shape it with a hot piece of coat hanger wire.
Good luck. Hope this helps.
Norm
I know this is out of time period, but how would you make paper with stone age tools and materials?
Nicholas W.
Hi Nicholas;
First, you have to ask yourself, "What am I going to use the paper for?" Is it for writing, painting, wrapping, clothing, etc.? I'm going to assume that you want the paper for writing, drawing or painting.
Paper could be created by using the bark of certain trees, like the thin layer of birch bark. The Australian aborigines painted on strips and sections of tree bark. People from Asia and some of the Pacific islands made items from the paper mulberry tree (Broussonetia papyrifera). It was a significant fiber crop in the history of paper. The bark was stripped, pounded and washed to create a paper-like material for clothing. The Polynesians painted and stamped designs on their "tapa". The pithy section of certain plant stalks can be gathered, mulched and sandwiched between two mats to flatten it. One mat is removed and the thin layer of mulched pith is allowed to dry into paper sheets.
Do some research into the Egyptian methods of making paper from papyrus. Also, research China's history on the ancient art of paper making.
Hope this helps,
Dino Labiste
It does. This is most appreciated! In answer to your question, I would use the said paper for all these things: writing, painting, drawing, or clothing etc. Have you ever tried?
Nicholas W.
Hi Nicholas;
> Have you ever tried?
I've produced custom, hand-made paper for gift cards. The material was recycled paper, which was turned into pulp, along with mulched raw plant material and dried, pressed plants. The pressed material was added to the paper mulch to create an artistic design element to the paper.
I've made paper out of the pithy section of papyrus and tule. Also, I've dabbled in making tapa. It's not easy getting a good amount of raw paper mulberry bark unless you live on one of the countries or islands where the resource is abundant.
There are books out there that can teach you how to make paper the old way. You'll learn more by doing the research yourself. Also, seek out someone who can actually show you the process.
Good luck on your project,
Dino Labiste
Hello,
I hope you don’t mind me contacting you. I work for a TV production company in Scotland, and I am researching for a new fishing series on the Discovery Network. I read with interest about the traditional Hawaiian method for catching fish using a poisonous plant, and I would love to find out more – specifically whether there is anyone left still practising fishing this way, or who is knowledgeable enough to demonstrate it.
We are due to film in Hawaii in just a few weeks’ time, and any contacts or advice you can share with me would be much appreciated.
Thank you and best wishes,
Flora Stewart
Series Researcher (Extreme Fisherman)
IWC Media
Hi Flora;
I'm the person who did the article about utilizing plant toxins for catching fish in the tidal pools of Hawaii, which was a traditional Polynesian fishing method before European contact. Unfortunately, I don't know any person that I can recommend that still uses that technique of fishing in Hawaii. Today, I think it is illegal to fish that way according to the United States Fish and Wildlife Service. Maybe you can find someone in Hawaii who can show you the plants and talk about it's uses for fishing.
Have you heard of a unique type of fishing along rocky shorelines in California called "poke pole fishing"? Fishermen use this technique to catch monkey-faced eels during low tide. I use this method of fishing whenever I have a craving for breaded monkey-face eel meat. It's lightly fried in a skillet. Very tastey! I've been meaning to write an article for our website on poke pole fishing.
Regards,
Dino Labiste
_____________
Hey There!
I hope this message finds you well. My name is Lande Yoosuf. I contacted you a few months ago through One Scribe Media for a project on the Discovery Channel.
I'm reaching out again because I currently work for Crybaby Media, a company that casts and develops shows for production companies as well as television networks.
We're currently working with another television network on a new idea and I wanted to see if perhaps you or anyone you know would be interested in applying.
NATIONWIDE CASTING CALL: SEEKING FATHERS THAT WANT TO TEACH THEIR SONS SURVIVAL SKILLS
A MAJOR CABLE NETWORK is casting a show about fathers that want to take their sons out to the woods for a life-altering experience. Do you want him to know how to live off of the land in case of a natural disaster? Do you think survival skills are essential for manhood and future heads of households? If you are well versed in survival skills, and would like your son to put down his video games or smart phone, apply for the casting.
Thanks for reading,
Lande Yoosuf
Crybaby Media
_____________
Hello;
Sorry to email you out of left field, but we ran across your information when we were doing research and thought we would reach out. My name is Kevin Lee and I'm an executive producer and owner of Tollbooth TV -- a small reality TV production company in Burbank. I've been the executive producer and showrunner for Jess James is a Dead Man on Spike, Growing Up Twisted on A&E and Murder on Spike. Here are a couple of links about my company and myself, so you can know that we are legit.
http://tbivision.com/news/2014/01/tinopolis-goes-into-business-with-lees-tollbooth/220962/
http://www.imdb.com/name/nm1643782/?ref_=fn_al_nm_5
We are casting for a new reality pilot about skilled trackers. This isn't a competition or game show. It'll be about real tracking experts doing what they do best.
I'm writing to you because I'm hoping that you could put the word out to trackers that you know . . . . or maybe even refer somebody that you think would be good for the show to me.
Thank you for your time!
Best Regards,
Kevin Lee
Tollbooth Group
_____________
Hi Dino,
My name is Molly Tom. I'm a Casting Associate with Leftfield Entertainment, a full scale television production company that creates a number of programs for various cable networks, such as The History Channel, Discovery, A&E and National Geographic - including the international smash hit, "Pawn Stars."
I found the "Primitive Ways" website while searching primitive skills experts, and I thought I would reach out to you about a great opportunity that might be a good fit for you or someone you know.
We’re currently developing an exciting new series with a major cable network that is going to ask the strongest self reliance experts in the world a very simple question - how long could you survive alone in the wild? We're looking for folks who want to prove that they have the skills, determination, willpower and mental strength to take part in the ultimate survival experience. No gimmicks. No film crew. No games. The series will feature a group of self-reliance experts as they battle the elements and fight to survive on their terms with nothing but what they can carry on their backs. Their mission: to survive alone in the wild and document their journey every step of the way. If this seems like something you would be interested in, we'd love to hear from you. Likewise, if you know someone else who might be right for this, please let us know. Any help spreading the word would be greatly appreciated.
I've included our casting notice, but if you have any questions or would like more information, please don't hesitate to email me us or call us directly.
Thank you in advance and I look forward to hearing from you soon!
Best,
Molly Tom
Casting Associate
Leftfield Entertainment
_____________
Dear Dino,
My name is Christina Kindwall and I am a Development Director with a television production company in Seattle called Screaming Flea Productions. We are a leader in creating original television documentary programming for major cable networks such as National Geographic, A&E, HGTV, Animal Planet, Discovery Channel and the History Channel just to name a few of our clients.
In fact, a program that I developed and am very proud of has just premiered on the National Geographic Channel earlier this month. It is called The Legend of Mick Dodge and profiles the life of a mountain man who lives deep in the Hoh Rainforest of the Olympic Mountains in Washington State.
I have reached out to you because I am developing a new television series concept that profiles those embracing a Stone Age lifestyle –whether it be for a day, month or a lifetime. I am extremely impressed with what you do and have been told by others in the community that you are one of the most advanced experts.
I would like a chance to speak with you about the direction of the project I would like to develop and how we could perhaps act as a resource for one another . . . . there is a message in what you do that I think would resonate with the masses and could touch lives of many, if packaged correctly.
I will make myself available if you have time this evening, tomorrow or this weekend for a call. Please let me know how best to reach you?
Thank you very much for your time and consideration.
Sincerely,
Christina Kindwall
Director of Development
Screaming Flea Productions, Inc.
_____________
Greetings Dino!
I hope this message finds you well.
My name is Lande Yoosuf and I am a Casting Producer working on a casting call through my company One Scribe Media. We’re looking for folks that are bushcraft, survival or primitive skills experts.
I found you online and wanted to know if you or anyone you know would be a good fit for this opportunity. We are seeking folks with primitive or survival skills to host a show. It’s an educational program that basically walks the audience through different survival scenarios. We want someone that is engaging, knowledgeable and thinks on their feet.
Please let me know if you are interested. Is there a number I can call you from? Or you can call or e-mail me. I also attached a copy of the flyer for your reference.
Thanks for reading. Looking forward to hearing from you!
Lande Yoosuf
One Scribe Media
_____________
Hello there, I am a reality TV producer and looking for an interesting piece of talent who has experience in both cooking and survival/prepping skills. In theory, this person would be able to cook a meal using the elements left from a post-apocalyptic world OR be dropped off in the wild and know exactly what fish/trees/animals are edible and which are poisonous. I know this is a very random search, but I do feel this Guy is out there. Looking for someone in their early 30\'s-mid 50\'s. If you or someone you know fits the bill, please email me.
Jake Rosen
crybaby media
www.crybaby-media.com
_____________
Hi Folks,
I'm a fan of the PrimitiveWays website and I'd like to extend an invitation to contribute projects to the MAKE website. MAKE is a DIY magazine and website. We also produce Maker Faire. While we emphasize modern technology, we also include more traditional technologies and I'd like to see more primitive technology represented, too.
If there is interest, let's talk.
Thanks,
Stett Holbrook
Senior Editor, MAKE
_____________
Hello Dino!
My name is Erin, and I work with National Geographic Television. We are currently researching primitive living skills and talking to people who live "off-the-grid", subsistence lifestyles, and I came across PrimitiveWays.com. My colleague just got back from Earthskills Rendezvous, and met some really incredible people, but I wanted to reach out to you as well. I'm hoping that you might have some ideas of folks to speak with - people who are truly living off the land, either in shorter bursts, or year round. Any thoughts and ideas would be hugely appreciated!!
Many thanks,
Erin Krozek
Producer
National Geographic Television
_____________
Dear Dino, Bob, Richard, Norm, Chuck, Ken & Susan --
I'm an LA-based development executive currently looking for candidates to appear in Discovery's Naked and Afraid: http://dsc.discovery.com/tv-shows/naked-and-afraid/about-the-show/about-the-show.htm I've also included a casting release as well for your review.
I was hoping you could help me reach out to your staff, subscribers and students by forwarding my email or including our info in your newsletter. Anyone interested (you too!) can contact me directly. E-mail is always the fastest way to reach me.
I'm happy to speak with you further if you have any questions regarding the matter. Please note my number below. I appreciate your time and thank you so much in advance for your help!
Best,
Ivette García Dávila
Director of Development
Metal Flowers Media, LLC
Stop and smell the reality.
Hello Ivette;
Your show sounds interesting and intriguing. Although, I find reality shows more on the entertainment side rather than depicting true life survival situations. But, these shows do expose human behavior when under extreme stress. It's interesting to see the interaction and relationship between civilized, urban humans as they cope with gender differences, personalities, the wilderness, animals, plants, the weather and basic human needs.
I'd apply to your show just to enjoy the experience, but you are looking for a certain age range in your candidates. I'm not sure you are looking for an older participant.
I'll promote your casting for the show on our website. Hopefully, you'll get some people who want to apply.
Regards,
Dino Labiste
PrimitiveWays.com
Hi Dino,
We could possibly be interested in an older wilderness survivalist! You are only as old as you feel right?!?
I would love to have a quick chat to get to know you a little better. What is the best number to reach you?
Thanks,
Hilary Manners
Metal Flowers Media, LLC
Stop and smell the reality.
_____________
Hi Dino,
I am a producer on a TV show titled, Extreme Cuisine. We are exploring the extreme/unusual foods of the Pacific Northwest right now. Would really appreciate any info on edible Kelp in that region. Could we possibly do a story where we go out harvesting them and then come back and cook something?
Attached, please find a sheet on our show. Would appreciate any information.
Thanks!
Roma
Hello Roma;
Extreme Cuisine is an interesting show. Jeff Corwin has a fun job of tasting exotic foods all over the world.
In the Bay Area of California, we have a diverse ethnic population from many corners of the globe. The smells and taste of all the different ethnic foods make the Bay Area a great place to live.
There are a variety of edible marine algae, seaweed and kelp in Northern California. The time to gather seaweed varies, but usually it is from March to July. Seaweeds are as seasonal in their growth patterns as land plants. Seaweeds grow in response to the increased sunshine filtering down to them in spring and summer, and die back when the days grow short in late autumn.
The choicest edible kelp harvested in Northern California are:
1. California Nori (Porphyra perforata)
2. California Kombu (Laminaria digitata)
3. California Wakame (Alaria marginata)
4. Bull whip kelp (Nereocystis luetkeana)
They are easiest to gather at low tides. Some seaweed grow at the high intertidal zone while others grow in the lowest intertidal zone, which requires a wetsuit and extreme low tides for harvesting.
Other edible species are Sister Sarah (Cystoseira osmundacea), Green Nori (Enteromorpha intestinalis), Ogo (Gracilaria verrucosa) and Sea Lettuce (Ulva lactuca).
There is another seaweed that is also edible and that is the California Sea Palm (Postelsia palmaeformis). In 1984, it became illegal to gather California Sea Palms because the plants were under too much harvesting pressure. Hopefully, these restrictions will help the Sea Palms return to their former numbers.
I hope this information helps you with your show about Pacific Northwest marine cuisine.
Let me know if you have any other questions concerning seaweeds and I'll try and help you as best as I can.
Regards,
Dino Labiste
Hi there,
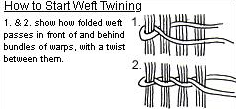
I was referred to your site on how to make a rabbit blanket by a member of my rabbit group on Facebook. We all do not understand step 13 . . . . the twining part. It is not clear as to what exactly we are supposed to do.
Is there any chance you could clarify for us what exactly you mean. We stopped short of wanting to weave, but you specify not to do that. Is there any chance of a video?
Thank you so much for your help,
Claudia
I hope the illustration will help you.
Sincerely,
Bob Gillis
Hi Dino,
My name is Paul. I was in the airport a few days ago and I met someone who told me about the PrimitiveWays website, So, I looked it up.
I live in Molokai and I was wondering if you ever met or heard of Paul Elia from there. He was a Hawaiian cultural artist and he used to sell stuff in downtown Kaunakakai. He passed away in the past year or so.
I'm Caucasian, but I like Hawaiian/multicultural skills and stuff. My wife is from the Philippines and I love how they improvise over there. It's quite remarkable. It reminds me of the "primitive ways" that you guys write about and study. I actually don't think of them as primitive because they were all high tech advances at their given times.
Well, I was just writing off a few emails. I thought I would try to connect. I thought it was unusual that I was talking about atlatls at the airport terminal.
Paul F.
Aloha Paul;
Welome to our PrimitiveWays.com website (http://primitiveways.com/). It's nice to hear from interested people who have visited our internet site.
Our goal is to share with people the technology of the past, which links everyone to their prehistory and binds us together as human beings, We don't consider the word "primitve" as pejorative, but rather as being the "first" skills of humanity. Homo sapiens are a very creative species. We have adapted and lived in every environment of the world. It's fascinating to learn about the past technologies that have given birth to our civilization today.
I have not met Mr. Paul Elia, but I'm sure he would have been an interesting person to "talk story" about Hawaiian culture.
Stay feral,
Dino Labiste
"Knowledge is not complete until it is passed on."
Hello, I've just started trying the bowdrill, but with no success. I can't even get smoke. I apply (what I think anyway) the right amount of pressure and go slower in the beginning to warm up the board. Both the ends of the spindle are polished, which I've heard is from lack of pressure. I'm sorry I don't know what type of wood the board is or the spindle. I know that doesn't help you out very much but, I would love any advice you could give.
Respectfully,
David K.
Hi David;
There is not much information to go by other than what you told me. It could be the type of wood you are using. Try scratching the hearthboard wood and the spindle wood with your fingernail. If you can scratch or dent it, it's a good start. I like to use soft wood on soft wood. You may be lacking in downward pressure. If you are not getting smoke, then you need to press down harder on your bearing block or whatever you are using for your hand hold. Also, increase the sawing motion of your bow. Utilize the whole length of the bowstring. The two factors for generating friction are spindle rotation and downward pressure.
Good luck on your fire making efforts,
Dino Labiste
Okay, the fireboard is way too hard, but the spindle is okay. What kind of wood do you suggest I use for the fireboard? I live in Ohio. Thanks for taking the time to reply. :)
Get a hold of some cedar wood. If you can't find a dead cedar branch in the wilderness, go to your local lumber store. Cottonwood will also work. Do the fingernail test and experiment with any other wood you can find. I would avoid the conifers.
Good luck,
Dino Labiste
I think I have cedar. I'll give it a try and let you know how it works. Thanks. :)
David K.
Some words of advice:
1. The thickness of your hearthboard should be at least 1/2" thick. Too thin and you'll bore through the heardboard very fast before you get an ember. You also don't want your hearthboard to be too thick. When you get the wood warmed up by going slow in the beginning, pick up your sawing pace and apply a good amount of downward pressure.
2. Create a wide V-shaped notch. Don't make it too narrow. Your dust should be dropping into the notch area and not swirling around the top of the hole on the hearthboard. Be sure to have the cut of your notch go at least halfway into the spindle hole.
3. Accumulate your powder in your notch before you start to go faster. The dust should be as fine as flour. If your dust starts to pack up in the notch and you still haven't got an ember, take a thin twig and poke into the dust to create more air pockets. A key factor for ignition is to also get oxygen into the mix.
3. More downward pressure and faster bowing movements during the optimum period of ignition.
Success in fire-by-friction is not only proper technique, but also being aware of the process and making adjustments accordingly. If the spindle is binding, create another notch hole. If the cordage is slipping, push down on the cord with your thumb to tighten the tension. If your spindle is sliding out of the hole, keep the spindle in an upright position and don't cant the spindle. As you execute the bow drill method, your bow, bearing block, spindle, hearthboard and you should act as one unit. Your wrist is connected to your shin, your spindle is seated into the bearing block, your foot is keeping the hearthboard stable, your whole arm is moving the bow in a level position, etc.
Remember to use the three Ps: Practice, Persistence and Patience. With the correct approach, this saying should ring true: "Where there is smoke, there should be fire." Good luck!
Nameste,
Dino Labiste
"Knowledge without experience is just information."
Hi!
I have got a large red deer antler and I would like to cut it and use it for
1. Presure flaker for knapping
2. A billett for knapping
3. A handle for a knife blade, just inserting tange into pithe
Would like guidance on where to cut the antler to get the best parts, as it is quite big and have a choice of what to use. Never done anything like this before. New to bushcraft, so don’t want to ruin the antler by cutting in wrong place (with hack saw I believe is best).
Any help greatly appreciated and any other suggestions? Can send photo files.
Cheers,
Phil O.
Sorry, Phil, I don't know what happened to the photos you sent via e-mail. I did not receive them.
As far as cutting up the antler, find the straightest tine on the antler to use as a pressure flaker. The billet will come from the crown area and further up the antler for a handle. You'll have to grind off any knobby area to create a smoothed surface billet. Round out the knapping end of your billet. You can use any of the tine parts for a knife handle.
Good luck on your project. Sometimes you'll have to just "do it" and see if it works. Making mistakes are part of the learning process in bushcraft. You learn by doing.
Aloha,
Dino Labiste
"Knowledge learned is knowledge gained."
Hello! Great information on your web site, thank you for hosting it.
I'm looking for natural dyeing (pigmenting) methods for reed that I will use in making baskets. One of the problems of dyeing reed is that the colors run when you're soaking the reed, and working the basket wet. Any thoughts on how I might solve this problem?
Anna B.
Hello Anna;
There are different botanical families of "reed", like the grass family (Poaceae) and the sedge family (Cyperaceae). Do you know the scientific name of the reed you are using? The outer coating on most reeds are waterproof, which becomes a problem when using dyes. If you don't need the outer coating, remove it and you should be able to dye the material.
Regards,
Dino Labiste
In this case (creating Cherokee double-wall-style baskets), we're using Asian commercially-prepared reed that is fully stripped to the inner portions only. I'm finding that, when we buy dyed reed, it runs terribly while working. Just curious if you had any suggestions for preparing the reed to reduce this.
Anna B.
Hello Anna;
Are you splitting them again to get the appropriate width for your basket or are using the material "as is"? I cannot see what you have other than your limited text description of the material. Are you doing any processing after you get the reed, If yes, what are you doing?
Regards,
Dino L.
The processed reed comes in a wide variety of sizes, so we do not have to split it. In this application we use round reed that receives no further processing once we get it. It looks like the example here: http://tinyurl.com/bh5auf3 The reed is free of any chemical residue to the best of my knowledge.
I'm assuming our suppliers use chemical dyes on the colored reeds. I've tried soaking in salt water, which helps a bit, but still runs. http://www.basketmakerscatalog.com/reed/dyedreed.htm
My teacher has learned from Choctaw and Cherokee basket makers, but has used only commercial dyes. I'm looking to use things like oak gall and clay, as they would be ample in supply and native to the area. I am hoping to use honeysuckle vine some day, but extended drought is causing problems in securing an ample amount.
By the way, thank you for bearing with my questions and poor explanations.
Anna B.
Hello Anna;
It does help when there is more information to comment on. Thank you for the added explanation. Round reed does tend to crack easily when used dry, especially when you put 90 degree angles or extreme twist and bends in the reed. Most of the round reed is made from rattan. To make it more flexible and to keep it from cracking, soak the reed in hot water for about 5 miutes. Don't use boiling water. If you can stick your hand in the hot water without scalding your hand, the temperature is just right. After soaking the reed in the hot water, you should be able to bend the reed without cracking it. Don't over soak the reeds longer than 5 minutes. Most people who refinish or make cane chairs use round reed or split round reed. Check out websites that talk about how to redo cane chairs. They might have more information on how to work with round reed.
> I'm looking to use things like oak gall and clay, as they would be ample in supply and native to the area.
Have you looked at my article on how to create a black dye from oak gall? Here is the link on PrimitiveWays.com.
http://www.primitiveways.com/black_dye.html
Kwa upande joto,
Dino Labiste
"Learning is forever."
Hi, I'm a 9th grader at Punahou School in Honolulu, Hawaii. I have to do a project for my Hawaiian Culture class and decided to make a Hawaiian knee drum. I have almost all of the materials except for the drum head. I know on your webpage (http://www.primitiveways.com/puniu.html) you used shark skin. I also know that you can also use kala skin (Unicorn fish). So the past few weeks I have been spear fishing and tried to get one. Unfortunately, I haven't had any luck. I was wondering how did you get the shark skin you used to make your Hawaiian knee drum? Did you catch a shark or acquire it from somewhere? Also, are there any other skins I can use for the drum that will be somewhat easier to get?
For the project we are allowed to receive help from other teachers. If you live in Hawaii or know other people, who can help and teach me to make a Hawaiian knee drum, I would appreciate it very much.
Mahalo,
Tyler D.
Aloha Tyler;
I live on the Mainland, so I cannot get together and help you with your Hawaiian knee drum project. In my area, there are seafood markets along the coast that sell shark meat to the public. When I was making the Hawaiian knee drum (puniu) awhile back, I had purchased some shark meat primarily for the skin. I did consume the shark meat. Today, I don't advocate the killing of sharks for food or any by-products. Scientists currently realize that sharks play a vital role in the intricate balance that makes up the ecosystem of the ocean. Modern fishing practices, such as long-lining, and new demand for shark fins have decimated shark populations around the world. Add to this the fact that sharks come to sexual maturity relatively late in life and have small litters when they do give birth. Generally, the catch rate for sharks has been twice the birth rate in recent years. Not a good combination. Yet the truth is that sharks are a vital link in the ocean food chain. When shark populations decline sharply, the results can be dramatic, upsetting the balance of the oceans and producing unintended consequences with effects that can reach around the globe.
That said, here are your options for acquiring the material for the drum head:
1) Go to Tamashiro Market to buy kala (Acanthurus unicornis) fish. The store is located on the outskirts of Honolulu, near Kalihi. Their address is 802 North King Street. Call before going down to the market to inqurie if they have any kala for sale. It depends on the catch of the day. Sometimes they have frozen kala. Their phone number is (808) 841-804.
To process the kala skin, cut off the head and remove the fins around the body of the fish. Don't cut into the main body of the skin. Carefully peel off the skin from the meat. If you run into any areas that won't come off easily, use a dull knife to remove the skin. Do not cut the skin. Your fish should be large enough to cover the coconut opening for your knee drum. One side of the fish skin should be adequate. You can remove the other side of the skin and you'll have a second drum head. When you've taken off the kala skin, use a butter knife, held at a 90 degree angle, and scrape off all of the adhering meat on the underside of the skin. Wash it clean with water. You can immediately fasten the kala skin to your coconut shell with cordage. If you plan to wait awhile, dry it out in the sun. When you are ready to use it, soak the skin in water until it is pliable again.
2) You can use deer rawhide or goat rawhide. If you know someone who hunts deer or butcher goats, ask them for the hide. Remove any meat, membrane and hair from the hide. You can also purchase rawhide through the internet.
If you want help, contact a hula halau (hula school) in your local area. One of the projects that a hula student might have to do is make a puniu. Someone at the halau can give you information on where to find a drum head for the puniu.
Good luck on your Hawaiian knee drum project. Let me know how it turns out.
Regards,
Dino Labiste
Hi Dino;
My pine pitch is the usual sap, charcoal and wax mixture. I haven’t tried dung yet. Is there any more info out there about making pine pitch less brittle?
Bruce W.
Hi Bruce;
The only mixture I now use is 1/2 pine resin and 1/2 powdered charcoal with bees wax mixed in to make it less brittle. The amount of bees wax I add in is subjective. I add in enough bees wax for what I need the pine pitch mixture for. I have heard of using some type of latex substance, but I have not tested any other additive to my current mixture.
I had thought of experimenting with dogbane sap, but I did not get around to it. In Hawaii, a latex-like substance (white sap) from the breadfruit tree was used as a filler and adhesive. I've handled it before and it is definitely very sticky. When it dries, the breadfruit sap has the consistency of dry latex.
Awhile back, I used deer dung instead of the bees wax, but the overall pine pitch mixture was still brittle for my needs. If you don't have deer dung, any dry herbivore scat will do. The plant fibers from the scat acts like fiberglass and helps to bind the pine resin and charcoal mixture together. Finely chopped up grass added to the mixture will also work. A friend, by the name of Rob Withrow, told me that a good strong epoxy-like mixture can be made from a blend of pine pitch resin and deer or rabbit scat. The ratio is one to one. Only a very small amount of powdered charcoal dust is added.
Regards,
Dino Labiste
Hi Dino,
Logic tells me that experimentation and good handrill technique should allow a person to use the two stick fire board along with the hand drill to get a coal. I've never tried this. Have you or any other primitive skills people you know used this method and what have their experiences been with it if they have?
Thanks alot.
Regards,
Eric W.
Brampton, Ontario,
Canada
Hello Eric;
I have successfully gotten a coal from the two stick fire board and hand drill method. Like any good fire hearthboard, in order to get a ember, you have to have the right type of wood. Hardwoods, like oak, ash, hickory, etc. (most dicot flowering trees), are difficult to achieve a lighted ember through the hand drill method.
The only reason for using the two stick fire hearthboard is due to the unavailability of finding wood that is wide enough to accommodate the diameter of your spindle tip. Also, by making two pilot holes side by side on the two stick hearthboard, you don't have to create a side notch for your char dust to fall into. I recall a bundle of cottonwood sticks that I used once which had a slight bend to one of the sticks. My char fell through the crack, but I created a lighted ember that dropped through the crack and deposited on the ground.
Check out the two articles on the PrimitiveWays website concerning the two stick hearthboard and hand drill method:
http://www.primitiveways.com/two-stick-hearthboard.html
http://www.primitiveways.com/hearthboards.html
> Logic tells me that experimentation and good handrill technique should allow a person to use
> the two stick fire board along with the hand drill to get a coal. I've never tried this.
Thinking about it is great for ideas, but doing it is even better. Experiment and let your curiosity (and logic) guide you through all the mistakes and failures. The fun part is implementing it and learning through the "process of doing".
Good luck on your pyro endeavors,
Dino Labiste
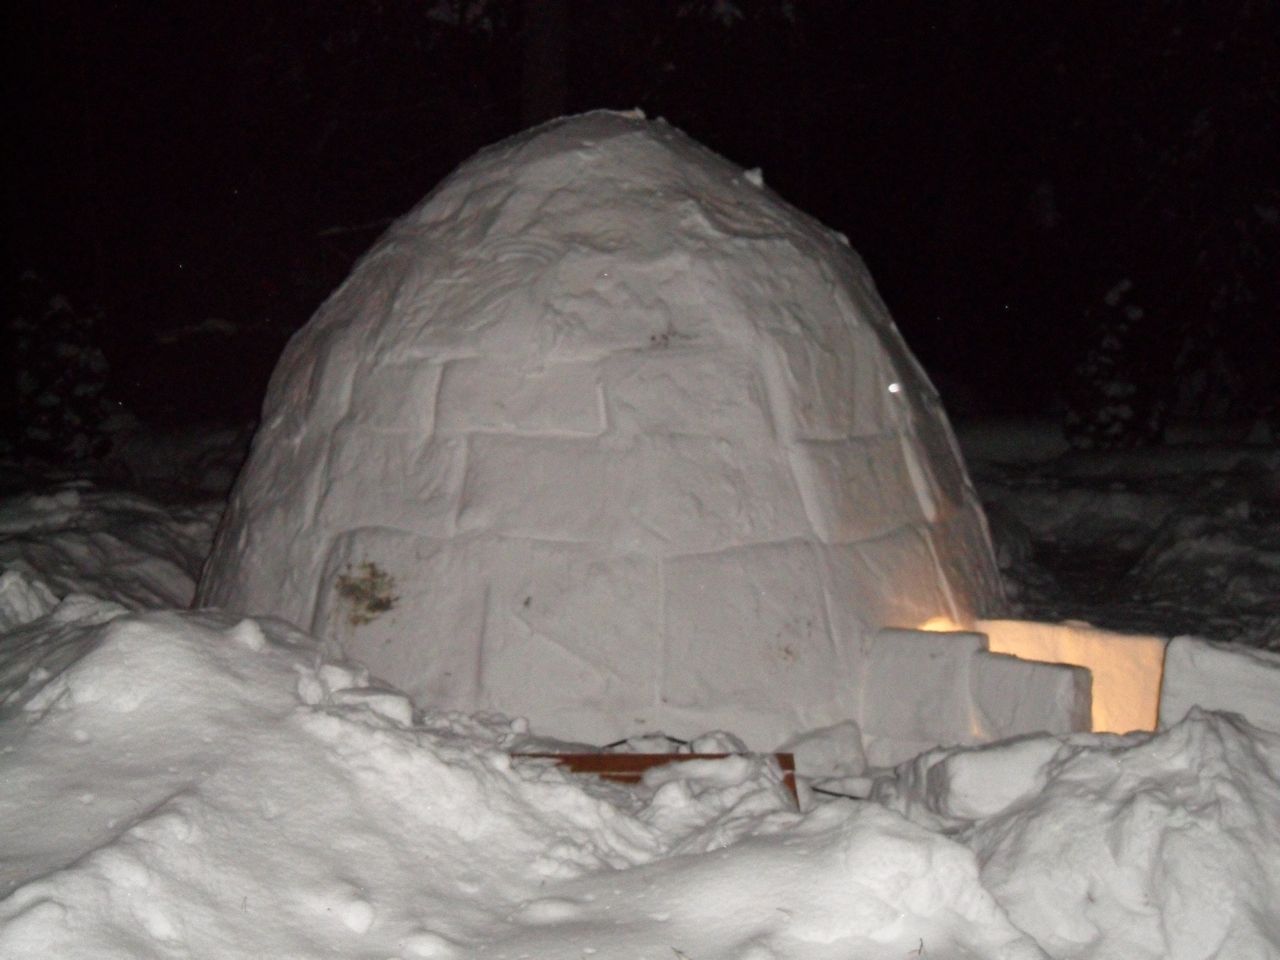
Dear Susan,
Thanks ever so much for posting your igloo construction instructions regarding the block shapes at different levels and bevel angles. Two days ago I was about to give up being only 10 or so blocks from completion. However, then I re-read your article again (with practical experience this time) and this gave me courage to try one more time.
The two sources that I used was the 1949 NFB film by Wilkinson, and you article at: http://www.primitiveways.com/igloo.html
Two days ago I finished the entrance tunnel. So, now it is completed.
The igloo is 2.4 meters (8 feet) from floor to ceiling, and its inner diameter is 3 meters (about 10 feet). Tools were a carpenter's saw for cutting blocks, a plastic shovel for cleaning up the excess snow around a "cutting field", a 4' x 4' piece of plywood to stamp down the powder snow, and a piece of cardboard so I could cut the snow with the saw in an identical manner every time to produce similar sized blocks (about 370 square feet of snow was stamped down with 4' x 4' plywood board to make all the blocks). The larger blocks were 2' x 2' in size and the smaller ones about 18' x 24'.
Your image with the contact points helped very much in understanding how to eliminate block rotation. I take it that your contact point picture below is showing the blocks from the outside looking in. This since I noticed that when I placed contact point A, not over the entire length of the edge, but rather when contact occurred at the "towards the outside" edge, block rotation was eliminated.
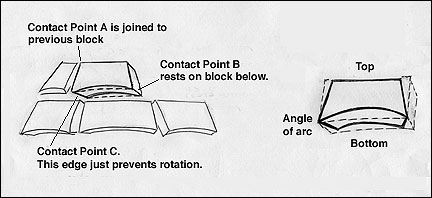
I also had to use a slightly different vertical bevelling than what is shown in the following picture:
Instead of cutting to the center in a vertical manner, I cut vertically, but bevelled the preceding block so that the new block could lean against it.
It was a nightmare (took 4 days to build) but the next igloo (if I ever do this again) should hopefully go faster.
Thanks for valuable information you have supplied. You yourself mention that there isn't very much literature on preferred block shape, and it seems that your website is the best source available!
We live in southern Finland and there has been an abundance of snow this year.
Thanks again,
Tom
Hello Tom,
Thank you for such a nice letter. I was delighted to see your photos. The igloo looks great.
In response to your question about the perspective of the drawing of the blocks, yes, it is from the outside. As for the angle of the preceding block, I understand what you are saying. I do the same thing myself, but it doesn't take much of an angle. Sometimes I just don't trim it as much. Those details are hard to show and hard to explain. Maybe your letter will help someone else with the details.
If it takes too long to make a 10 foot igloo, you might want to scale it down a little. If you build it 8 feet in diameter, you can dig down into the floor, expanding it as you go until it is 10 feet wide at the base. That will help you finish it sooner. Also, everything you learned will make it easier next time... besides there may be more hands eager to help once others see what can be done with packed snow!
Now, I have a question. Have you slept in it yet?
Best wishes to you and your family,
Susan
Hello Dino;
I love your site! I was wondering what you use oak galls for? I saw it on your calendar to gather them.
Richel
Hello Richel;
Thank you for your nice comment about PrimitiveWays.
Oak galls contain a high concentration of tannic acid. It's makes an excellent dye solution.
The early European settlers, that came from Spain and Mexico, made writing inks from oak galls when they had difficulty getting supplies shipped to California. The oak galls were powdered and mixed with water. Rusted iron was added to the solution to render a dark brown ink for writing with quill pens.
Some people, today, make toys that sometimes represent a deer out of an oak gall. Four short twigs are pushed into one side of the oak gall to delineate the deer legs. Two short forked twigs are poked into the top side of one end of the oak gall to portray the antlers.
I can't quite remember it's medical uses, but the tannic acid from oak galls was utilized for medicine.
Regards,
Dino Labiste
Hi Richel;
I did a Google search on "medicinal uses of oak galls" and came up with this webpage:
http://www.ehow.com/about_5398760_oak-galls-used.html
Regards,
Dino Labiste
Hello Dick,
Question: How do you keep embers burning while traveling to another campsite?
Best Regards,
Lance
There are lots of materials that can maintain a glowing ember. The technique consists of maintaining an adequate supply of dry, finely divided plant material plus a limited supply of air. Insufficient air or fuel and the glowing ember dies. Too much air and the ember burns too quickly. Practice, practice, practice. For the fuel: I have used dry fungus such as tinder fungus from a birch tree, dry powdered rotten wood, inner part of an agave stalk, dry crushed mugwort leaves. Put a large amount of the material in some sort of a container that will limit the air flow.
Hope this answers your question.
Dick
Hello Dino;
I am interested in doing a Imu pit oven, I've done loads of research and read your article about it about 3 times. I just had a couple things to clarify that I haven't been able to figure out. I live in Uganda, that’s in east Africa. I am unsure of the stones to use. We have a pumice here, but it's cut into pieces that are rather small. The Nile river is really close. I can easily go down and get smooth round stones. I don’t know what the best option is.
Secondly, I am wondering how to season the pig. I am going to do a whole pig. From the research that I have done, it seems all you do is rub salt all over. I did stumble across a recipe with tara and coconut cream with brown sugar. Sounds tempting. Any help would be much appreciated if you have the time.
Nathan
Hello Nathan;
Don't use pumice stones. If you have basalt stones, that would be better to use. Here is a suggestion on the smooth round stones in the Nile river, since I don't know what type of stones you have. Gather 4 similar Nile river stones and heat them in an open pit fire. Blaze them until they are red hot. If they break (or possibly exploded due to trapped moisture in the stone), then don't use them. If they remain intact after your intensive firing, they might be good. The main thing is that the rocks retain their heat during the cooking process. Experiment by cooking a small chicken in a small imu using the Nile river stones to see if they will work.
> It seems all you do is rub salt all over.
If you do use salt, don't use a lot of salt. Use common sense. If you rub a lot of salt, the pig will be very salty in taste. I don't use any salt during my imu cooking. Your guests can always season the cooked pork afterwards with salt according to their taste.
> I did stumble across a recipe with tara? and coconut cream with brown sugar.
I am not familiar with "tara". If you are unsure about what seasoning to use, experiment with a small portion of meat, like a small poultry or a pork butt. Cook it in a small underground oven and taste the results.
Have fun with your imu cooking.
Regards,
Dino Labiste
Hello, my name is Brett and I was looking at the PrimitiveWays website and you seemed like the right person to ask this question to. What did primitive people cook out of? And How do you make it?
Thanks for your time,
Brett
Brett, when you say "cook out of", I assume you mean cooking in a pot before metal (6,000 BP) or pottery (8,000 BP). Up til the late 1700's in California, people cooked in water tight baskets. They used hot rocks which they rinsed, then stirred inside the basket with the food to heat it. If the rocks are glowing red, about three rocks will boil water this way. In the Pacific Northwest, the people made bent wood boxes which would hold water. They also used hot rocks to boil it. A third container was rawhide bags filled with food and water and hot rocks. People in southeast Asia could boil water next to the fire in green bamboo sections with the top split off. In south America and Africa, gourd boils were used. Coconut and ostrich egg shells were also used as containers. Finally, burned out wooden bowls could be used. All these require the stone boiling technique. Making water tight baskets and bentwood boxes is a very precise and time consuming art. Having gourds was such a blessing, that the ancient Pre-Inca of Peru valued gourds above pottery and buried gourd bowls on the chests of royalty and priests. Sometimes tightly made African baskets can be made water tight by soaking overnight, then cooking oatmeal in them. The pasty oatmeal plugs up the holes.
Good luck and I hope this answers your question,
Norm Kidder
(additional response from Sue Labiste)
Hello Brett,
I read Norm's response to you and thought it was pretty complete. I thought you might be interested to know that sometimes the "rawhide" used to cook in was the skin still on the animal. I've read of hot rocks being used inside the internal cavity of marmonts as a means of cooking. The skin itself becomes the rawhide bag.
If you want to try some other ways of cooking primitively . . . . ones that do not require a container, you could try some of these ideas:
Pit roast or Hawaiian Imu oven: this is a pit, often lined with rock. A fire is lit and allowed to burn hot for a few hours until only coals remain. Some cultures removed the coals and some didn't, but all seem to add vegetation for moisture (steam). Then the food goes in. A new layer of greens is added to protect the food as the whole thing is covered with earth. The oven is left to cook the food. The cook time depends on the volume and type of food. You find this technique throughout the world with some cultural variation. California Indians often used this method. The food tastes great this way.
Cooking directly on the coals: When coals are still red hot (not white and ashy) you can broil meat/fish directly on the coals. Try it with some tri-tip the next time you do a barbecue.
Spits: We've all done hot dogs this way. Fish is particularly nice if you keep it just off to the leeward side and you add alder chips to create a smoky flavor. This is the traditional way to do Pacific Coast salmon. The idea is to cook it slowly, not hold it directly over the fire. The spit sticks are upright, slanted toward the fire, but not close enough to burn the sticks.
Have fun cooking,
Sue Labiste
Dino;
How might the indigenous groups that lived along the coast avoided shellfish poisoning? Is there traditional wisdom that dictated when to eat (or not to eat), or a taste test? What about treatment?
Inquiring minds want to know, since the quarantine is in force now [July] by law, but not historically.
Thank you,
Ginger B.
Hi Ginger;
I have not read any research information concerning your questions. That is not to say that there is no information out there in the anthropological records. It's just that I don't have the answers for you. You will probably have to investigate deeper into academic research.
My best guess is that there might be a certain time coastal indigenous groups didn't gather shellfish due to the red tide. Indigenous people are incredible observers of their natural world. Humans all over the globe, whether ancient or modern, developed hypotheses about their environment and the organisms that interacted with their lives. If a type of food was making them sick during a certain point in time, then they didn't eat it. Maybe, someone decided to eat a shellfish, like mussels, again and did not get sick. By observing the seasons, it might have helped them determine when it was safe to eat the mussels again. Someone had to do the taste test. Maybe someone observed the algal bloom in the water and associated it with not eating shellfish during that time of the year.
Another way of observing when the toxins from the algal bloom occurs is when it produces harmful effects on marine ecosystems. For example, when masses of algae die and decompose, the decaying process can deplete oxygen in the water, causing the water to become so low in oxygen that animals either leave the area or die. If by observation, there were hardly any fishes in the water or they were dead on the surface of the water (or on the beaches), then it might be an indication that the red tide effect is present or something is happening that is killing the fishes. No eating of shellfish could have been implemented during that time. Another obvious observation is when the blooms turn the water a deep red. These observations along the coastal waters might have given clues to native groups as to when not to consume shellfish. Of course, people had to get sick or die during that time to give an indication that something was wrong with the shellfish. And someone had to eat those shellfsih again to know that it was now safe to ingest. Maybe, coastal people depended on marine life to sustain them during the summer months and they had to eat the shellfish to see if it was edible again. Afterall, it was edible before people started to get sick. So when was it fit for human consumption again? Observing the ocean shoreline might have given them the answer. There was more fish in the water after the red tide. No fishes were dying, so maybe the shellfish are OK to eat now. The red color in the water is gone. Just my guess.
Keep on inquiring. Maybe that is how indigenous people got started. It began with questions about important matters in their lives, while observing and experimenting to come up with conclusions. These conclusions might have turned into traditions that got past down from generation to generation.
Regards,
Dino Labiste
Dear Ms. Labiste,
Your igloo building article is the only one on the web which mentions carving a concave bottom on the block so it will stick when placed. This, I feel, is key to success. I also put a concavity on the side of the block which contacts the previous block to ensure a single point of contact at the top.
Your article is also the only one I saw which mentions stomping down the snow to cut the blocks from. Most instructions start with the equivalent of "find a place with perfect snow for building an igloo". With lots of stomping and patience, I have been able to build igloos in deep powder snow.
In dry snow, I tend to cut blocks, which are about 16" x 24" x 4-6" thick. Given how thin and crumbly the blocks are, I have never worried about shaping or beveling the blocks. Just make sure there are only 3 points of contact with the previous blocks and the rest takes care of itself.
Thanks to your excellent article, I now have a place to send people who want GOOD advice on how to build an igloo!
Thanks,
Chuck J.
Etna, CA
Thank you Chuck. What a pleasure to hear others are enjoying the process of building igloo shelters in the winter. It sounds like you have become quite proficient. My illustrations might lead one to believe the key to success is to bevel the blocks to fit exactly, then cut a concavity in the bottom of the block. But as you suggest, the key is the 3 point contact . . . . and I might add, a gentle hand when working with compacted powder snow, or snow with layers of iced-over snow.
Now that we are getting some snow to work with, I hope you have time to enjoy some igloo building!
Best wishes,
Sue Labiste
Thanks for the reply. At the risk of sounding obsessive, there is one other subtlety I would like to point out with respect to cutting out the blocks. I am sure you are aware of this, but did not mention it in your article. To avoid breaking blocks when cutting them out, make the bottom and end cuts first. Make the large area back face cut last. When you finish the back face cut, the block will settle a little bit if it is truly free. It the block does not settle, redo the cuts until the block settles on its own accord, if you try to pry the block free, it will usually break.
I also make a point of never quarrying the blocks from where I am putting the igloo. I did this once and I could not reach the ceiling from inside to stabilize that last block! This also happens if you start too large or don't slant the blocks inward enough.
Thanks for the soapbox,
Chuck
Great tips Chuck.
Regards,
Sue Labiste
Good morning. My name is Joey Allen of Stillwater Nevada. I was researching decoys via the Yahoo search engine and found an excerpt from your work here: http://www.primitiveways.com/tule_ethnobotany.html
I have been a decoy maker since 1993. My cousin, Martin George, Grandson of Jimmy and Wuzzie George, was my teacher. We are from Stillwater, Nevada, a community just outside the city of Fallon. The article states that the decoys are from California. I am unaware of any California Indians who are decoy makers. Martin George's mother was from Woodford California, but the decoys are native to the Stillwater area.
I'm not sure if other information is correct. Martins brother Davin was another maker of the decoys. Their father Ivan had also made decoys for sale. The Ivan George decoys are fairly rare and if you are in possession of one you are truly fortunate.
If you have any questions, you can contact me. You can also call the Churchill County Museum for further verification of the information. They have examples of decoy makers and tule technology from Nevada's prehistory.
Thank you for your time.
Joey, thanks for the information. I'm happy to know that descendants of the George family are still making decoys. I have a Daven George decoy in my collection, and the park where I worked (now retired) has one by Darren George, if I remember right. The decoys I make are roughly based on these models. We also have the photos of Jimmy George making a decoy which he covers with a duck skin from `Survival Arts of the Primitive Paiutes' by Margaret Wheat. I have also seen decoys found in a dry cave (I believe it was Lovelock) in Nevada, and replicas made by a friend of mine - Jim Riggs - in the museum in Bend, OR. Where I live in the San Francisco Bay Area, the only evidence is references to decoys `stuffed with tules' at a lake here in Fremont. There are also drawings of decoys from other parts of the state. The only details I could find clear enough to make a model were the ones from your family. Nevada and California seem to share some similar technologies, and a linguistics expert studying our Ohlone people's language found evidence that they originally came from Nevada, so may have brought the decoy technology with them. Because the Ohlone people were heavily missionized soon after contact, relatively little of their material culture survived. In my efforts to provide students with a complete picture, and where there is evidence for use of a tool but no archaeological or ethnological samples, I have to go to the nearest neighbors of the Ohlone who can provide me with samples to copy. With duck decoys, the nearest neighbors were the Paiute because, as you note, there are no California Indians still making tule decoys today (unless they are also copying the George family samples). When teaching I always try and remember to credit the source of the model. One of these days I'll try to get by the Churchill Museum to check on their collection.
Hope this helps clear things up,
Norm Kidder
Hello, my name is Thad Beckum and I would like to make a wild turkey decoy from the skin of the bird! What do you think would be the best way to preserve this skin so that I could pull it over a mold. I have a lot of soft lightweight wood in my area that could be carved into a nice turkey shape. If I scrape the fat from the skin and degrease, what would be the best natural way to make sure that this will last me awhile.
I have done a good bit of braintanning, but have never worked with bird skins! Could I simply use punky wood and smoke it enough to preserve it. If I could preserve it, I may consider gluing it down on the mold with animal glue, like putting a snake skin on the back of a bow!
I do not want to use borax, even if it is natural. It is not available here, only if you buy it.
I am trying to make this decoy for a TV show that will be filmed in the spring. I will be hunting with primitive archery dressed in my braintan buckskin. I will be hunting with the men at the NWTF and this will air on the Outdoor Channel!
I would like to handle this skin as little as possible so that the feathers do not get out of shape! I would appreciate any help you could give!
Thanks,
Thad
Hi Thad;
Borax would work well for preserving the skin/feathers and keeping any tiny organisms from feastng on your feather and skin. But, if you don't want to use Borax, then another alternative is a salt solution. You mentioned that you did not want the feathers to get out of shape. If you use the salt solution, the feathers will get matted. After it dries, you will have to hand preen the feathers back into shape. It will not be as pristine as it originally was, but it can be fluffed back into shape.
The salt solution basically preserves the skin from organisms that like to feed on your skin and feathers. If you decide to do the salt solution, here it is:
Use a trough or plastic bin large enough to hold your turkey skin and feathers. Fill it with enough hot water to cover your turkey skin and feathers (I'll refer to "turkey skin and feathers" as TS&F from now on). DO NOT put the TS&F in the container yet. Pour salt (regular salt from the supermarket or grocery store) into the hot water and stir until the salt dissolves completely. Depending on how much water you have, it will take a good amount of salt to create the solution. Don't ask me how much salt is needed because I have never measured the amount I use when I preserve duck skins with feathers. I keep pouring salt into the hot water until it doesn't dissolve anymore. Sorry, but that's the best I can tell you about measurement.
After you feel it has enough salt in the water, let the solution cool to the touch before putting in your TS&F. If your solution is still hot and you put your TS&F in, the feathers will slip off the skin. I would let the TS&F sit in the solution for 2 weeks. The whole TS&F should be submerged in the salt solution. Gently weigh it down with something if it floats to the surface. After 2 weeks, take it out of the salt solution, thoroughly rinse it with fresh water and let it dry in the sun. Any matted feathers will have to be hand preened to get it back to looking good. A blow dryer set on cold air will also help fluff up the downy feathers.
You'll have to decide whether this method of preservation will work for your needs, since you do not want to get the feathers out of shape. I would recommend experimenting with a small chicken skin with feathers or just do a variety of feathers, like the primary, secondary wing feathers, down feathers and breast feathers to see if you can get it back to it's original shape after soaking it in the salt solution.
I hope this info is of some use.
Regards,
Dino Labiste
Dear Mr. Labiste,
I really enjoyed your video about starting fires with the spindle method. You and others on Youtube make it look easy. I have noticed that most of the primitive pyromaniacs (consider that a complement) come from the southwest where the humidity is dry. I live in Marquette, Michigan where we have high humidity. Have you ever tried to start a fire outside of the southwest. I assume the dry air is an advantage.
So far, all I can do is create a lot of smoke. I have used a variety of spindles: cattail, mullein, and cedar with hearth boards of basswood and cedar. I have used the hand drill method, the bow method, and even cheated using a drill press at different speeds. All I can do is make a lot of black dust and smoke but no coals, which makes me wonder about the humidity.
I would appreciate any information you might have concerning the humidity in the air.
Larry Buege
Hi Larry;
Humidity can be a factor. I would also look at your equipment. The V-shaped notch on your hearthdboard has to be wide enough to accept your char (the fine dust that results from grinding the spindle and hearthboard together). Is your char swirling around the top of the hole and not falling into the notch? Sometimes when people get more smoke and no lighted ember, it's because they are burning off the accumulated dust on top of the hole before it gathers in the notch. Widen your notch on the hearthboard. Also, the point of your V-shaped notch should go about half way into the hole on the hearthboard. I would also recommend removing the bark on your spindle and heardboard. You want char that is as fine as flour. The outer bark tends to create coarse char that becomes difficult to ignite.
Go slowly at first to warm up your spindle and hearthboard. Accelerate to a moderate speed, while applying downward pressure, to next acquire your char in the notch. When you see enough char accumulating in the notch, increase your DOWNWARD PRESSURE and SPEED to ignite the char. If you stop because you are tired, leave the spindle in the hearthboard hole. Don't take the spindle out. If you have fine dust in the hearthboard notch, there might be enough heat from your efforts on the spindle tip to light the char. Gently wave your hand back and forth over the char to feed it some oxygen. When you see smoke wafting from the char, you have a lighted ember.
Due to the early morning fog in my area (I live next to a bay), I usually keep my hand drill spindle and my hearthboard wrapped in leather to keep it as dry as possible. I also do the same for my tinder. Most of the time, modern practioners don't realize that primitive tools had to be prepared and stored properly to provide for optimum success. Today, people often think only in terms of "survival skills", gathering what they can find immediately, without any preparation or afterthought. It's good to have that knowledge in case you ever need it. But, if one is to live or replicate the primitive lifestyle, one should be prepared to have a high percentage of success. Tools should be functional. Our paleo-ancestors were knowledgeable and well prepared for living their lifestyle many thousand of years ago.
Good luck on your pyro endeavors. Let me know if you get any positive results.
Regards,
Dino Labiste
We have ignition! Thank you. I widened my notch and was able to make coals using a mullein spindle and a basswood hearthboard. I used a bow instead of a hand drill, but I'm sure the principle is the same.
Thanks again for your time,
Larry Buege
Hi Larry;
Good to hear you got success. It's those little nuances that make it happen.
Regards,
Dino Labiste
Hi,
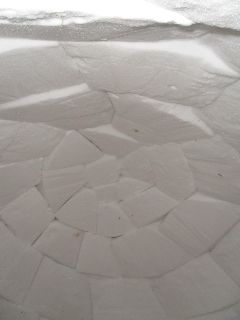
I was looking through the wonderful gallery on the PrimitiveWays website and came across this picture:
http://www.primitiveways.com/Images2/acorn_leaching.jpg
I hope I understand the picture in the first place. Is the material in the centre of the leaves the acorn mix?
I'd be very thankful if you could explain to me how this leaching process works. I do not know that much about acorn preparation and have only ever seen them leached through a synthetic bag in a stream.
Thank you for your help!
The PrimitiveWays website really is excellent. Keep it up!
Jon
Hello Jon;
Acorns contain tannic acid and have to be leached before eating. Tannins, which are plant polyphenols, interfere with our ability to metabolize protein. The amount of tannins vary with the different acorns.
Here is a condensed version of the acorn leaching process:
1. Acorns are dried in the shell.
2. Acorns are shelled. There are different species of oak. If the acorn you are using has a skin on the nut (similar to the skin on a peanut), that has to be removed before pounding.
3. Acorn nuts are ground into VERY FINE flour. The finer, the faster the leaching of the tannins.
4. The photo you are referring to only shows one method of leaching acorn: A sand basin is created. The sand basin is lined with overlapping grape leaves. The acorn flour is spread over the grape leaves.
5. A cedar bough is placed over the flour to evenly disperse the flow of water into the flour.
6. The water leaches the tannins out of the acorn flour as it slowly percolates. Allow the water to disperse into the sand, then continue leaching with more water.
8. After the 3rd or 4th leaching of water, taste the acorn. There should be no bitterness when the leaching is finish. If there is still any taste of bitterness, continue the leaching process.
9. After leaching, boil acorn flour with water.
The taste of acorn is subjective. Some people say it is bland, others say it has a unique nutty taste. Despite it's varied taste, acorn is highly nutritious. Percentages vary from species to species, but all acorns contain large amounts of carbohydrates, fats and protein, as well as the minerals calcium, phosphorus and potassium, and the vitamin niacin.
Hope this helps,
Dino Labiste
(pertaining to the video entitled, "Cordage Making")
Dear Dino;
As a native California Indian (Koyom'kawi Maidu), I am very pleased on your video take of the dogbane cordage. This has been the most informative piece that I have come across. I do not know one of our elders that knows the "traditional" crafts and this adds to my quest to know the "old" ways. I am very appreciative.
Wallace Clark
Thank you, Wallace, for your kind comments. I'm glad that the video has been of some help to you and to those who would like to learn the "old ways" of making cordage. Dogbane has provided me with many items of practical use. I am grateful for it's generosity and I am constantly learning from the dogbane plant.
Regards,
Dino Labiste
|
|
and Plants |
and Tools |
|
We hope the information on the PrimitiveWays website is both instructional and enjoyable. Understand that no warranty or guarantee is included. We expect adults to act responsibly and children to be supervised by a responsible adult. If you use the information on this site to create your own projects or if you try techniques described on PrimitiveWays, behave in accordance with applicable laws, and think about the sustainability of natural resources. Using tools or techniques described on PrimitiveWays can be dangerous with exposure to heavy, sharp or pointed objects, fire, stone tools and hazards present in outdoor settings. Without proper care and caution, or if done incorrectly, there is a risk of property damage, personal injury or even death. So, be advised: Anyone using any information provided on the PrimitiveWays website assumes responsibility for using proper care and caution to protect property, the life, health and safety of himself or herself and all others. He or she expressly assumes all risk of harm or damage to all persons or property proximately caused by the use of this information.
© PrimitiveWays 2016