The Work Process:
Getting hides
Most hides tanned into robes by native women, were the skins of
young cows killed at a certain time in the winter for the best
fur (starting November, according to James W. Schultz, who lived
with the Blackfeet). In addition, Bulls of a young age were good
for robes. On the other hand, Shepard Krech theorizes in his book
"The Economical Indian", that: "cow robes with
the hair on were lusher than the thin haired bulls."
Unfortunately, most of what is available for tanning today are
bull hides. Most of these animals are killed at an age of 18 months,
and they make nice robes. In general, the older the animal, the
harder the skin is to tan.
Tanning is an art form. To choose the right animal for the right
hide at the right time of the year for a given project was something
native people learned to master.
I tried contacting local sources for hides, so that I could actually
go to the ranch and look at the quality of the skins and 'meet'
the buffalo but it worked out best for me to order them via UPS
from the North American Bison Cooperative in North Dakota (701
947 2505). Currently they charge $135 plus $25 for shipping .
I also recommend checking the web site www.bisoncentral.com
for ranchers near you.
These are salted hides, which are semi dry. The best time for
getting them is wintertime to be sure they haven't been stored
for too long as that might affect the quality of the skin (the
hair might start to slip).
Some people do not like salted hides, but they work fine for me.
Soaking
After getting a hide, it has to be rehydrated and washed
to remove the salt. Running water would be the best choice for
this but a 40-gallon trash can works also. Tap water has the advantage
of containing chlorine, which kills bacteria and so prevents premature
hair slippage. Sometimes I wear rubber gloves to prevent infection,
especially when my hands are bruised or cut.
I soak my hides between 12 and 24 hours and change the water as
often as possible.
I wash the hair side of my skin with soap or shampoo to further
clean the fur. A lot of dirt will also drop out of the hide while
I work it. In addition, if the water does not taste salty anymore
that might be an indicator that I have washed out as much salt
as possible.
I make sure the hide is thoroughly soaked and limber.
The edges especially tend to curl up and stay dry, as well as
areas with big chunks of meat on tend to absorb the water slower.
An unfleshed and soaked hide is not a lovely sight but it makes
you realize the miracle of transformation that will take place
through the work of your hands and natures masterplan. A heavy
cold and stinky piece of flesh turns into a less stinky, durable,
warm and soft robe.
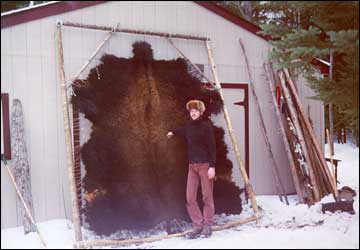
| Markus standing next to a huge buffalo bull hide at Willow Winds in Michigan. |
Racking
To be worked on, hides were either stacked out flat
on the ground or put in a rack. I use a rack as I work in my basement
that has a concrete floor.
The rack is a square of 8 by 8 feet. I use 2 by 4-inch lumber
with smaller pieces to be put across the corners for added stability.
I check the lumber for cracks, as it will undergo quite some stress
and if not reinforced, might start to break. A soaked hide might
not look that big but once it is being worked on, it will stretch
quite a bit.
This 8 by 8 -size frame means I have to cut the hide in order
to fit it, which is fine, as the hide is usually too big to be
used as a robe when left whole. Of course, I could use a bigger
frame if I wished to leave the hide untrimmed.
If the skin is trimmed, the front leg and neck scraps can be collected
and the hair be twined into strong ropes. Marquis writes about
the Crow: "The choice lariat (to round up horses) was one
made of spun and plaited buffalo hair". .
After trimming the hide, I cut holes all around the edge, maybe
5 inches apart, and lace it evenly into the frame. The hide is
tough to cut so I use a board to support the skin and then push
the knife through.
It is not unlikely that I might have to clean some meat and fat
away around the edges before being able to cut the holes.
So after the hide has been framed, I support it on all four corners
with chairs, bucket, or something to hold it high enough of the
ground, to be able to hop onto it without touching the ground,
as I will do later in the process.

| Various fleshing and thinning tools. |
Fleshing
Native people had a variety of fleshing and scraping
tools that were very highly valued and passed on from one generation
to the next.
Grinnel writes :"One of the fleshers was given me by the
wife of White bull, When she was 65 or 70 years of age . Its first
known owner was Magpie Woman, when she grew old she gave it to
her daughter, Sun Woman, when Sun Woman grew old she gave it to
her daughter, Hole in the Nose, but Hole in the Nose fell sick
and died, and Sun Woman kept it, and when she died it came to
Bull Wool Woman, the wife of Frog. From her it passed to her daughter
White Bull's wife. Bull Woman had been dead nearly 50 years when
the implement came into my hands, when it was perhaps 140 to 150
years old ".
Sometimes the women would also cut a groove into the handle of
their tool for each hide tanned.
The other day, one of these implements, a completely intact elk
horn handle flesher was auctioned off on Ebay for $1950!
I use one tool for fleshing and thinning which has a steel blade
as sharp as I can get it. To flesh the skin, I hop onto the hide
and start removing meat and fat. Beginning at the edges, I work
my way towards the center.
Sometimes I switch to a knife, especially in the hump area, that
usually contains a lot of fat and meat . The big fat chunks can
be saved and rendered, for use in the tanning process or other
projects like soap making or for fat lamp fuel.
The fleshing is a lot of work and should be done before the hide
starts drying out, best in one sitting but the hide can be covered
overnight with wet towels and finished the next day.
As the hide stretches, I go around and retighten it. It is worked
the best when kept taut.
This working step is about getting all meat and fat off, adhering
bits off tissue and membrane will be cleared off in the following
thinning process anyway. Also, I will not be able to clean and
thin (as described below) the hide nicely around the lacing holes,
which is OK because the whole edge will be cut of later.
Thinning
As a buffalo is a mighty beast, its hide is too thick
in many places to be able to tan soft without prior thinning.
This means removing skin by shaving it off.
James W. Schulz writes about the Blackfeet: ".standing upon
the hide, smooth side up, the tanner, with an elk horn-handled,
steel-bladed instrument the shape of a hoe, chipped it to about
one half of its original thickness"
A razor sharp blade is what I need now for thinning. When I hop
on and off my hide to thin it, I try to keep it clean as dirt
and sand will dull my blade faster.
I try to shave the hide to an even thickness so I end up with
a uniform product.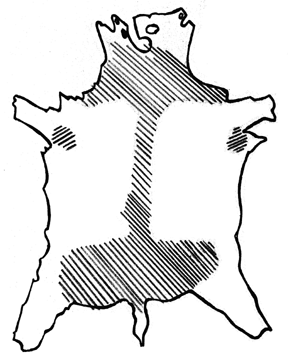
The highlighted areas in the drawing need the most attention,
as they are the thickest.
The little areas under the arms have a very tight skin structure
and will probably never turn out soft anyway.
Take your time and make sure that the skin is as thin as you can
get it without compromising its integrity. You will save yourself
a lot of work later as a thin skin is much easier to tan than
one that is left too thick.
In general, if you see hair roots shine through , do not go any
deeper. This is easier to see when the skin is still wet. If you
scrape it when it is already drying, you need to gauge it differently:
I usually feel in from the sides with my arms and hands and try
to determinate thickness, or try to pinch the skin if it is loose
enough.
I go over the whole hide during this process. It is easy to punch
holes at this time, especially when the scraper dulls and you
try to force it. After it has been thinned properly, I take the
skin out of the frame, cut the edge off, put new holes in it and
relace it. This way you get a nice clean and thin edge.
The scrapings removed from the hide during the thinning process
have a couple of uses. They can be boiled down into hide glue.
Or as Grinnel states : "Many women saved the scrapings from
the hides they tanned and put them in parfleches (rawhide containers)
against a time of scarcity. Then they were boiled and made a palatable
food."
Occasionally the whole green (untanned hide) would be eaten by
the natives, cooked in a sort of pit bake according to Grinnell.
Braining and Working the Hide in the Frame
Now it is time for the first braining.
Braintanning is also referred to as "fat liquoring"
and actually, a variety of tanning mixtures can be used. It seems
that native people mainly used a mixture of all or some of the
following: brains, bone marrow, liver, soapweed (according to
Grinell) and grease.
Today we can substitute ingredients if we wish and use eggs, lecithin,
soap, castor oil etc. Probably every modern and old-time tanner
has his own recipe he uses.
All these substances are involved in complicated chemical reactions
within the skin and help transforme it from rawhide into leather.
For details on skin structure and what chemical reactions occur
during tanning, I refer to: "Wetscrape Braintanned Buckskin"
by S.Edholm and T. Wilder.
Whatever solution you use, the hide should be semi-dried - if
the hide is somewhat moist, the solution is more easily absorbed,
unlike a dry hide whose fiber structure is too tight to readily
absorb the mixture.
To start with, I use a fairly thin mixture and heat it up hot
enough so I can just stand to put my hand in it. I apply it to
small areas at a time so the solution does not cool down to fast
on the skin. While the liquor is soaking in, I help it along by
pushing and stretching the skin with a tool that has a blunt,
rounded edge. (such as a paddle, an ax handle or a scraper with
a dull blade). This work process will help force the solution
deeper into the hide. Afterwards I add another thin coat, cover
the hide with hot wet towels and leave it over night.
The next day I use the blunt tool again and also walk on the skin
barefoot to further move and stretch it. While the skin is drying,
I can leisurely repeat the walking and pushing process. If I work
inside, I use a heater and a fan to help speed up drying time.
If you do not want to finish the tanning process in one setting,
this would be the point to take a break.
Boller writes about the tribes of the upper Missouri :" it
(the skin) is then left to dry, when it is taken down and put
away until wanted, for during the busy hunting season it is as
much as a squaw can do".
According to many tanners, partially finished hides with at least
one coating of brains dried into them will be easier to tan soft,
as the enzymes of the tanning agent are at work during the storage
time.
Braining and Pulling the Hide
To continue the tanning process, I take my dried hide
out of storage and cut it in half along the spine.
These so-called "split robes" were common among native
people. Again Boller writes, that after the tanning:"the
two sides are then sewed together with sinew and the robe is ready
to be traded. "
This splitting technique came either from the way they skinned
the animal or for the ease of tanning smaller sections because
a big hide might have to be handled by more people. Marquis writes
about the Crow: "In the original butchering of the animal,
after one side was skinned, the hump was cut of. This was necessary
in order to roll the carcass for skinning the other side",
(as a shot buffalo usually died on its belly). According to Harold
E. Briggs' "Frontiers of the Northwest": "one squaw
was capable of preparing ten (buffalo) robes in a season. Although
two or more worked together on heavier ones." This tailoring
process of cutting hides in halves also helps reduce the size
of the finished product.
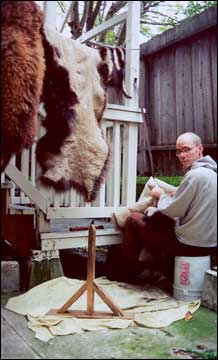
| Markus softening half of a buffalo hide using a metal strap. |
Of course whole hides were used as well and were in high esteem.
Marquis writes : "A head and tail buffalo robe , that is
an entire robe of one piece and in good order, had a standard
price of five dollars in goods. An extra good article would be
higher.A split robe, one made up by the sewing of segments, was
salable at a valuation lower than that of the full head and tail
robe." One reason to keep the hide whole (leaving legs, tail
and head attached) was, that the skin was seen as inheriting the
spirit of the animal in its completeness.
Tanner Jim Miller for example does not cut his robes and does
his entire tanning with the hide laced in the frame for the entire
process.
Other tailoring methods include attaching the skin of the front
legs to the neck of the main body to maximize size or taking out
sections of the head and hump area to make the hide lie flat.
For images of robes displaying these techniques I refer to "Robes
of Splendor -North American Painted Buffalo Hides" by New
York Press .
Having cut the hide in half, (I now work one half at a time) I
spread another application of tanning solution onto it and then
fold it up flesh side on flesh side and cover it with a plywood
board. Then I put a weight on it (Once I saw tanner Randy Breeuwsma
drive his truck onto the "sandwiched" hide he was working
on.) This really presses the solution into the hide and allows
no air to circulate. I leave it like this overnight.
The next morning I unfold it and scrape off all the solution that
has not soaked in. Then I hang it out to dry. When the hide is
partially dry, I start "pulling" it, as described below.
I use a heavy-duty metal strap, about 6 feet long and 2 inches
wide. I nail the top and bottom of it to the walls of my house
creating a nice stable D-curve to pass the skin through. I sit
down while working .I lean back and pull the hide back and forth
along the strap.
For this purpose, Natives would pull the skin around an upright
pole; or fix to a tree a twisted cord of rawhide, or a buffalo
shoulder blade bone with a hole in the center.
Besides the pulling, I stretch the hide over my knees and shake
it out every once in a while to help it regain its original shape.
Then I put it up to dry some more. After a while, I repeat the
pulling and stretching process. While it is hanging to dry, I
stretch it with my hands in all directions a little.
After this work session and when the hide is almost completely
dry, I take it down put another coat of brains on and leave it
folded up again over night.
The next morning I start sewing up the holes, that may have been
created during the skinning or the earlier thinning process. I
sew them up using sinew and a baseball stitch, entering the needle
into the hair side. Usually they hold up during the softening
process, although an occasional hole might have to be resewn.
Now I repeat the whole stretching and pulling process as mentioned
previously. 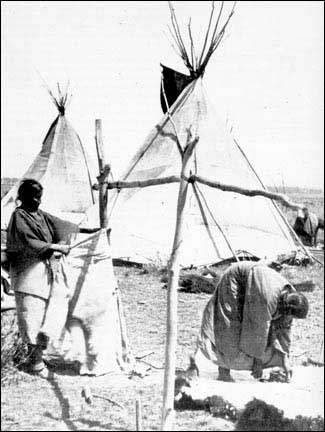
At this time, I will be able to see where I left the hide too
thick and where it is too thin. Where the fibers have started
separating, I work around them.
Now the hide should turn out nice and soft. If it does not, the
braining and pulling as described above can be repeated, but in
thin areas, the risk of the skin fibers separating and creating
holes becomes greater.
| Photo on the right: A very rare shot of Cheyenne women tanning buffalo hides (1870's). The woman to the left of the photo is softening a hairless buffalo hide by pulling the skin around a rope, while the woman to the right is thinning a buffalo skin with a scraper. It is interesting to note that the tipis in the back are already made of canvas not skins. The seams can be clearly seen on the original print. Photo courtesy of the Smithsonian Institution (negative # 90-17238 |
Finishing
After both halves have been softened, I cut a section
off from each half along the spine.
This helps me to control the size of the finished product and
also takes away the somewhat uneven and not completely tanned
edge. Then I sew the two halves together to make the finished
robe.
The leftover pieces of hide can be used for various smaller projects.
Boller for example writes of these segments: "When a sufficient
number accumulates, these pieces are sewed together and used as
beds"
The lacing/stake holes around the skin can be cut off but I leave
them intact.
On some hides, native people cut the somewhat untanned edges at
intervals to maximize flexibility. This method can be seen on
many paintings of Swiss artist Karl Bodmer, who during his travels
in 1833/4, made drawings of tribes people. These are among the
most detailed and accurate representations available for study.
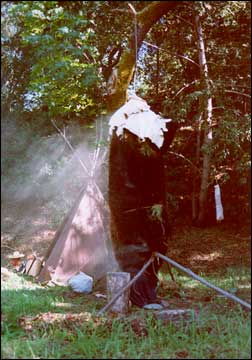
| Photo on the left: Buffalo hide set up for smoking at the Rattlesnake Rendezvous in Sunol, California. |
Smoking the hide
As with any braintanned product, the hide should be
smoked. This process keeps it from becoming stiff should the robe
get wet and will also help to keep dermis-eating bugs out of it.
A lot of the hides in museums do not seem to be smoked as tanner
Wes Housler also observed. Check out his article on tanning bison
hides at www.braintan.com
I lace up my hide like a sleeping bag through the lacing holes,
hair side out. Then I suspend it from a tree, hanging about 1
1/2 feet above a smoldering fire and tie a cloth around the bottom
to funnel the smoke into it. To keep the sides of the hide from
touching I arrange sticks in the interior, so that the smoke can
circulate freely. I smoke the hide from 6 to 8 hours. For more
detail on the smoking of braintanned hides, see "Wetscrape
Braintanned Buckskin" by Steve Edholm and Tamara Wilder.
The smoking is the final step in the tanning process, so once
that has been finished, the item is ready for use.
If, after prolonged use, it seems necessary to clean the robe,
various sources state that moist white clay was used for this
purpose. It was rubbed into the flesh side of the robe to absorb
dirt and grease and was then shaken out after the clay had dried.
To clean the hair side, Jim Miller for example simply leaves his
robes out in a light rain.
The finished product is a great "keep me warm" item
for the house (if you do not object to the somewhat "wild
natural" smell) or for camping trips. Unfortunately, the
hides are somewhat too bulky for backpacking, unless you find
someone to carry them for you.
In addition, I would especially like to thank Jim Miller for introducing me to the art of tanning buffalo hides, my friend Travis Dietz for his patience with the editing, and my wife Tamara for putting up with my "hobbies". Thanks also to all the other people that helped me in creating this article.
I will continuously update this article as I gain more experience, insight and information.
For additional information, comments or inquiries about my
robes, please contact me.
NOTE: I am always looking to buy salted or dried buffalo hides.
If you have any, please contact me via e-mail at: markusklek@yahoo.com
References and books of interest:
- "Braintan Buffalo Robes Skins and Pelts" by Jim
Miller
- "Among the Indians" by Henry A. Boller
- "Memories of a White Crow Indian" told by Thomas B.
Marquis
- "The Cheyenne Indians Vol. 1" by George Bird Grinnell
- "Wetscrape Braintanned Buckskin" by Steven Edholm
and Tamara Wilder
- "Leather" by Lotha Rahme
- "The Ecological Indian" by Shepard Krech
- "Karl Bodmers America" by University of Nebraska Press
- "Robes of Splendor" by New York Press
- "Seeing the White Buffalo" by Robert B. Pickering
- "Buckskin and Buffalo" by Colin F. Taylor
- "The Cheyenne in Plains Indians Trade Relations" by
Joseph Jablow
- "Buffalo Nation" by Valarius Geist
- "Sacred Buffalo" by Sycamore Island Books
- "Blackfeet and Buffalo" by James W. Schultz
- "Andele, the Mexican-Kiowa captive" by J.J. Methvin
- "The Sacred Pipe" by Joseph Epes Brown
- "Women of the Earth Lodges" by Virginia Peters
Tourist postcard from the early 1960s showing members of
the Kiowa tribe examining the drying of a buffalo hide. This is
a remarkable document from a time when the art of braintanning
buffalo hides was virtually forgotten among native people.
I assume that the skin shown in this photo was merely a display
piece as it is racked very sloppy. To be tanned, the hide has
to be taunt and evenly stretched.
Brain Tanned Buffalo Robes & Moccassins made by Markus Klek
Markus has written an excellent book on buffalo hide tanning called "Native American Buffalo Robes, A Study of Their Role in Plains Indian Societies and a Guide to Traditional Tanning Techniques". If you are interested in purchasing a copy of his book, you may contact Markus at markusklek@yahoo.com
E-mail your comments to "Markus Klek" at markusklek@yahoo.com.
Markus Klek resides in Germany.
We hope the information on the PrimitiveWays website is both instructional and enjoyable. Understand that no warranty or guarantee is included. We expect adults to act responsibly and children to be supervised by a responsible adult. If you use the information on this site to create your own projects or if you try techniques described on PrimitiveWays, behave in accordance with applicable laws, and think about the sustainability of natural resources. Using tools or techniques described on PrimitiveWays can be dangerous with exposure to heavy, sharp or pointed objects, fire, stone tools and hazards present in outdoor settings. Without proper care and caution, or if done incorrectly, there is a risk of property damage, personal injury or even death. So, be advised: Anyone using any information provided on the PrimitiveWays website assumes responsibility for using proper care and caution to protect property, the life, health and safety of himself or herself and all others. He or she expressly assumes all risk of harm or damage to all persons or property proximately caused by the use of this information.
© PrimitiveWays 2013