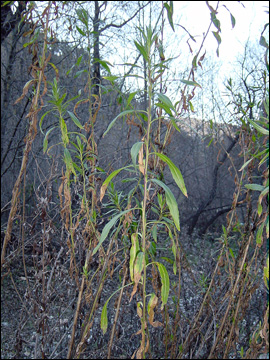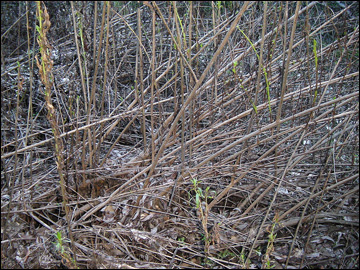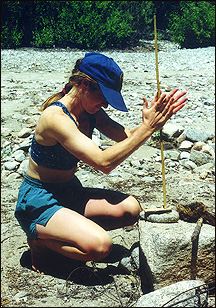
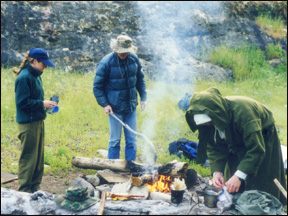
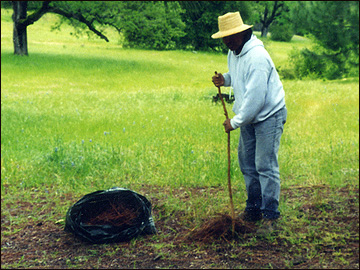
Fire was created using the hand drill method. The dry spindle and hearthboard materials were gathered from the surrounding area.
Mule fat (Baccharis salicifolia) |
Dry Mugwort (Artemisia douglasiana) leaves |
The spindle was made from Mule fat and the hearthboard was made from the root structure of Willow (Salix sp.). An ember was also created by focusing the sun's rays through glasses onto a ball of dry, crushed mugwort leaves.

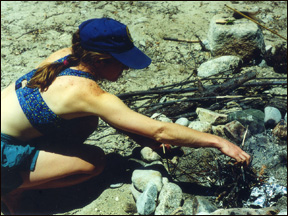
A lighted coal was transported in a wrapped bundle of Cramp Balls (Daldinia concentrica) fungus, milkweed fibers and bark to the next campsite.
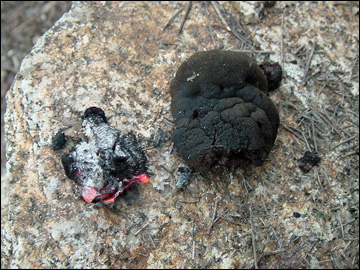
Glowing ember of Cramp Balls. The fungus is found growing on dead oak.
FIRE MAKING
Fire has a strong positive psychological impact upon an individual in a survival situation. Fire can fulfill many needs. It can furnish warmth and comfort, cook food, create light at night, purify water, signal for rescue, produce tools and provide protection from animals. Building a fire, when needed, will increase your ability to survive in the wilderness.
There are various methods for creating fire-by-friction (bow drill, fire thong, hand drill, fire plow, fire saw, etc.). Practice different techniques for starting a fire, building a campfire and transporting fire. If one method does not work, then try another technique until you become proficient and successful at making fire.
Articles and videos on making fire on PrimitiveWays.com:
a) Video tutorial on hand drill fire making - http://www.primitiveways.com/Dino_and_Fire_making.html
b) Bow drill fire making - http://www.primitiveways.com/pt-bowfire.html
c) Egyptian bow drill - http://www.primitiveways.com/e-fire.html
d) Hand drill fire making basics - http://www.primitiveways.com/hand_drill.html
e) Hand drill fire, bamboo fire saw and fire plow - http://www.primitiveways.com/3%20fire-by-friction%20methods.html
COOKING (to prepare food for eating by heating)
1. Broiling over hot coals:
Meat can be skewered on a green stick and broiled over hot coals. The end of the stick can be propped on stones to keep the meat above the coals. Turn the meat over to assure even cooking. Use sticks that are not toxic or will not impart an unpleasant taste to your food. To keep the meat from rotating on the stick, place two holes in the stick. Skewer the meat over the holes. Poke two sharp twigs into the meat through the holes in the stick, then into the meat again.
A straight branch could also be use to cook meat over the fire. Use any cordage to tie a constrictor's knot about 3/4th down the branch. Split the branch 1/4th down the stick from the tip to the knot. Sandwich the meat between the split. Tie another constrictor's knot at the opening of the split to clamp the branch around the meat.
2. Using hot stones:
a) Meat that is cut thin, is laid on flat heated stones to cook.
b) Hot stones are placed in the body cavity of a fowl or fish. The meat is also wrapped in leaves or mats, made from non-toxic plants, to hold in the heat. Place the wrapped meat in a wooden bowl with a sealed wooden lid. New hot stones replace the previous stones as they lose their heat.
3. Clay baking:
Wrap large non-toxic leaves around a fish or fowl. Mold a thin layer of clay around the wrapped fish or fowl and let the clay slightly dry.
Then wrap a thick layer of clay around the package and place it near the fire to dry. When dry, bury the clay package in hot coals and bake it. When cooked, break open the clay and peel back the leaves and skin.
4. Other different methods of cooking on PrimitiveWays.com:
a) Cooking with heat - http://www,primitiveways.com/primitive_cooking.html
b) Salmon roasting over hot coals - http://www.primitiveways.com/salmon%20cooking.html
c) Bamboo rice cooker - http://www.primitiveways.com/bamboo_rice_cooker.html
d) Adobe clay oven - http://www.primitiveways.com/adobe_horno.html
e) Earth (underground) oven - http://www.primitiveways.com/Imu1.html, http://www.primitiveways.com/pit_oven.html
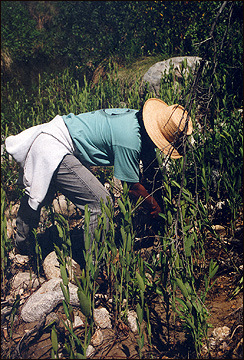
Yucca leaves were gathered for plying into cordage. The leaves were pounded with a short, stout branch on a log, then washed in the stream to remove the green, pulpy matter. The Yucca plant contains a compound called saponin that creates a soapy lather. We washed our hands in the soapy water as we rinsed out the fleshy material. Long, white fibers were left after processing the Yucca leaves.
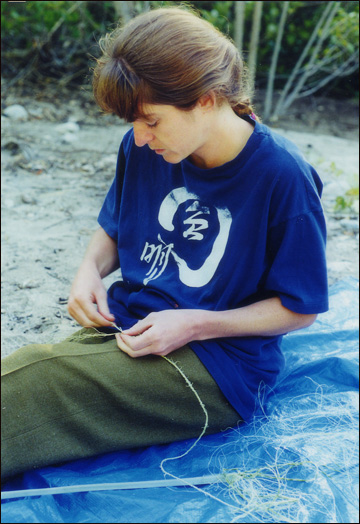
Dry milkweed stalks were also processed into cordage material.
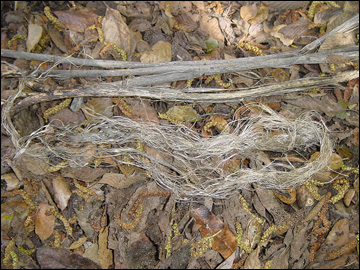
Milkweed stalks and extracted fibers.
A Dogbane patch was found near a stream. Dry red stalks were gathered for making strong cordage.

CORDAGE MAKING
The ability to twine, braid, twist, roll or weave fibers into cordage is a practical skill to learn in a wilderness survival situation. Lashing dwellings, making containers, snares, fishnets, bow strings, mats and hammocks are a few of the uses of cordage. The materials from which to ply and braid cords or ropes are in abundance everywhere. Any fibrous material that has reasonable length, moderate strength and is flexible or pliable can be utilized.
Cordage can be made from many different fibers including (bast*) Dogbane, Milkweed, Nettles, Hemp, Flax; (leaves) Cattail, Yucca, Agave, Iris; (bark) Willow, Maple, Basswood, Cedar; (root) Grey Pine, Beach Lupine, Spruce; (whole stem) Tule, Juncus, Straw. Each material has specific requirements for extracting the fibers, but there are only 2 basic ways for using the fibers to make a cord: braiding (or plaiting) and twining.
Even a relatively weak material can make a strong lashing as long as it is wrapped many times and not subjected to much movement. Knots stress fibers greatly; therefore, unless these materials are especially strong and flexible, it is more advisable to wrap and tuck them several times rather than tying off with several knots.
When cleaned and plied into cordage, the individual fibers are made to take a more equal stress load. This increases tensile strength and flexibility. Since additional fibers can be spliced indefinitely, the cord can be made as long as desired.
Fibers may be cleaned and separated by many methods:
1. Scraping
Scraping removes non-fiber chaff and in some cases makes the fibers more flexible and workable. This is done with a semi-sharp bone, shell, metal tools or thumbnail.
2. Hackling
This consists of using a pointed spike-like tool to comb, clean and separate the fibers (e.g. running a bone awl repeatedly through a bundle of fibers).
3. Pounding & Washing
Plants, like yucca and agave, can be pounded and washed to remove pulpy material. Use a smooth peeled branch to pound and a smooth peeled log as an anvil.
4. Retting
This is the rotting of the fiber yielding plant to weaken all materials except the fiber itself. This allows for easy cleaning by washing or other methods. The plants are soaked in creek or rain water. If the retting is carried on too far, the fiber begins to weaken and eventually becomes worthless. After 5 days, check the progress every couple of days. Retting plant fibers can create an unpleasant odor due to decomposition of the soft vegetative matter. After retting and the fibers are washed clean, allow the fibers to dry in the sun. The odor will eventually disappear.
*Bast are the strong fibers in the phloem of a number of dicotyledonous plants. They support the conductive cells of the phloem and provide strength to the stem. In vascular plants, the phloem is the living tissue that carries organic nutrients, particularly glucose and starch made during photosynthesis, to all parts of the plant where needed. In trees, the phloem is the innermost layer of the bark.
Articles and videos on making cordage on PrimitiveWays.com:
a) Video tutorial on making cordage from Dogbane fibers - http://www.primitiveways.com/cordage_video.html
b)
Making Yucca cordage - http://www.primitiveways.com/yucca_processing.html
c) Making cordage by hand - http://www.primitiveways.com/cordage.html
d) Various cordage materials in North America - http://www.primitiveways.com/cordage_in_North_America.html
DEADFALLS & SNARES
Traps entangle, hang, crush or choke a prey. Several well-placed deadfalls and snares have the potential to catch much more game than any method of hunting in a survival situation. When using deadfalls and snares, numbers are important. The more traps that you place, the better your chances of catching something.
Determine what species are in a given area and set your snares and deadfall specifically with those animals in mind. Look for the following:
1. Tracks
2. Scat
3. Nesting or roosting sites
4. Feeding and watering areas
5. Chewed or rubbed vegetation
6.
Runs and trails
Position your deadfalls and snares where there is proof that animals pass through. You must determine if it is a "run" or a "trail." A trail will show signs of use by several species and will be rather distinct. A run is usually smaller and less distinct and will only contain signs of one species. You may construct a perfect deadfall or snare, but it will not catch anything if haphazardly placed in the woods. Animals have bedding areas, waterholes and feeding areas with trails leading from one to another. You must place snares and deadfalls around these areas to be effective.
It is equally important, however, not to create a disturbance that will alarm the animal and cause it to avoid the trap. Prepare the various parts of a deadfall or snare away from the site, carry them in and set them up. Such actions make it easier to avoid disturbing the local vegetation, thereby alerting the prey. Remove or mask the human scent on and around the snares or deadfalls you set. Nearly all mammals depend on smell even more than on sight. Even the slightest human scent on a trap will alarm the prey and cause it to avoid the area. Removing the scent from a trap is difficult, but masking it is relatively easy. Mud, particularly from an area with plenty of rotting vegetation, is good. Use it to coat your hands when handling the trap and to coat the trap when setting it. Smoking the trap parts is another effective means to mask your scent. When you position the trap, camouflage it as naturally as possible to avoid alarming the animal.
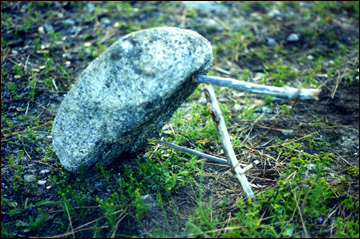
It's important to mark the locations of traps as a reminder to where the traps have been placed and to warn other people in your group. A stick planted in the ground can be split at the top to hold a pointed stick indicating the direction of the traps.
Different trap designs are capable of taking small or large game with very little calorie expenditure. Traps continue to work while you tend to other tasks, rest or sleep.
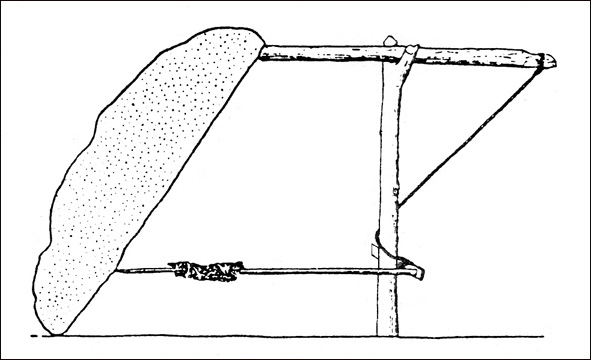
Paiute Deadfall
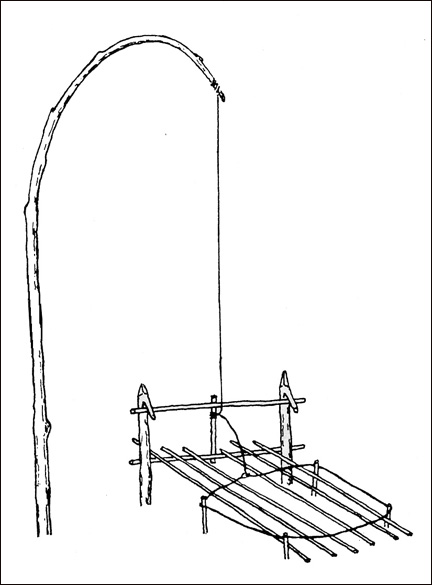
Mohave Treadle Snare
NOTE: The Paiute deadfall and the Mohave treadle snare are for informational purposes only. They are extremely dangerous and can cause harm to any unsuspecting person. In some parts of the country, using them is illegal. You should never use deadfalls or snares unless you are in a true survival situation.
We practiced making a Paiute deadfall with available materials in the area. The cordage was twined from Dogbane fibers. After the Paiute deadfall was constructed, the trigger stick was tapped with a branch and the rock came crashing down immediately. In the photo below, placing the upright support stick further back along the horizontal stick would have improved the efficiency of the trap. This would have kept the upright support stick from falling under the rock, which would have created a gap between the stone and the ground. The Paiute deadfall was dismantled after we had finished making the improvement and succesfully tested it with a branch.
When constructing the Paiute deadfall, place a rock or log under and near the edge of the deadfall stone. If the deadfall stone accidentaly drops or the trigger stick collapses, the rock or log will keep the deadfall stone from crushing your fingers.
SHELTER & BEDDING
Different kinds of shelter can protect you from the sun, snow, rain, wind, cold and/or animals. The ideal shelter site location is near water, building materials and fuel. Try to locate yourself in an area where these survival resources are close at hand so that you expend a minimum amount of time and energy in gathering them. Keep in mind the type of shelter you need, how much time and effort to construct the shelter and the materials available. For an overnight shelter, it should not be much bigger than you are. It must also be large enough and level enough for you to lie down comfortably.
Depending on the weather conditions, the site should be elevated, well drained and protected from the wind and possible rain. Do not make the mistake of relying upon current conditions to persist throughout your entire survival situation. It may be warm, sunny, and comfortable now, but in the middle of the night you do not want to be awakened by a raging storm totally unprepared.
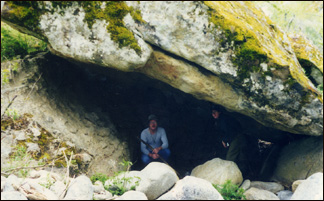
The most basic shelter is a cave. crevice or rock ledge that will provide a barrier between the elements and you. Before entering a cave, look for animal tracks that lead into the cave. Look in the cave, crevice or rock ledge to be sure there are no animals living in there. Another type of shelter is a simple lean-to made from natural materials or a plastic tarp and cordage. Instead of poking holes in a tarp to tie it off, place a small pebble under the tarp and tie the top side of the tarp around the plastic and stone. This will act as a grommet to secure your cord.
Other different shelters on PrimitiveWays.com and Wildebeat.net:
a) Constructing an igloo - http://www.primitiveways.com/igloo.html
b) Making a scout pit - http://www.primitiveways.com/scout_pit.html
c) Shelter information - http://www.wildebeat.net/index.cgi/shows/skills/E159.html
There are a number of ways in which heat escapes from the body and into the surrounding environment. Understanding the five heat loss mechanisms involved in this heat transfer process is vital in order to minimize heat loss and preserve as much body heat as possible during the night. It is very important when making a survival shelter and creating your bedding.
The 5 heat loss mechanisms are:
1. Conduction
Conduction is the transfer of heat from a warmer object to a cooler object when the two objects are in direct contact with each other. This serves to even the temperature difference between them. For example, when you sit on a cold log, the heat from your warm body will transfer to the log. You become cooler as the log becomes warmer.
The rate of heat transfer between two objects of different temperatures depends upon several factors. These include the temperature difference between the two objects, the total surface area where the two objects are in contact and the efficiency of the insulation that is between the objects.
The amount of heat being transferred between two objects of different temperatures can be slowed by the use of effective insulation. Insulation retards the movement of heat between them by creating pockets of dead air space which trap the flow of heat. Air conducts heat poorly, which is why still air is an excellent insulator. Proper insulation beneath you at night is very important. It must resist the crushing effect of your body weight and be thick and lofty enough for numerous pockets of dead air space to impede the flow of heat as much as possible.
A good bedding will provide insulation between the cold ground and you. A thick covering of leaves, pine needles, duff or other organic debris under you as you sleep will help retain body heat or keep out moisture.
Crawling inside a big pile of dry leaves or pine needles will also keep you warm. Rest the head, neck and lower legs on more organic material to prevent conductive heat loss in those areas.
Water conductivity is 240 times greater than that of dry air. Do not get wet on a cold night.
2. Evaporation
When water changes from a liquid to a gas, it takes up a great deal of energy and lowers the temperature of the surface on which it occurs. The process of evaporation occurs when sweat changes phase to sweat vapor. This phase change requires heat. Your body heat drives this phase change.
In hot environments, evaporation is a welcome process. You may even encourage the process by wetting yourself down when the need and opportunity arises. In cold environments, however, evaporation can be a killer as it consumes a large amount of energy and warmth from your body and transfers it to the outside world. In addition, when the clothing you need to stay warm becomes wet, it looses much of its insulative value and exposes you to the risk of hypothermia.
You should carefully monitor your amount of perspiration during times of heavy exertion because of the dangers of becoming wet in cold weather. If you are becoming overheated and begin to sweat, remove some clothing or reduce your efforts in order to become cooler and to keep sweating to a minimum.
3. Convection
Convection is somewhat like conduction as mentioned above, but happens when air or water with a lower temperature than the body comes into contact with the skin and then moves away. The amount of heat loss depends on the temperature difference between the body and environment, the amount of surface area in contact, plus the speed with which the air or water is moving. For example, when your warm face is exposed to a blast of cold air, the speed of that air matters. This is sometimes referred to as the wind chill factor. Another example of convection is blowing on hot food to cool it down.
To reduce heat lost through convection, have a windproof outer shell, like your plastic tarp, that you can wear over your insulation layers. This will help prevent wind from penetrating your clothing and removing the body heat you have stored there. Be careful of overheating and creating sweat in a non-breathable, plastic material.
In addition to wind-induced or “forced” convection, “passive” convection occurs via the “chimney effect” that draws cool, dense air into our clothing system from pants cuffs and waist hems, displacing warm, light air that exits out of your neck hems and other vents. Tighten the cuffs and hems to preserve heat with cordage or any binding material. Loosen them up to vent heat, cool down and minimize overheating.
Cover all exposed skin from the wind. Build a type of shelter that provides protection from the wind.
4. Radiation
Radiation is the transfer of electromagnetic energy between two objects of different temperatures. Since our bodies tend to be 98.6 degrees F, we are often warmer than our surroundings and so we radiate heat to them. In turn, we can receive radiative heat from the rays of the sun, fires and light reflected off from snow, rocks, sand or water.
Radiative heat loss occurs primarily on cold, clear nights, and is readily noticeable after sunset. At night when there are no clouds, the temperature tends to become cooler than on nights when there are clouds. Cloud cover dampens the effects of radiative heat loss somewhat, by reflecting a significant portion of radiant heat back to the earth’s surface.
Exposed human skin is also a radiator. The more total area of exposed skin, the more energy is radiated to the environment, assuming of course that the body is warmer than its surroundings. Make sure all exposed areas of your skin are covered to minimize the amount of radiative heat you lose to your environment. This includes the head, face, neck and hands. Also, find overhead protection to help reflect back heat, like a tree or rock shelter.
5. Respiration
Technically, respiration combines the processes of evaporation (of moisture in the lungs) and convection (displacement of warm air in the lungs by cold air from the outside environment). Because humidity in the lungs is 100%, breathing is an important heat sink in cold, dry conditions. Significant moisture (and thus, body heat) can be lost when that moist air is exchanged with much drier outside air. In addition, some body heat is lost to the process of warming the cold air entering your lungs. The colder and drier the air and the faster and more deeply you breathe, the greater the loss of heat. Deep heavy breathing will move large amounts of heat from your body and out into your environment as you work harder. Do not do hard labor during cold nights.
A cloth mask over your mouth as you sleep will help trap warm air from your breath. Respiratory heat losses can be minimized by breathing air that has been pre-warmed and/or pre-humidified prior to taking it into the lungs.
Understanding the complicated relationship between thermoregulation, physiology, environmental conditions and the materials available at your shelter site location will help you to create an effective shelter and bedding to keep you warm at night.
While awaiting rescue, keep yourself busy by improving your campsite. It will help your morale and increase your level of comfort. Improve your shelter and bedding, gather water and firewood and keep vigilant for the opportunity to signal would-be rescuers.
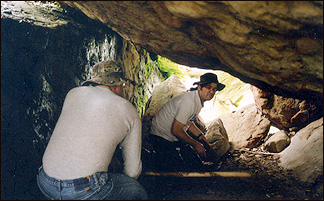
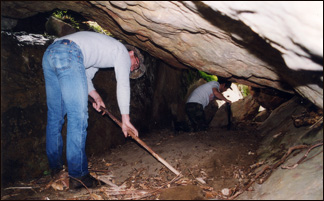
A rock enclosure formed by large, stable leaning rocks became a covered shelter for the night. Stones were rearranged to block off any openings. A stick was used to sweep out any hard debris, like small stones and broken branches. A flat sleeping area was created.
A load of pine needles were collected to provide bedding to insulate against the cold ground at night. A stick was used as a rake to gather the pine needles, which were stuffed into a plastic trash bag for transporting.

Taking a heated stone with you to bed will also help to keep you warm at night. A warm stone can be wrapped in a T-shirt and placed next to your body to radiate heat. If your feet is cold, place the stone against your feet. More than one wrapped warm stone can be taken to bed with you to provide a comfortable night sleep.
During the evening, cold air will begin to settle into ravines and shallow valleys. Move to higher ground for the night to avoid this cold, damp air.
There are more wilderness skills that will help you in a survival situation. Every predicament and location are different. Learning the various skills required to keep you alive in a wilderness survival situation is the first step. There are many books, magazines, internet information and instructors out there who can teach you. Find accurate resources, practical applications and experienced teachers. You'll have to do some research to weed out any misinformation and incompetent tutors.
Test your skills in a variety of conditions and with a variety of materials. As one accumulates additional knowledge and experience to the different situations we might encounter, our decisions become more natural and intuitive. It's important to take the time to practice your wilderness skills to give you the confidence to use your knowledge before the need arises.
"The more you know, the less you need."
Aborigine saying
E-mail your comments to "Dino Labiste" at KahikoArts@yahoo.com
We hope the information on the PrimitiveWays website is both instructional and enjoyable. Understand that no warranty or guarantee is included. We expect adults to act responsibly and children to be supervised by a responsible adult. If you use the information on this site to create your own projects or if you try techniques described on PrimitiveWays, behave in accordance with applicable laws, and think about the sustainability of natural resources. Using tools or techniques described on PrimitiveWays can be dangerous with exposure to heavy, sharp or pointed objects, fire, stone tools and hazards present in outdoor settings. Without proper care and caution, or if done incorrectly, there is a risk of property damage, personal injury or even death. So, be advised: Anyone using any information provided on the PrimitiveWays website assumes responsibility for using proper care and caution to protect property, the life, health and safety of himself or herself and all others. He or she expressly assumes all risk of harm or damage to all persons or property proximately caused by the use of this information.
© PrimitiveWays 2016