This article has been put together as a guide to a beginner who has the desire to make a bow from a sapling using just a hatchet. Bow making basics like selection of suitable wood and the process of tillering are covered elsewhere. The description which follows is just a guide as to how the job might be tackled.
There really isn't much to say on the topic. The first thing to state is that it is quite possible, perhaps even easy, to make a functional bow using nothing but a hatchet.
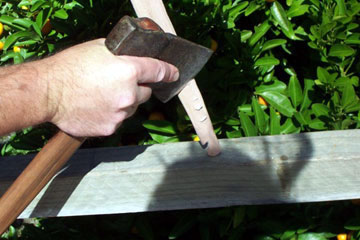
A hatchet can be quite a dangerous tool if used improperly. Because it has a short handle, it is quite easy for it to swing against your body. If chopping something with a downward stroke, it is a good idea to keep your handle as low as possible...then if the hatchet swings further than intended it may hit the ground before it gets you. Always try to be aware of where the hatchet may end up as you make a cut. Think about what you are doing. If you are holding the workpiece with your hand, ensure that your hand is well clear of the chopping area. A hatchet becomes more easily controlled when it is grasped near the blade and used to make small slicing cuts. Most of the finishing cuts on your bow will probably be made like this:
The choice of hatchet is a personal matter. At present I have five different hatchets and two small tomahawks and they all perform well enough. Currently I prefer a lighter hatchet, especially if I am going to be using it for a long time. Some folks may prefer a special hatchet which is sharpened with a bevel on just one side, and this probably has some advantages. However, all my hatchets just have a standard double bevel - but they are sharp.
Using a hatchet alone to shape a bow makes the whole process quite convenient and portable. When a drawknife is used, some device to hold the stave is usually desirable - and generally these things are not very portable. If a rasp or sander is used, quite a bit of dust is generated, whereas the hatchet creates chips that are easier to clean up. I have worked on a bow with a hatchet during breaks at my office. All I needed was the stave and the hatchet... and a few moments to sweep up afterwards.
When heavy cuts are being made in the initial "rough out" stage of making the bow, it is best to sit the end of the stave on a sturdy wooden chopping block. When you get to the stage of making finer cuts, the only time you might need some sort of chopping block is when the floor needs protecting from cuts being made near the end of the stave. An old magazine, or a pad of leather or cloth may help to protect a special floor and reduce the noise. When making light cuts with a sharp hatchet, very little force is required. I sometimes make these cuts while sitting, with the stave lying on an angle between my left shoulder and the floor.
When the first heavy cuts are being made, it may be best to work from the middle of the stave downwards. When half the stave is roughed into shape, the stave can be turned and the other half can be worked on. You will soon find out what works best.
If you make a fairly good job of shaping the belly and sides of the bow with your hatchet, you may decide to leave the surfaces as they are. If you decide that the wood needs to be smoother, you could use your sharp hatchet blade as a scraper to do the job. A steel scraper is a good tool to use to create a nice smooth finish, but your hatchet should suffice. It is a good idea to smoothly round the corners of any bow to help it cope with the stresses of being bent.
Below is a diagram which suggests how a bow could be cut from a sapling stave with a hatchet. I recommend that you leave the bark side of the sapling as the back of the bow (the side that faces away from the archer), and that you do not cut or damage the back in any way. The bow shown in the diagram is intended to be one that bends fully along its length... it does not have a stiff handle section.
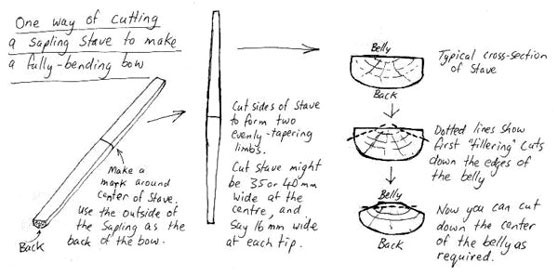
It is often stated that flat belly is best on a bow. However I find it easier (and quicker) to make a bow if the belly is at least partially rounded. With the method shown in the diagram above the belly is most likely to end up a little rounded. It could be made flat if not too much is cut off the corners of the belly at the start. No matter what type of belly is chosen, I recommend that you always smoothly round off all the edges. A hatchet with a slightly rounded blade can be used to produce a flat or a rounded belly.
Nocks can be cut into the bow by making light chopping cuts and then using the hatchet blade as a knife to cut the notches. To make the cuts required for the nock, I generally grasp the head of the hatchet and force it downwards into the wood while it is sitting on a firm surface. The hatchet can be rocked a little in a side-to-side motion as the cut is made. A single notch at each end of the bow (on opposite sides) can work well enough. A single notch nock is shown in the photograph near the top of this article, but there are several different types of nock which could be used.
If you have never made a bow, it would be a good idea to do some research. There are some good books on the subject, and there is some very good information on the internet (see other items on this site). If you want to start making a bow without doing the research you can still succeed. I would suggest that you select dense, straight, blemish-free wood. Generally a bow should be over twice the length of your draw length. A beginner might like to start by making a bow at least as tall as him/herself. You can "rough cut" the stave while it is still green, but you should not start to bend the stave until it has become completely dry. A wider bow is less likely to break than a narrow bow of the same draw weight.
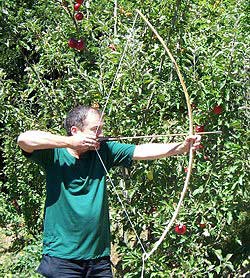
Below is a fully-bending bow that was cut with a hatchet from a small "snakey" sapling.
E-mail your comments to "Stephen Coote" at srcoote@gmail.com.
We hope the information on the PrimitiveWays website is both instructional and enjoyable. Understand that no warranty or guarantee is included. We expect adults to act responsibly and children to be supervised by a responsible adult. If you use the information on this site to create your own projects or if you try techniques described on PrimitiveWays, behave in accordance with applicable laws, and think about the sustainability of natural resources. Using tools or techniques described on PrimitiveWays can be dangerous with exposure to heavy, sharp or pointed objects, fire, stone tools and hazards present in outdoor settings. Without proper care and caution, or if done incorrectly, there is a risk of property damage, personal injury or even death. So, be advised: Anyone using any information provided on the PrimitiveWays website assumes responsibility for using proper care and caution to protect property, the life, health and safety of himself or herself and all others. He or she expressly assumes all risk of harm or damage to all persons or property proximately caused by the use of this information.
© PrimitiveWays 2013