Since I was pretty young I wanted to be a bladesmith, and one of the reasons I didn't begin learning earlier in life was that I was under the mistaken impression that it required very large, heavy and expensive tools. I could not have been more mistaken! About 5 years ago after stumbling upon an on-line primitive bladesmithing community, I began to heat and pound on steel and absorb all I could learn about simple carbon steels and the methods for working with them. Much has been learned through trial and error and advice from those willing to share. I have also picked up several lessons from blacksmith friends. From what I have seen, the blacksmithing and bladesmithing communities are pretty open and accepting and ready to help someone who isn't afraid to ask questions and to take some advice. It is my aim in this article to help pay the debt I owe to those who have helped me get started by encouraging others to begin, without waiting for the perfect tools. Since the focus of this publication is survival, I will discuss the making of a cutting edge from simple carbon steel using found scrap steel, wood & wood charcoal fuel, and makeshift anvils and hammers.
The internet can be a wonderful thing when you can't afford to travel far to see things. Through the internet, I have been able to watch smiths forge blades in Africa, Indonesia, Nepal, and other places around the world. Their forges were often depressions in the ground with a rudimentary air supply. A rock for an anvil and a chunk of mild steel for a hammer (or perhaps another rock), and some handmade tongs were often all they used to create beautiful, functional multi-use blades. So to begin with, let's dispense with our preconceived notions of what blacksmith tools look like. Learning to think outside the "blacksmithing box" will help you if and when the opportunity or need arises.
Fuel
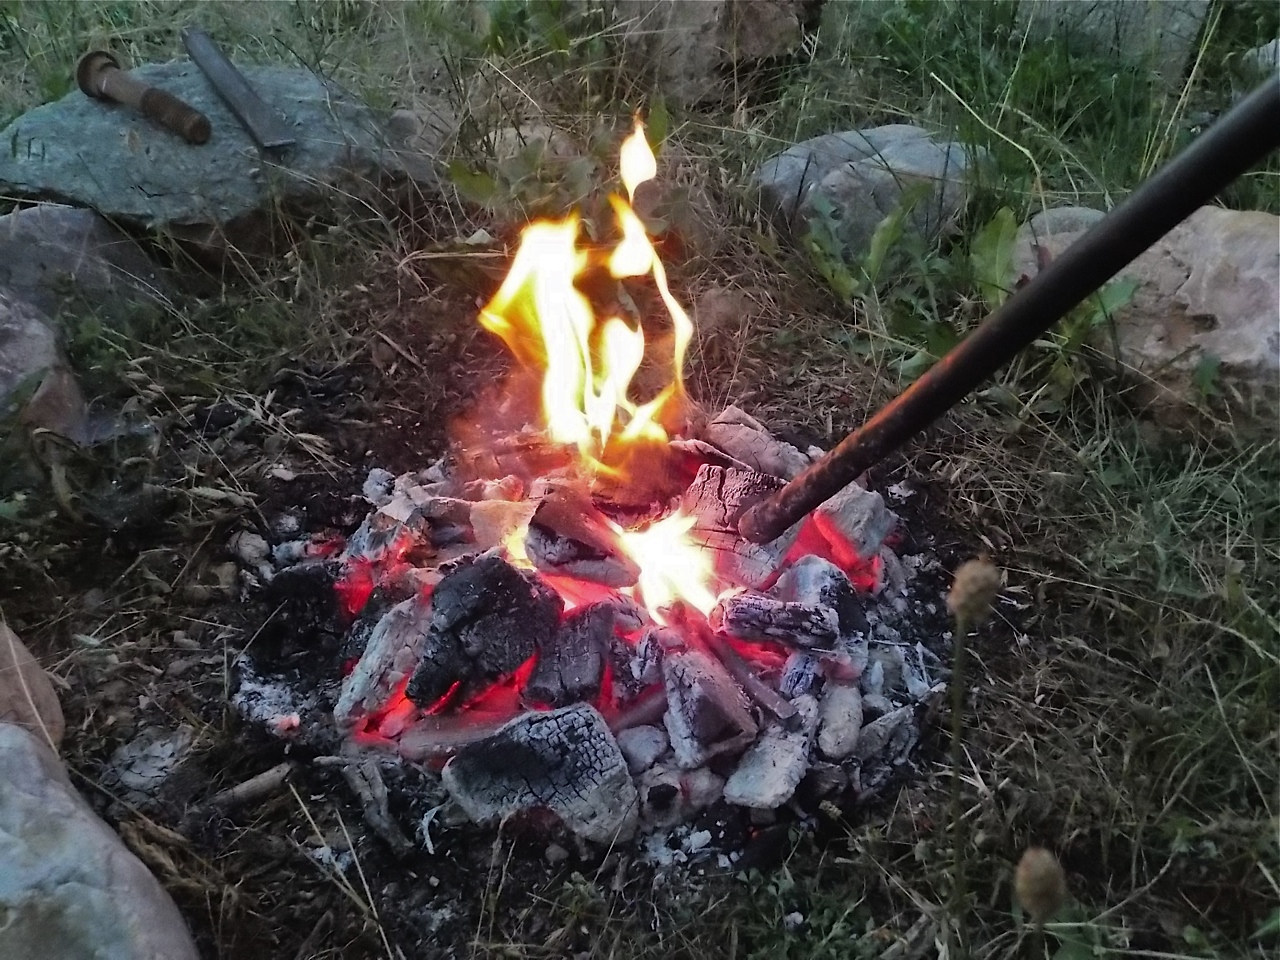
Most people think coal or coke when blacksmithing is mentioned, but some of the most impressive blades in the world have been made using wood charcoal as fuel. It's fairly cheap, free if you make your own, readily available and renewable. If you purchase charcoal for this purpose, buy hardwood lump charcoal for barbecue grills. The best price I have found is at restaurant supply stores -- 40 lbs for about 15 bucks. 40 lbs of charcoal will keep me busy for days. Some wood charcoals are rather sparky, but are still useable for our purposes. When making my own charcoal I prefer pine, douglas fir, or maple, all of which are native to my area. Lots of woods will work. I won't go into charcoal manufacture here, but it's really not difficult and doesn't take long. There is plenty of information on the subject on the internet.
Forge
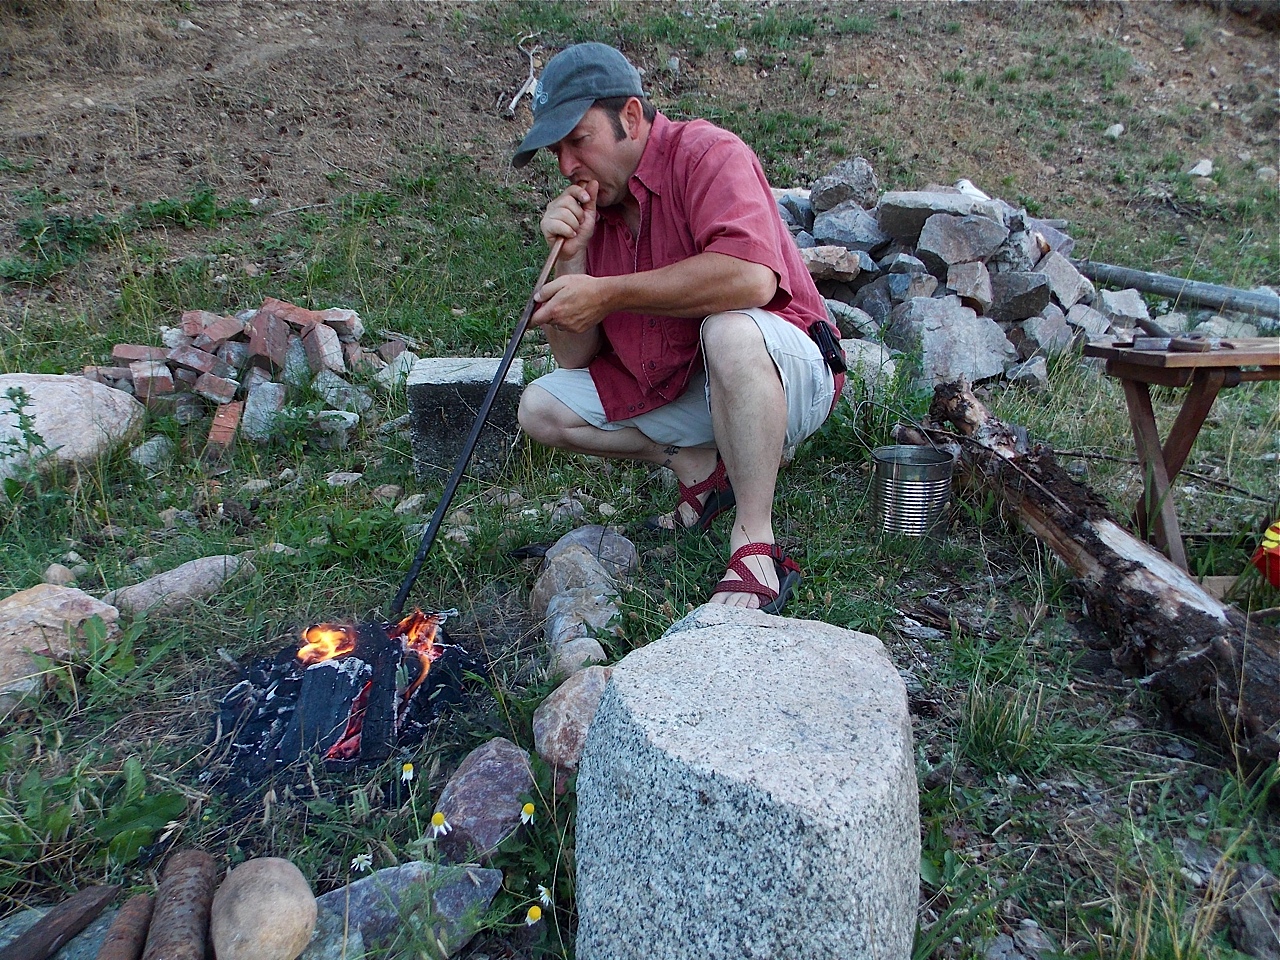
Dig a hole in the ground 14" x 14" and about 8" deep. It's that simple. Really. An old bucket lined with some clay will work if you need a portable set-up. Actually, just about anything that can be lined with an inch or two of clay and hold a good volume of fuel will work.
Air Supply
I apologize in advance to those of you with cheesy 80s pop songs stuck in your heads right now; it wasn't my intention. This is about getting air to the coals. Coals alone will have difficulty reaching the temperature and intensity that is needed for forging steel. Add air and you have more heat and more control. A blow-pipe powered by your lungs will work fine. There are several types of bellows that can be easily made with some scrap materials and some hand tools including bag bellows, a double bellows (great bellows) and a box bellows. One thing to remember is that your bellows must not back draw at all, or it is likely that you will explode your bellows when it sucks in charcoal dust and fire from your forge. Not fun. Rotary hand crank blowers common on mid-20th century forges are great if you can get them. If you have electricity available, an old hair drier on the low setting works great. If you are going to use anything besides a blowpipe, then you will need to get the air under your coals for best results. This can be done easily by using a piece of scrap pipe 1" diameter or larger. Simply drill some 1/4" holes in the pipe where you want the air to come out. Seven or eight holes either in line about 1" apart, or clustered in a section of the pipe will suffice. Leave a way to clean out the length of the pipe when you are finished forging. Connect your pipe to your air source with anything you can find that will work. Two of my forges use old shop vacuum hose and tin cans to connect to the air source.
Hammer
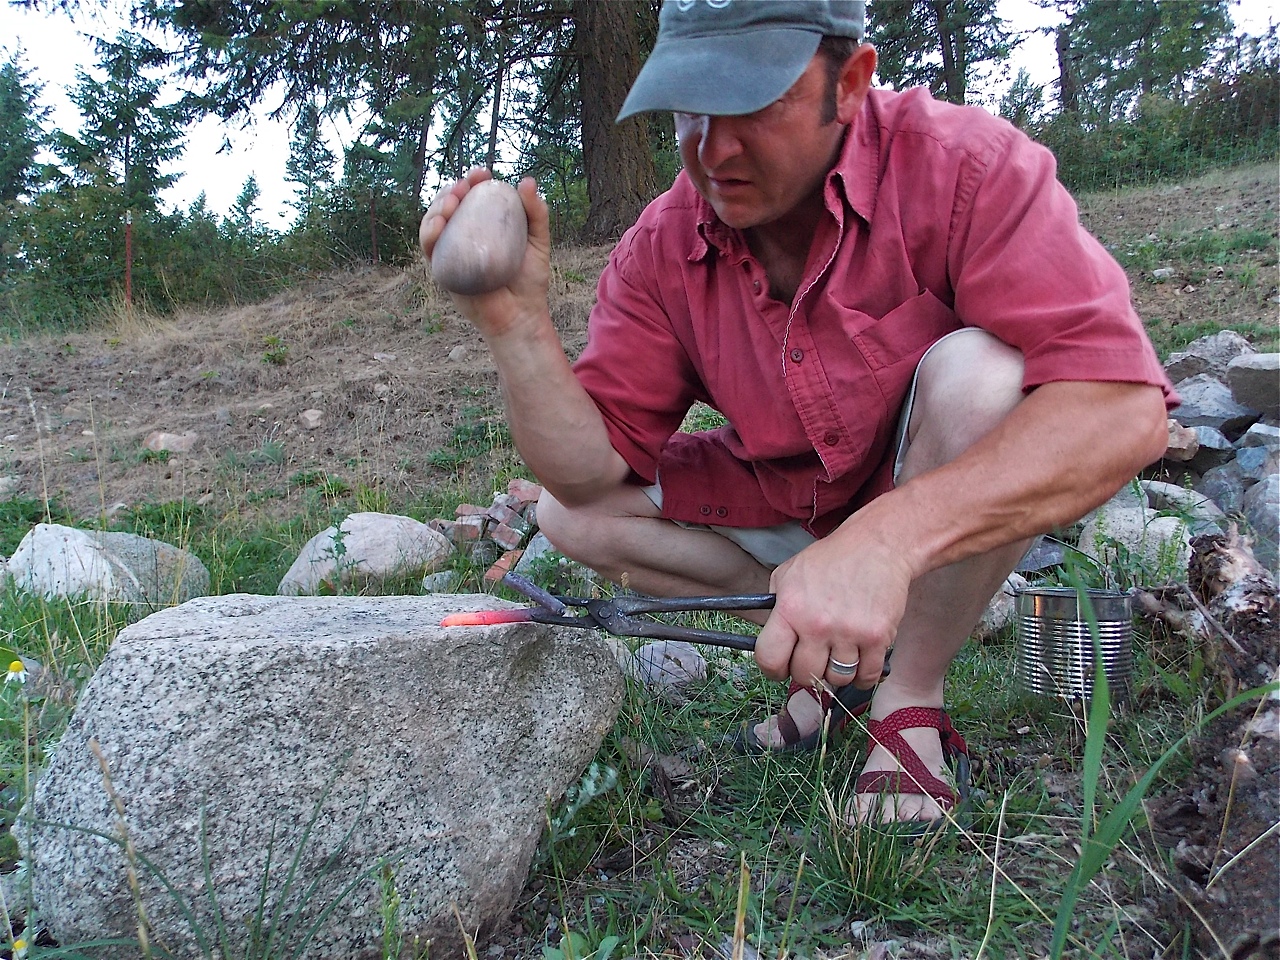
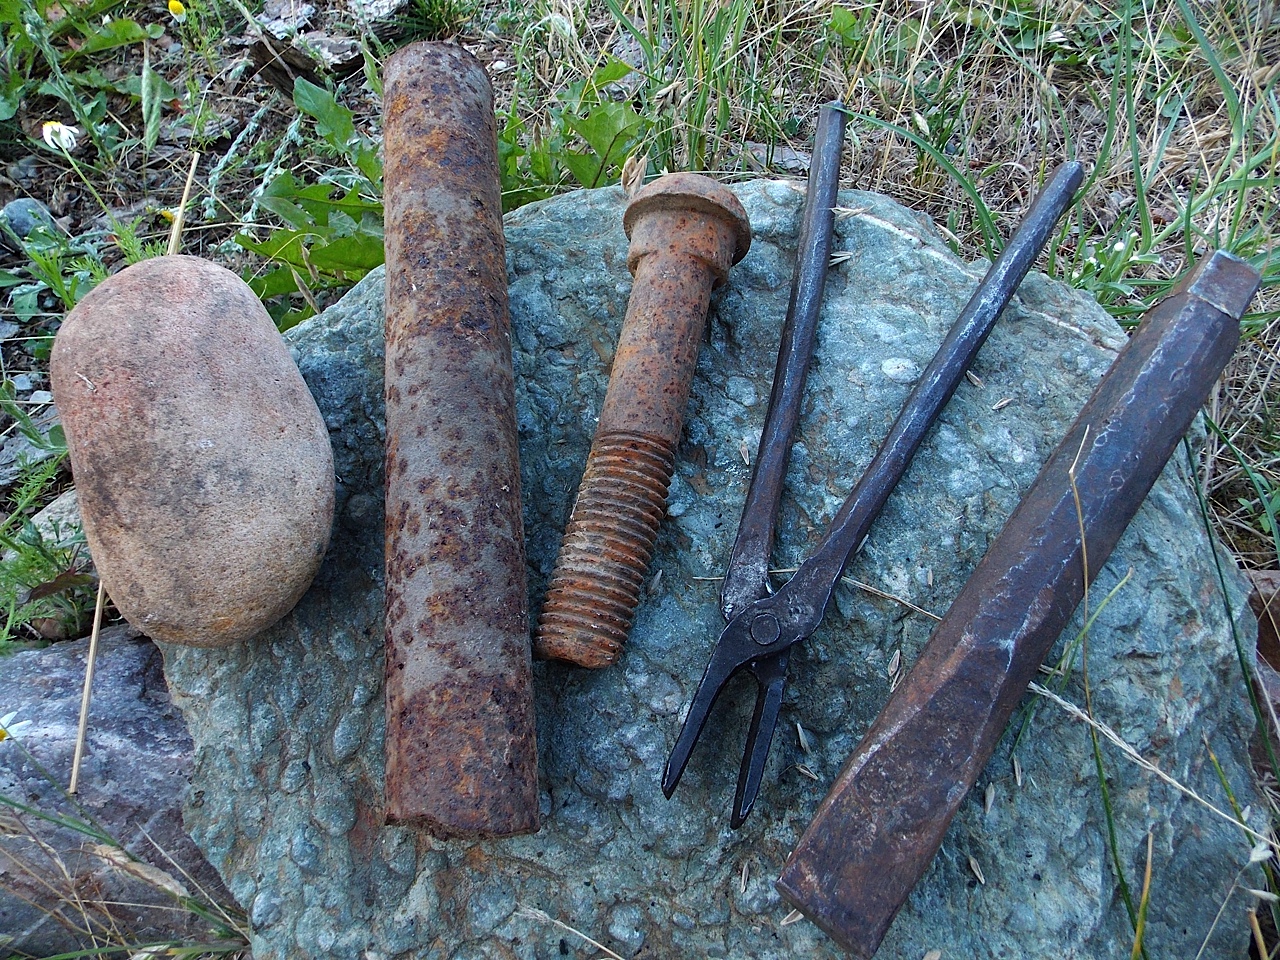
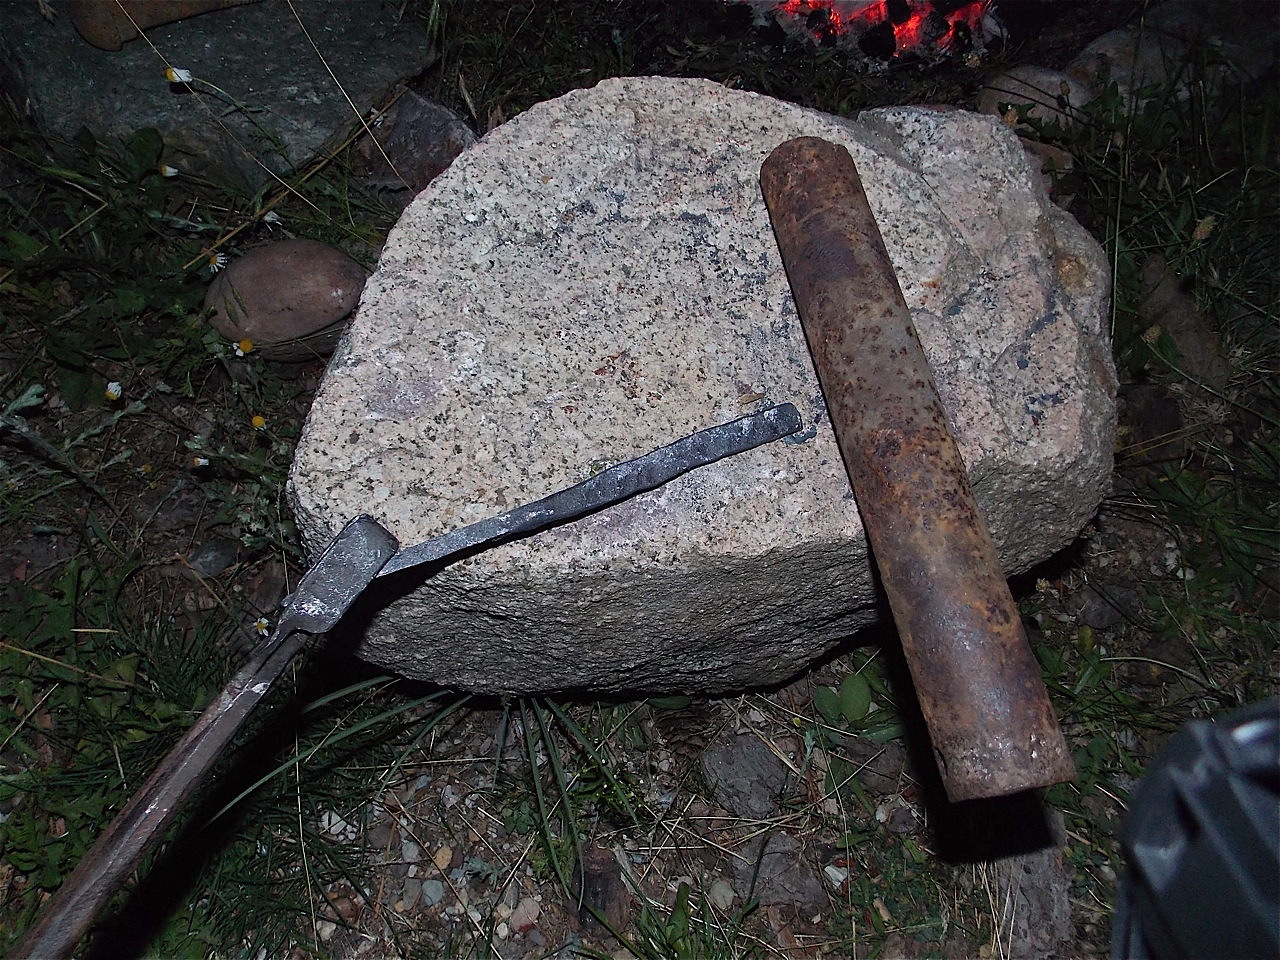
Hammers aren't hard to come by. They also aren't hard to improvise. Ones I have seen from Africa are a chunk of steel with a drawn steel handle -- all one piece of metal. A length of digging bar isn't bad. A hard river stone held in the hand will work.
Anvil
Many primitive blacksmith shops use a chunk of bedrock. Any old chunk of iron or steel will work if you can get at least a 2" clean face. Railroad track works best on end. I have one anvil I love that is a 2.5" x 2.5" by 20" piece of mild steel set on end in a stump. The vertical orientation places more mass under the point of impact and allows you to move metal more efficiently than the same anvil oriented horizontally. It also will have less tendency to bounce around when you are hammering.
Tongs
If you work with stock that is long enough. then you won't need tongs. However, the steel you have to bang on isn't always long enough so you will need a way to hold it. Old pliers or vice-grips work fine and are easy to come by. Chanel locks will also work. Old horse hoof nippers can be re-forged to hold various sizes and dimensions of stock. I do find blacksmith tongs at garage sales and second hand stores on occasion for a decent price.
Blacksmithing Stock
For our purposes,we will want simple high-carbon steel because we can soften it, and we can re-harden and temper it for our intended purpose, which is to be able to take and hold a cutting edge and be durable enough to stand up to serious use in the field. Since we are improvising we won't be buying new stock, but if you were to do so, some good steels to start with are 1070, 1084 and 5160. For sources of scrap, some of my favorites are old leaf springs from early autos, tire irons, large lock washers, old files, and potato harvester digger links. There are many other sources -- be creative and test, test, test.

To Begin
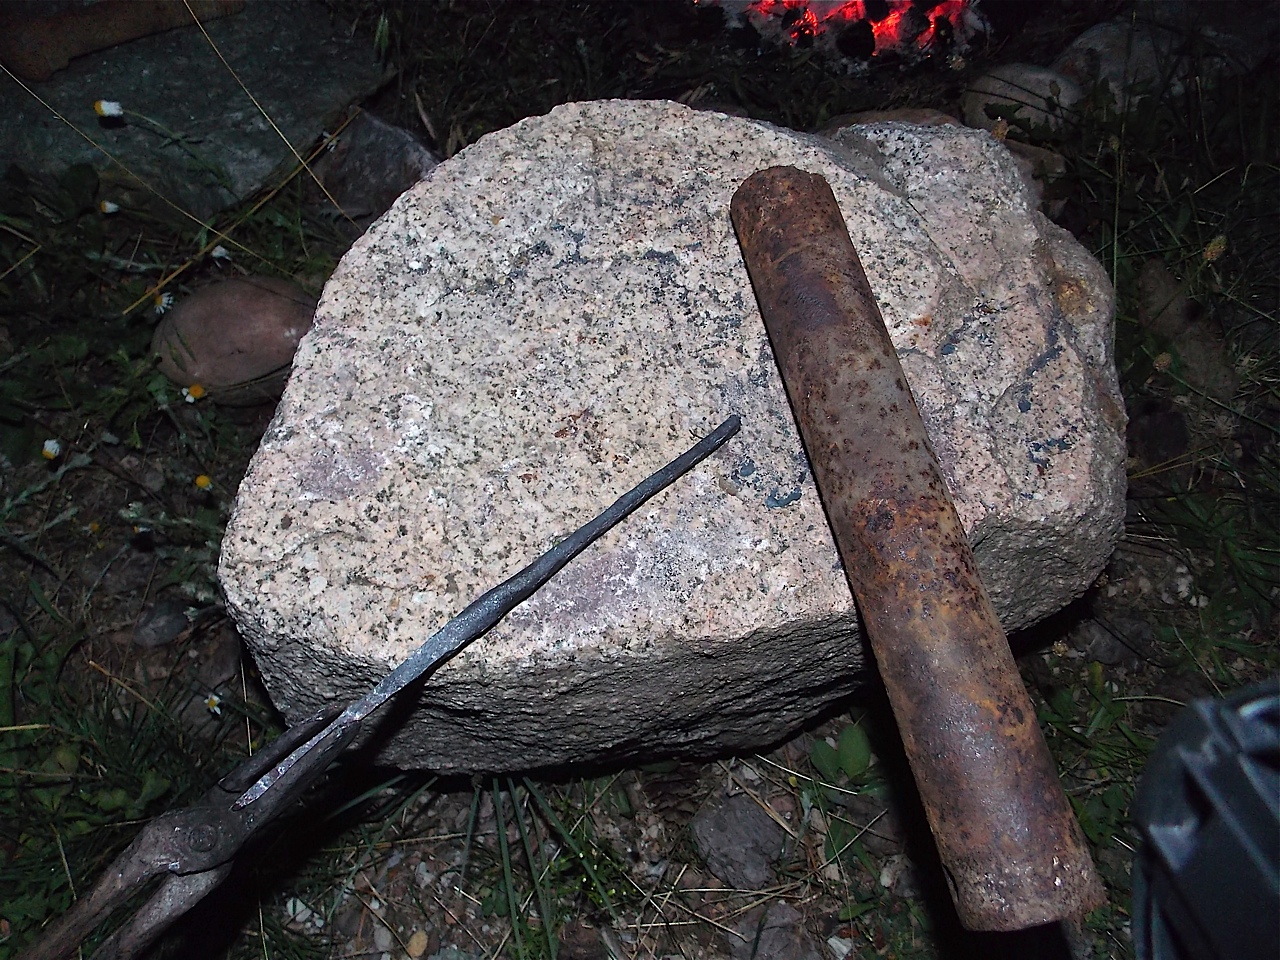
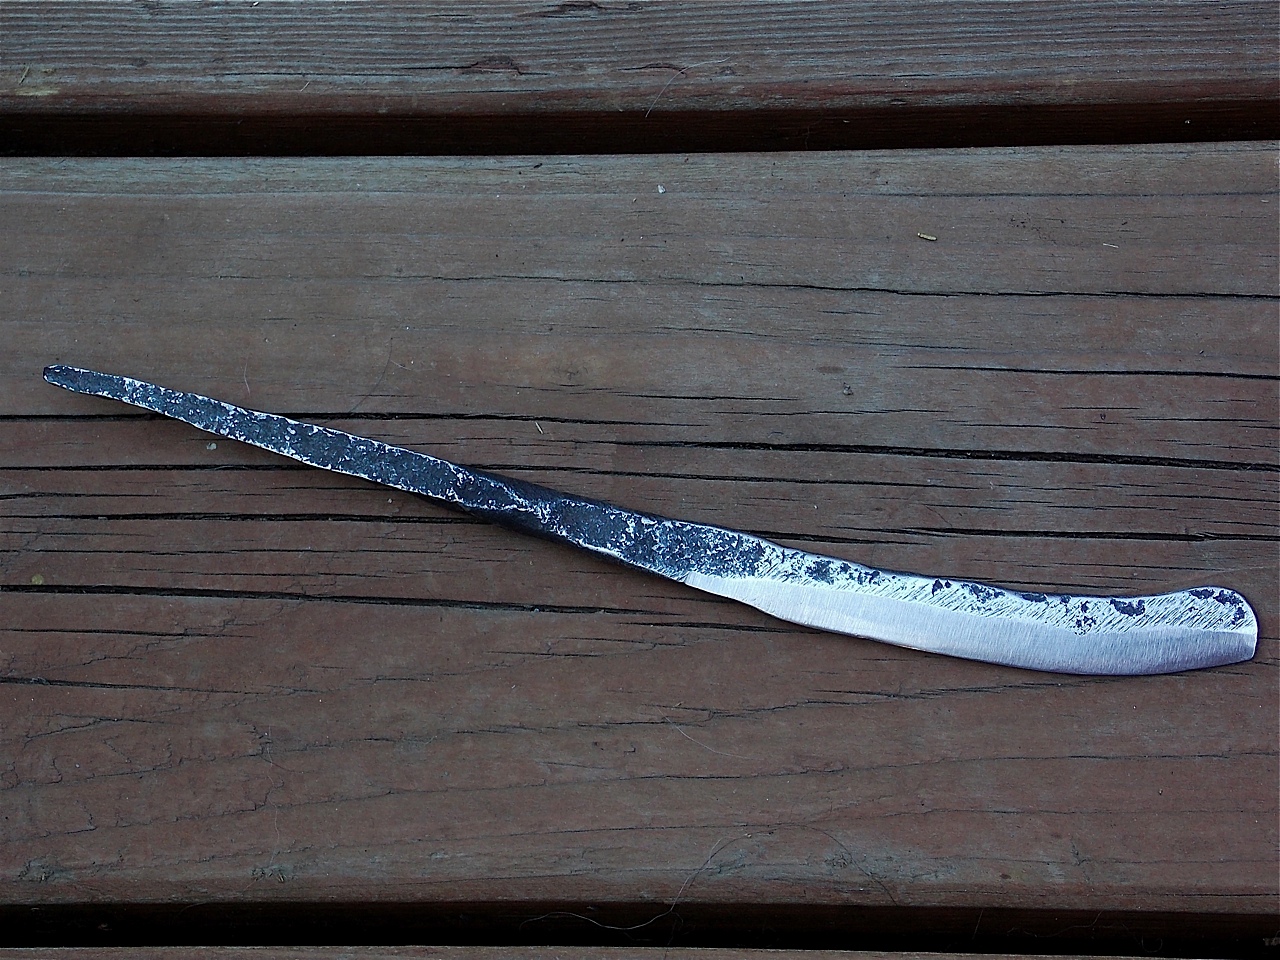
Kindle a fire in your forge, add plenty of wood and let it burn down to coals. A few minutes before the fire is ready, place your stock in the coals and allow it to pre-heat. When the fire is ready, check your stock to see if it has reached any visible heat. If it happens to be orange, then place it on the anvil and start shaping with the hammer. Straighten the stock if there are bends, then draw the knife tang. This is high-carbon stock you are working with, so you won't be able to get away with abusing steel that isn't hot enough to be glowing. When you loose color, quit hitting it and put it back into the fire and reheat. Remember: reheat, beat, repeat. For the knife in this article, I used the curled end of a digger link. I decided that a tapered stick tang would be most appropriate, and I intend to haft it in a wood handle.

When your knife tang is defined, turn the piece around and heat the blade end and flatten & shape your stock to the desired thickness. Straighten as you go. When the blade is flat enough and roughly the desired shape, make the blade bevels using your hammer. As anticipated, as the bevels were hammered into this blade, thinning the blade side only, the blade curved gently. If a straight blade is desired you can pre-bend the blade in the opposite direction to counteract this effect. I decided that a gentle curve was desirable for this blade and just let it happen naturally.
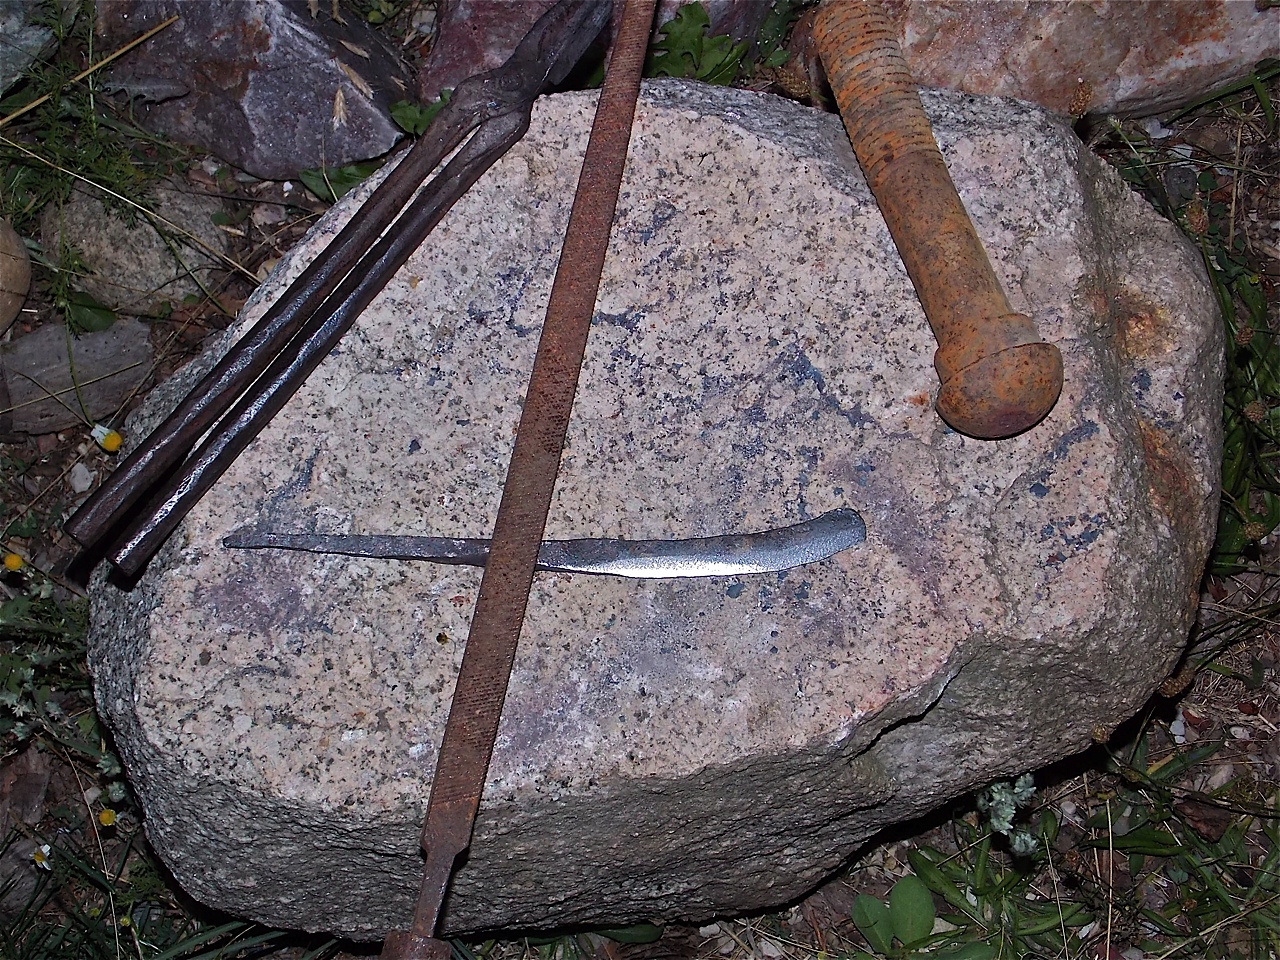
After the general shape is obtained and the blade bevels defined, clean up the profile if needed and rough file the blade bevels, and then sand to desired smoothness. This can be done with a grinder or sander if you have one, or you can draw-file with hand files, or you can use sand and water on a flat rock. Any of these methods will work if you have the time to accomplish the task. When done with the refining process then you are ready for heat treating, which is the real science behind bladesmithing.
Heat Treating Simple Carbon Steel
When I heat treat a blade I use 3 distinct stages in the process: normalizing, hardening, and tempering.
The forging process has introduced much stress to the steel, so to increase your blade's chances of surviving the hardening process the blade must be normalized first. To do this, evenly heat the steel above critical temperature. If you have a magnet -- use it to test the steel. If the steel is drawn to it; it's not hot enough. Once you find critical, then bring the steel just a tad hotter, then remove from the fire and allow to air cool. Repeat this 2 more times for a total of 3 normalization cycles.
To harden the steel, heat evenly to just above critical temperature and plunge the knife, blade-first into a quenchant. This can be as simple as a container of water, or you can use a number of fine oils. Canola oil heated to about 130 degrees F works great. Steels with more carbon usually do better with oil, medium carbon steels do fine in water. Do this stage decisively and quickly. Move directly from the forge to the quench tank, and do not move the blade once submerged as it can introduce warpage into the blade. This state puts the blade under extreme stress, and if a disaster is going to happen it will happen now. The blade made for this article is high-carbon steel, was water quenched, and it did fine.
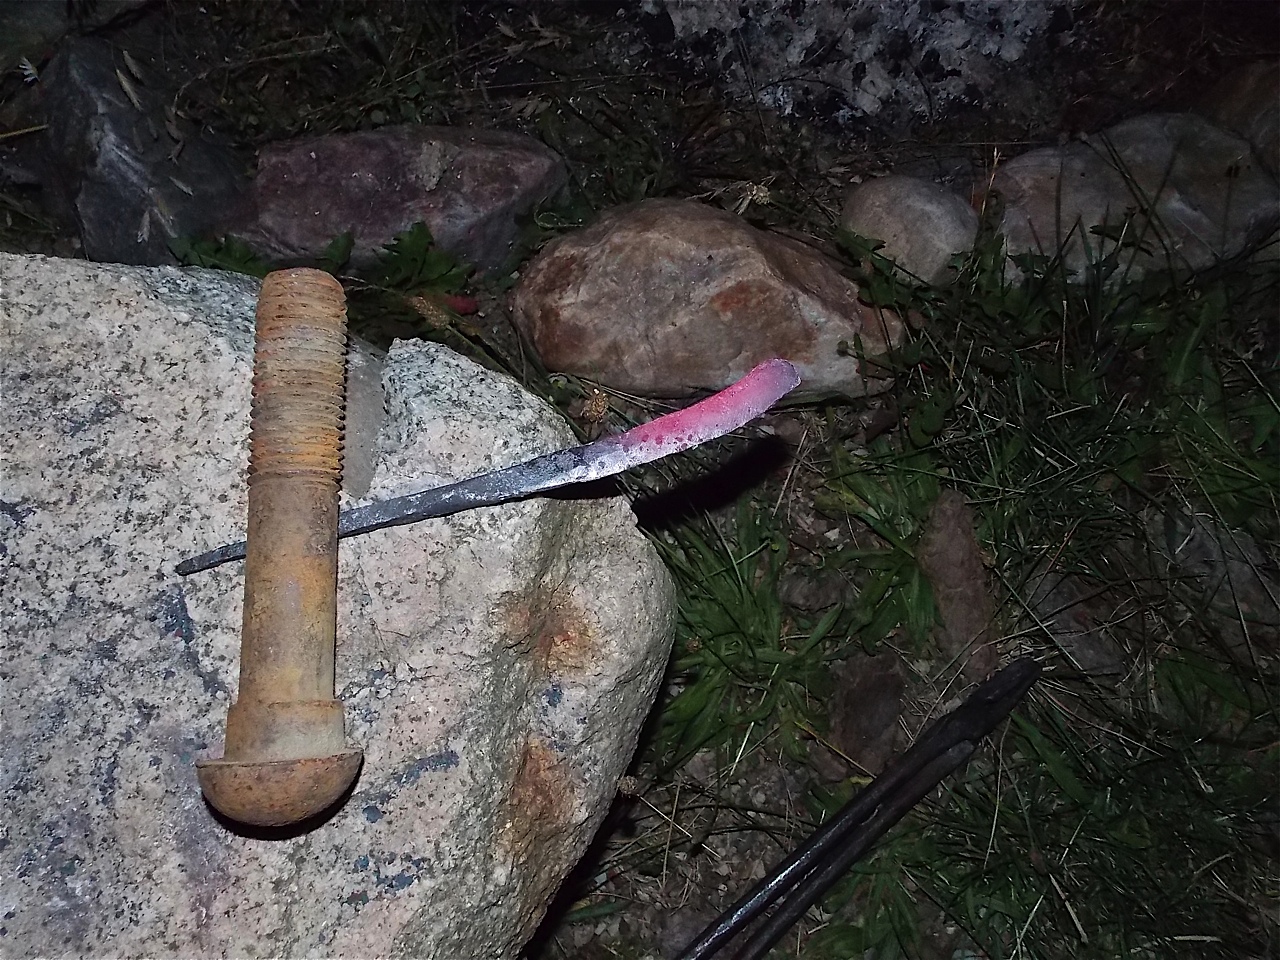
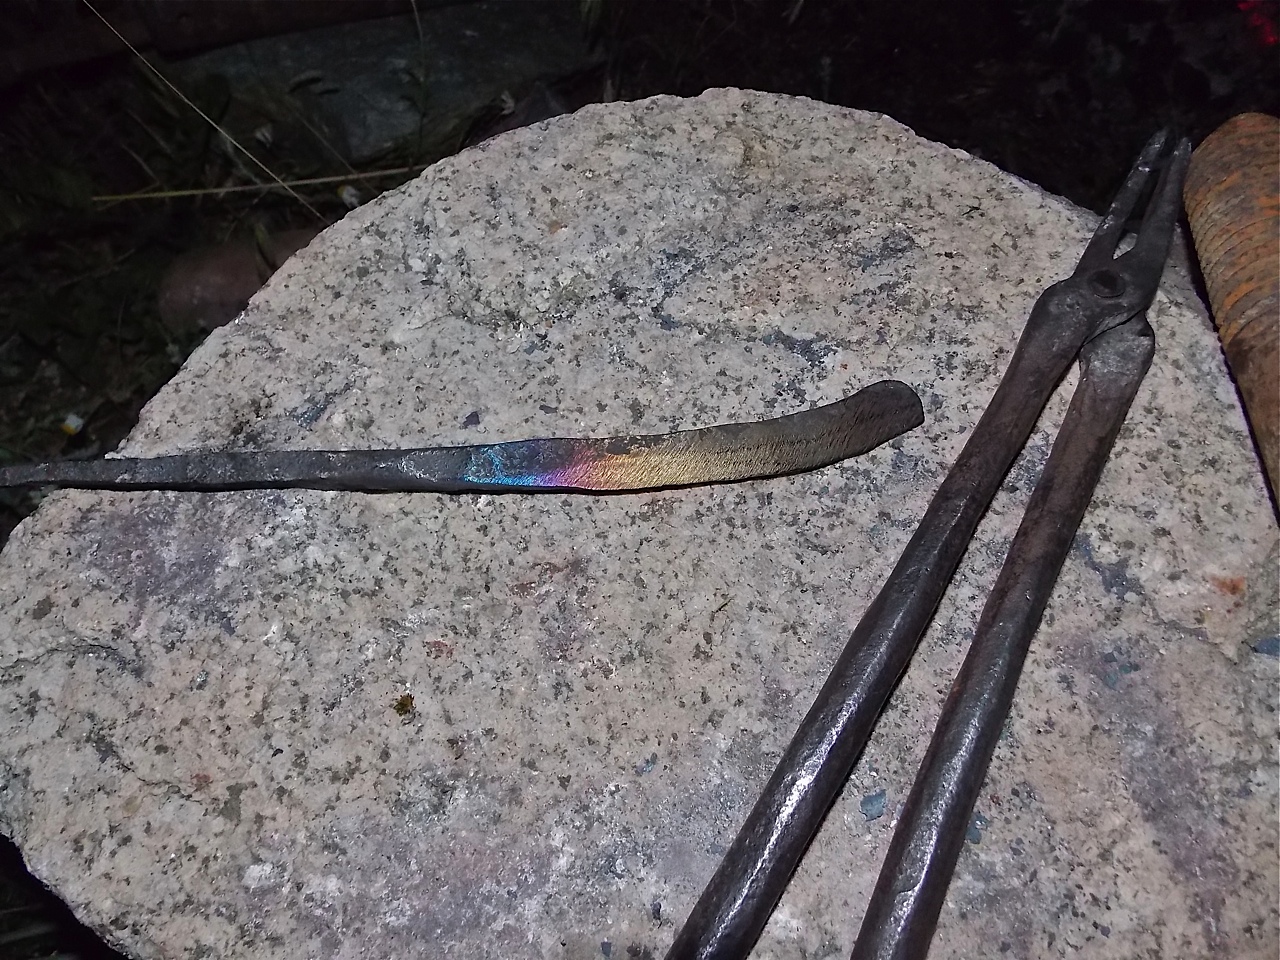
Once the blade is hardened, then it needs to be tempered. The tempering process is often misunderstood. Tempering is not hardening; it's the process of making your steel more durable. You want a blade that will be hard enough to hold an edge, soft enough to sharpen yourself, and durable enough to stand up to abuse without snapping in two. Straight from the quench your blade is like a piece of glass. To temper, lightly sand your blade with sandpaper or a smooth rock until you can see the shiny steel. Tempering will cause colors on the surface of the steel, and you need to be able to interpret these colors to do the job right. Let your fire rest until it loses forging intensity. It helps to place a layer of ash on the coals, then gently place the blade on the coals, spine down. This will heat the blade from the spine toward the blade. Don't take your eyes off the knife! It will take several minutes, but you will gradually see a light yellow or straw color creep into the blade. This will progress to a dark straw, then to brown, and if allowed to progress will turn to purple, bright blue and then to white. We want to stop the process when the blade is a dark straw. If you go to higher heats, your blade will be too soft. To stop the progression of the temper colors, quench in water. For the blade in this article, I also tempered the transition of the knife to a purple/bright blue. I wanted this blade to be very durable there. The tip of the blade was tempered to a brown to reduce the risk of snapping it off when during misuse. The tang on this blade was left soft. You can see these tempering colors in the photo below. As with many steps in bladesmithing there are many ways to temper, and I have covered only one primitive variation.
After tempering, your blade is ready for final sanding, hafting, and sharpening. I consider the blade done for this article to be pretty crude, but it was done with rocks and a few pieces of scrap steel, and I am confident that it will perform well. I hope this article has encouraged folks to build simple forges and begin to heat and beat on steel. Don't wait for ideal tools or equipment; just do it!
E-mail your comments to "Patrick Farneman" at patrickf@bridgestothepast.org
Visit www.bridgestothepast.org and join us in the journey of discovering our roots - the ancient ways and skills that help define who we are. Bridges to the Past is a non-profit organization dedicated to education and preservation of our shared human history through the skills of our ancestors.
We hope the information on the PrimitiveWays website is both instructional and enjoyable. Understand that no warranty or guarantee is included. We expect adults to act responsibly and children to be supervised by a responsible adult. If you use the information on this site to create your own projects or if you try techniques described on PrimitiveWays, behave in accordance with applicable laws, and think about the sustainability of natural resources. Using tools or techniques described on PrimitiveWays can be dangerous with exposure to heavy, sharp or pointed objects, fire, stone tools and hazards present in outdoor settings. Without proper care and caution, or if done incorrectly, there is a risk of property damage, personal injury or even death. So, be advised: Anyone using any information provided on the PrimitiveWays website assumes responsibility for using proper care and caution to protect property, the life, health and safety of himself or herself and all others. He or she expressly assumes all risk of harm or damage to all persons or property proximately caused by the use of this information.
© PrimitiveWays 2013