The genus of plants botanists term Schoenoplectus, offers a rich history and a cornucopia of uses. Dense patches of tule rise like forests of green spikes from wetlands or areas of seasonal flooding. Once you recognize the genus, you will see them everywhere. These plants, so frequently unappreciated in roadside ditches and irrigation ponds, have always been of value to humans. Today it provides wildlife with food and habitat. It acts as a biological filter, improving water quality. It is and was used by many Native American groups both as a food resource and for manufacturing items of material culture. Thatching for homes, baskets, mats, boats, decoys, hats, clothing and shoes are among the items of material culture constructed of tule by Native Peoples. Most of us know these plants as tule or bulrush. They belong to a larger group of graceful and useful plants in the sedge family (Cyperaceae).
Characteristics of Tule
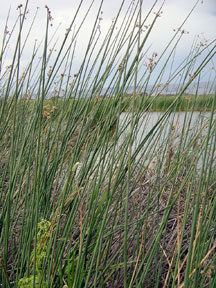
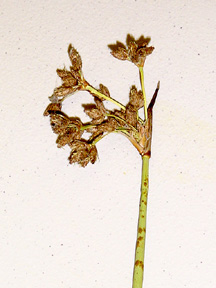
Schoenoplectus, or tule, is widespread throughout the United States. An identifying feature is the cylindrical or three angled stem. In many species the stem is the most prominent feature, often with only small, vestigial leaves appearing at the base of the plant. Tiny flowers appear near the tips of the stems in spikelets which are arranged in clusters. Species range from less than a foot to over fifteen feet in height. It is not always easy for the non-botanist to distinguish members of this genus from one another. In California alone twenty-three species are listed, some of which hybridize with each other. There are about 80 species of Schoenoplectus worldwide.
The interior of each tule stem is filled with spongy tissue packed with air cells. It is the pithy interior of the tule that makes it such a unique and useful material. This detail of its anatomy serves to make it both flexible and a poor conductor of heat. As anyone who has attempted to sleep outdoors on the bare ground is aware, an insulating pad is critical to maintaining body heat. The effectiveness of the tule in providing insulation can be attested to by its use by Native Peoples as a sleeping pad, in shoe construction, and even in leggings.
Gathering and Processing Materials
The stem or stalk of the tule is the plant part used in constructing a tule mat. The gathering time for tule stalks used in basketry or tule mat construction is seasonal. In most areas members of this genus are dormant in the winter. Winter stalks are usually brown, brittle, and pretty much useless. Stalks grow actively through spring and during the summer. Gathering is generally done at the peak of maturity and up through the time when the tips are beginning to die back. Spring-cut tule may not yet be fibrous enough to make a resilient twining material. Choose a species of a size and strength appropriate for your intended project. Generally this is one of the larger species with a cylindrical stem such as Schoenoplectus acutus.
Tule is cut green, and allowed to dry. Freshly cut stalks are fragile. Careless handling can easily cause them to fold over, creasing the fold and damaging the fibrous outer tissue. Care must also be taken to avoid damaging green tule as it is transported to a drying area. Lay cut stalks together and bind them carefully so they may be carried as a bundle without crimping. It is easier to handle fresh tule without damaging it if the seed heads are trimmed away. Find a flat protected area, open the bundle and allow the tule stalks to dry. When they are dry the tule can be bundled together and stacked upright. When you are ready to make your mat, size and cut the tule into equal lengths. Generally, the length of the stalk corresponds to the width of the mat.
Dried tule stalks are more resilient than green tule. The drying process shrinks and toughens the stalk. However, it must be rehydrated prior to being worked. To rehydrate the tule, the entire length of the dried tule must be kept damp long enough to make each stalk flexible. This can be done by submersion if a suitable body of water is available, or the tule may be hosed down and left under a wet towel. When the tule is no longer crunchy when bent, and it has a feel similar to leather, it is ready to work. Rewetting is necessary periodically during the construction process.
Construction of the Tule Mat
When the tule is ready, lay the stalks out on a flat area. As they are set out, turn them so every other one is facing the opposite way. Tule have wide butt sections and tapering tips. If your tule tapers rapidly from a broad base, it may be necessary to trim off the butt section. Alternating the butt ends with the tips allows the mat to maintain a rectangular shape rather than a fan shape.
The following photographs and drawings serve to illustrate a technique for creating a sleeping mat of tule, twined with natural cordage. It is just one of many styles, and I encourage the reader to explore the styles employed by Native People in your own geographic area.
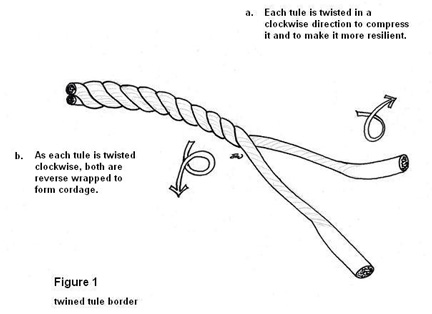
Once the materials are ready, the first step is to create a border. This is not just a design element for the finished mat, but an important part of its structural integrity. Borders may be of twined or braided tule. (See Figure 1 for an illustration of a twined border) As the tule is twisted and its foam core is compressed it becomes tougher and far more abrasion resistant. Without a border, the mat is susceptible to wear at each point were the cordage contacts the outermost tule stalk.
Tule stalks may be bound together into a mat using several
different techniques. Mats may be twined together using lengths
of twisted tule. A tule mat made with tule cordage has larger
gaps between  rows of
tule because tule cordage is a thick twining material. This method's
greatest advantage is that it does not require a fiber plant like
dogbane. Another mat-making method is to sew the tule together
with cordage. Here a needle is employed to pull the cordage at
a right angle through the center of each stalk from one border
to the other. Sewn mats create closely spaced tule stalks. With
this method, a single row of twining along each side's cut edges
stabilizes the mat.
rows of
tule because tule cordage is a thick twining material. This method's
greatest advantage is that it does not require a fiber plant like
dogbane. Another mat-making method is to sew the tule together
with cordage. Here a needle is employed to pull the cordage at
a right angle through the center of each stalk from one border
to the other. Sewn mats create closely spaced tule stalks. With
this method, a single row of twining along each side's cut edges
stabilizes the mat.
This article shows a technique using cordage as the twining material. The method termed "twining" differs from weaving. With twining, each time the two pieces of cordage are passed over and under the tule, it is given a half twist to the right. With weaving there is no half twist. The cordage used as twining material for this project is itself a twined product. Each row of twined cordage binds the tule together. Rows are spaced about every 5 to 8 inches depending on the size and purpose of the mat.
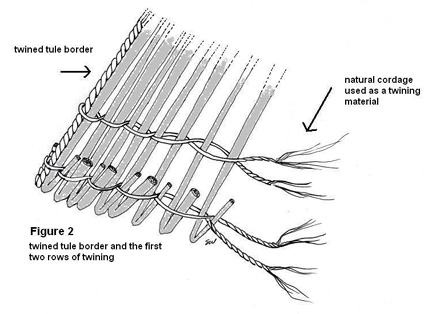
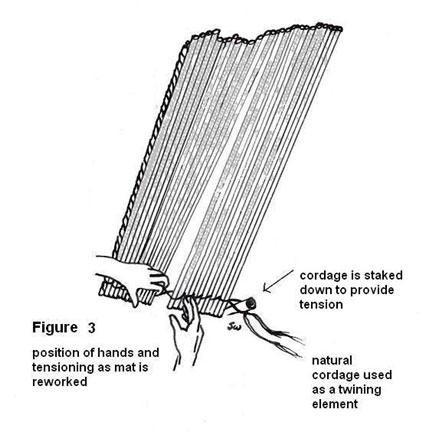
The twining technique illustrated here progresses left to right, rotating clockwise with each twist. The first row of twining runs from one border along the edge of one side of the mat to the border at the opposite side. The first row of twining incorporates the folded over ends of cut stalks. Fold at least two inches over for large sized tule mat. This helps prevent the cordage from slipping. Measure a length of cordage to fit your first row. Twining material may be measured at approximately two and one third times the distance from one braided border to the other. The center of the measured section of cordage is placed over the twined border and the border's folded edge. The lower half of the cordage is then pulled up around the first tule, joins the upper piece of cordage, and the two strands are twisted in a half turn. Be consistent with your half turns, always rotating clockwise. Tule are bound together two at a time. The folded edge of the last tule in each pair is incorporated into the next twist of twine as it binds the next two tule. (See figure 2) The first row incorporates twice the volume of tule and must be pulled very tight, crimping the softened tule. If it is not pulled tight enough, the ends of the mat will flare outwards. If the mat flares despite your efforts, do not despair. Reworking the row (See figure 3) will compact it further. Reworking can also tighten a mat which has shrunk after drying. After the first row is tied off, the second row may be started with a simple twist around the border and first tule. The second, third and further rows are more easily twined, simply incorporating two tule at a time.
 As the weaver works,
there are times when two hands seem inadequate. See photographs
1 and 2 for some hints on positioning and manipulating materials.
The first obstacle comes after two tule have been laid in place.
The half twist in the twining process has been made, but now each
hand holds a piece of twine, and another two tule need to be added.
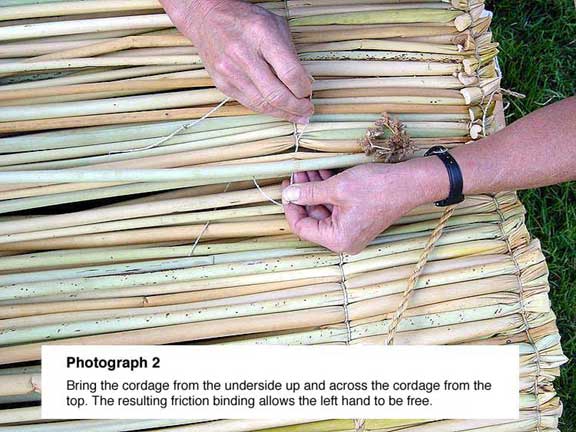
Bring the twine from the underside up and cross it over the other
piece of twine. Hold tension on both pieces of twine until the
cross over is made. Now, tension on the piece of twine brought
up from below will make a temporary friction binding. This allows
the other hand to be free. Start the first row on a flat surface,
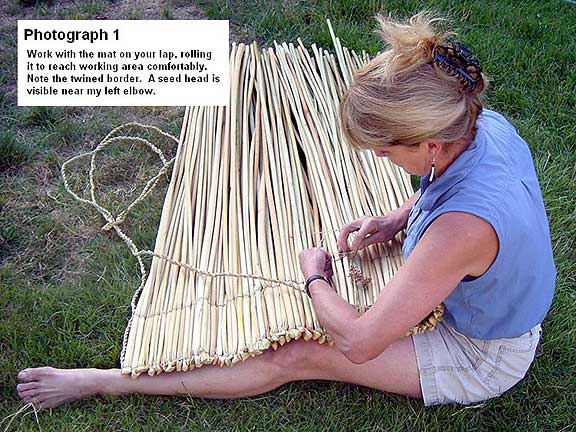
as you gain control, move the work onto your lap. As the mat becomes
larger, roll the starting end up to make the piece more manageable.
Turn the mat frequently to check your work. It is easy to miss
a tule when you are learning the process. Complete all the rows
across each few feet of matting. That way, if time does not allow
completion of the mat in one sitting, the twine ends may be tied
with an easy release type of knot and the whole piece may be rolled
up and set aside until it can be worked again. If the cut ends
need to be reworked after they have dried, roll up the mat and
rehydrate the cut ends by soaking them in a five gallon bucket
of water. Eventually these mats will show signs of wear. When
a portion of the mat is damaged, repair is straightforward. Simply
open the twining stitch with an awl at the point where the tule
is broken. Hold it open while you remove the old tule stalk and
insert a new one in its place.
As the weaver works,
there are times when two hands seem inadequate. See photographs
1 and 2 for some hints on positioning and manipulating materials.
The first obstacle comes after two tule have been laid in place.
The half twist in the twining process has been made, but now each
hand holds a piece of twine, and another two tule need to be added.
Bring the twine from the underside up and cross it over the other
piece of twine. Hold tension on both pieces of twine until the
cross over is made. Now, tension on the piece of twine brought
up from below will make a temporary friction binding. This allows
the other hand to be free. Start the first row on a flat surface,
as you gain control, move the work onto your lap. As the mat becomes
larger, roll the starting end up to make the piece more manageable.
Turn the mat frequently to check your work. It is easy to miss
a tule when you are learning the process. Complete all the rows
across each few feet of matting. That way, if time does not allow
completion of the mat in one sitting, the twine ends may be tied
with an easy release type of knot and the whole piece may be rolled
up and set aside until it can be worked again. If the cut ends
need to be reworked after they have dried, roll up the mat and
rehydrate the cut ends by soaking them in a five gallon bucket
of water. Eventually these mats will show signs of wear. When
a portion of the mat is damaged, repair is straightforward. Simply
open the twining stitch with an awl at the point where the tule
is broken. Hold it open while you remove the old tule stalk and
insert a new one in its place.
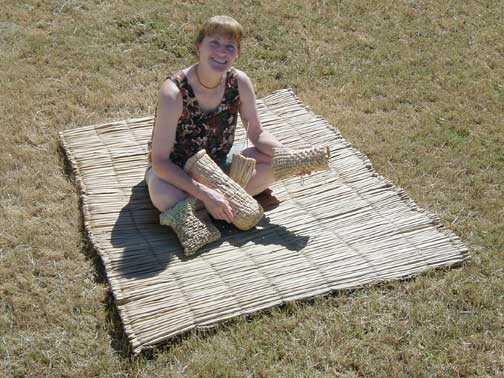
This method produces a tough, closely spaced tule mat which is comfortable, provides good insulation and is resistant to soiling. These mats are light weight, and durable. When not in use they may be rolled up and stored upright. The mat in the photograph has served as a sleeping mat during the Rabbitstick Rendezvous 2005, numerous camping trips, and many school programs. It shows little sign of wear.
References
Paul D. Campbell
1999 Survival Skills of Native California, Gibbs Smith
Publisher, Salt Lake City, Utah
Catherine S. Fowler
1990 Tule Technology Northern
Paiute Uses of Marsh Resources in Western Nevada, Smithsonian
Folklife Studies number 6, Smithsonian Institution Press, Washington
D.C.
Robert F. Heizer & Albert B. Elsasser
1980 The Natural World of the California
Indians, University of California Press, Berkeley, CA
James C. Hickman, Editor
1993 The Jepson Manual Higher Plants
of California, University of California Press, Berkeley, Los
Angeles, London
Christopher L. Moser
1989 American Indian Basketry of
Northern California, Riverside Museum Press, Riverside, CA
This article was first published in The
Bulletin of Primitive Technology (Spring 2006, #31)
E-mail your comments to "Susan Labiste" at labiste_s@sbcglobal.net
We hope the information on the PrimitiveWays website is both instructional and enjoyable. Understand that no warranty or guarantee is included. We expect adults to act responsibly and children to be supervised by a responsible adult. If you use the information on this site to create your own projects or if you try techniques described on PrimitiveWays, behave in accordance with applicable laws, and think about the sustainability of natural resources. Using tools or techniques described on PrimitiveWays can be dangerous with exposure to heavy, sharp or pointed objects, fire, stone tools and hazards present in outdoor settings. Without proper care and caution, or if done incorrectly, there is a risk of property damage, personal injury or even death. So, be advised: Anyone using any information provided on the PrimitiveWays website assumes responsibility for using proper care and caution to protect property, the life, health and safety of himself or herself and all others. He or she expressly assumes all risk of harm or damage to all persons or property proximately caused by the use of this information.
© PrimitiveWays 2013