VI. Coiling and Paddling the Walls
A sausage-shaped clay hunk was held vertically between the palms and rolled back and forth. In this way it lengthened until it reached about 12 inches at a uniform diameter of about 1 inch. This formed a coil. (Coils were sometimes thinner on prehistoric pots.) As Rosa Lopez's right hand laid the coil clockwise on the base, still inverted on the mold, her left thumb pushed small sections of the coil over and onto the base at intervals of 1 inch to fasten it. Each coil was a concentric unit (unlike the Pueblo spirals). If necessary, extra pieces were spliced in to make it complete. The thumb tabs were rubbed over with a moistened thumb and the entire line smoothed with wet fingers to bond it. Josefina Ochurte laid her coils counterclockwise with her left hand while her right middle finger pulled out the little connecting tabs. A small smooth flat stone dipped in water replaced wet fingers to bond the seam.
Blows directed downwards with the paddle flattened the coil, pulled it out, thinned it, and increased the height of the pot's wall. It was removed from the mold and held upright in the lap. Moistened fingers bonded and smoothed the inside seam as they had the outside.
Before placing the next coil, irregular rims were trimmed level. A moistened flake of stone or wet agave fiber cord, used in a sawing motion, traditionally did this, but in Rogers' time and more recently at Santa Catarina, a steel knife was used. The joined tips of the thumb and first finger formed a right angle which swept clockwise around the cut rim to smooth it. The bowl was lifted and turned counterclockwise after each stroke.
Returning the bowl to the mold, the coiling continued until it reached the vertical side of the mold. After this, additional coils were placed with the bowl maintained upright on the lap. An anvil held against the inner wall opposed paddling on the outside. A water-worn cobble served as anvil, bonding, thinning and giving curvature to the wall. A small bowl, mano or, as an expediency, a small basket would work. A hollow or solid-stemmed mushroom-shaped ceramic anvil was also employed. Such anvils are still made in many sizes by Josefina Ochurte at Santa Catarina. The paddle struck upward against the wall to lengthen and thin it and prevent lateral distention. Any cracks were quickly filled by the fingers with a thin clay soup and then paddled.
To bring a wall in, the rim was beveled acutely inward and the new coil placed on its outer margin. Bonding took place on the inside first, the reverse of the earlier procedure. (Sometimes the tabs pushed out with the thumb were not completely obliterated, but could be found on the finished vessel.) To recurve the rim, coils were placed on an outward beveled rim, the reverse of bringing the wall in. Paddling continued upward until the desired thinness of the wall was achieved. At Santa Catarina, finished pots varied from around 1/8 to 3/16 of an inch in thickness.
To make the small water-olla-style neck, the paddle was reversed and the paddling done with the narrow handle against the first two fingers of the left hand inserted in the neck of the pot. The coils were also thinner at this stage. Sweeping upward motions of the paddle drew the clay out and gave height to the neck. Because of its delicacy, irregularities of the rim were nipped off with the teeth. Finally the potter filed pits and cracks with daubs of wet clay and, using the wet palm of her hand in a circular motion, rubbed and smoothed the entire surface of the vessel.
VII. Drying
Next the light cinnamon-colored or buff brown pots were dried in the sun. Only a few hours might have passed between the completion of the last piece and the preliminary baking that followed the drying. Rosa Lopez fired a bowl after only four hours. Rogers explained that a short drying time was possible because of the nature of the clay being used and the paddle and anvil technique, which forced water to the surface where it quickly evaporated. Placing an unfired pot near an open fire during humid weather hastened the process for some potters. On an unusually hot, dry day the pots were sometimes kept out of the sun to prevent checking. If checking occurred, the vessel was simply broken up and the clay reused.
Josefina Ochurte allowed for drying time as she worked. After smoothing a coil onto the vessel with a wet stone, but before paddling, she would often take a few minutes to work on a clay pipe. She began these pipes by rolling a single piece of clay in her palms to about an inch of thickness. She tapered one end into a stem and shaped the other with a conical wooden mold. Removing the mold, she enlarged the pipe bowl with her right index finger. She gave the stem a gentle arch and pushed a little pointed twig with the same arch into the stem to the bottom of the bowl. She smoothed the outside of the pipe with the help of a small smooth stone. The flat, triangular handle was attached last, after the bowl had been formed. The twig in the stem would be burned away during firing. Any residue could be pushed out with another small stick. The mouthpiece sometimes had to be opened by abrading it in a perpendicular fashion across a stone.
VIII. Decoration
Vessels generally received little if any decoration, although roughly painted bowls were commonplace among the Colorado River tribes. The Mohave were the most given to decorating their pots. As pigment, they used a yellow ochre (or limonitehydrous ferric oxide) that turned red when fired. Their many design elements had meanings and names, each potter using a number of icons as her own. The Yuma painted designs on pieces not meant for cooking or hard usage, usually on water -- or food -- storage ollas. Large storage jars and cooking pots were not painted by the Kumeyaay but water jars and serving bowls often received designs. The decorations were irregular, inconsistent and without apparent plan. Incising was known by Yuman potters, but only painting had survived to Rogers' time and that was exclusively in red, applied in broad lines somewhat carelessly.
Rogers wrote that Kumeyaay design elements had no particular meaning and appeared to have derived from the Colorado River Yuman groups. A. Kroeber saw a similarity in some of these elements among the Mohave with tattoo marks, which seemed true of other groups as well. Some of the motifs are found in petroglyphs and pictographs and on the basketry of southern California.
Kumeyaay pigment or paint came from hematite or red ochre (anhydrous ferric oxide). Rosa Lopez obtained hers from the earth (a ledge in Carrizo Canyon near Jacumba), but a bacteria also deposited it as a scum in iron-bearing springs. The pigment was ground in a small pottery cup or a large concave potsherd then mixed with water that had been prepared by soaking an egg-sized piece of baked mescal (Agave deserti) in it for twenty-four hours. From time to time the sweet syrup from the baked mescal was squeezed out into the water. This sugary mixture set the pigment during firing.
The Kumeyaay vessel was held upright on the palm of the left hand while it was decorated with the right. The end of a 3-inch piece of agave-fiber cordage served as a brush. Milkweed fiber cordage was preferred in earlier days but they had stopped making this when Rogers observed Lopez in the late 1920s. The Yuma twisted two strands of the inner bark of willow into a 6-inch cord, doubled it over and twisted it into a 3-inch, four-ply cord and applied paint with the bent end. A thin red wash occasionally was coated over a Kumeyaay vessel with the palm and closed fingers or a broad design was painted with a single finger.
Manuela Aguiar, a Southern Diegueño or Kuatl potter in the Sierra Juarez of Baja, was making designs in red on some of her pots when I visited in the summer of 1994. Generally vessels from the Santa Catarina area were left undecorated.
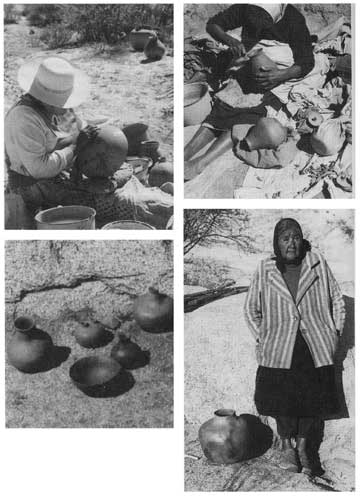
Josefina Ochurte gives final polish to unfired plate and evens jar rim with a knife. Notice pottery anvils on ground beside her. Below: unfired water vessels to the rear of fired food bowl and canteen. She stands beside a seed olla, late fall 1997.
The article is from the book, entitled "Survival Skills of Native California" (ISBN 0-87905-921-4), by Paul Douglas Campbell. Permission to use the article on the PrimitiveWays website was given by Mr. Campbell. Paul Campbell can be contacted through his publisher, Gibbs Smith, P.O. Box 667, Layton, Utah 84041.
We hope the information on the PrimitiveWays website is both instructional and enjoyable. Understand that no warranty or guarantee is included. We expect adults to act responsibly and children to be supervised by a responsible adult. If you use the information on this site to create your own projects or if you try techniques described on PrimitiveWays, behave in accordance with applicable laws, and think about the sustainability of natural resources. Using tools or techniques described on PrimitiveWays can be dangerous with exposure to heavy, sharp or pointed objects, fire, stone tools and hazards present in outdoor settings. Without proper care and caution, or if done incorrectly, there is a risk of property damage, personal injury or even death. So, be advised: Anyone using any information provided on the PrimitiveWays website assumes responsibility for using proper care and caution to protect property, the life, health and safety of himself or herself and all others. He or she expressly assumes all risk of harm or damage to all persons or property proximately caused by the use of this information.
© PrimitiveWays 2013