Fletching By Hand
by Jon Jeffer
 I started to make
my own arrows just about the time I finished my first primitive
bows. This may conjure up an image of a guy with a new bow, looking
at it and scratching his head. That was about how that happened.
I had the weapon, but I was missing the ammo! It probably happened
just like that back in the Stone Age!
I started to make
my own arrows just about the time I finished my first primitive
bows. This may conjure up an image of a guy with a new bow, looking
at it and scratching his head. That was about how that happened.
I had the weapon, but I was missing the ammo! It probably happened
just like that back in the Stone Age!
Anyway, I knew something about the way that modern arrows are
fletched. A jig is used that holds the arrow shaft and the feather,
and then with glue applied to both, the jig will hold them together
at the right angle until the glue dries.
This system works great, but it has a few disadvantages. First
off, I did not have the jig and I didn't want to buy one. My thought
process did not get much further than that, but its worth noting
that it is not a process that lends itself to fletching in the
field, or under primitive conditions.
So I set out to figure out how to fletch arrows by hand.
There are a lot of traditional fletching styles that were done
by hand. Some are clearly easier or harder to accomplish. One
option for primitive hand fletching is to just do a really lousy
job. That was in fact my first approach. My first primitive bow
was light, in the 25 pound range, and the arrows were made out
of Phragamite reed shafts, with wooden foreshafts sharpened to
points. I used goose feathers left at full height, and wrapped
three of them on with cotton thread soaked in glue. The first
ones were anything but symmetrical, and the process always seemed
like I had one hand too few. And some of those fletch jobs were
way over on the ugly side of hideous, but they all more or less
flew.
My bows went up in weight and quality, and my aspirations as
a fletcher was towards more durable, more accurate arrows, and
a way to make them that would let me gin up a mess of arrows within
some reasonable amount of time. I tried a number of approaches
and variations, but finally arrived at a method that worked. As
it turns out, it is more or less the method described by John
McPherson in his book, "Naked into the Wilderness".
Shafts: I started with straight
shafting material. My shafts were 5/8" hardwood dowels from
Home Depot. This is not exactly Abo, but it sure saves time working
down shoots to homogenous gauge, and straightening them with fire.
When you get lumberyard dowels to use as arrow shaft material,
it pays to pick through the pile. First, pick shafts as straight
as you can get them. One way to do this is to hold them up and sight
down the length of the shaft and rotate it. You'll see how straight
the shaft is. You will be cutting them shorter so its okay if
the ends take some bend. In fact, you will almost never find perfectly
straight shaft material. But some of it is really bendy, and you
want to avoid that. If you do a good job getting pieces that are
more or less straight, you can usually get away with not doing
any subsequent straightening.
The other thing to look at is the grain. Ideally, the grain
should run the length of the shaft. If the grain runs off at an
sharp angle the arrow will often break at that point if it hits
something hard.
To prepare the shafts, I cut them to the proper draw length.
If in doubt make the arrows a few inches longer than you think
you will need them, and then put one of the finished arrows on
the bow and pull it. Have someone else mark the shaft with a pencil
while you hold the bow at full draw. Once you know your draw length
its easy to cut shafts to that length. Remember that if you are
mounting broad heads you'll want the shafts a bit longer
I cut the nock (that's the slot in the back of the arrow that
fits onto the bow string) using three (or four) hacksaw blades
taped together so that the teeth of the blades face in opposite
directions. It is a good idea to clamp the shaft into something
while you cut the nock. A vice or some such arrangement is perfect.
If you don't have a vice, you can improvise with a C-clamp and
a post, or a railing. You can cut a V notch in a small piece of
wood that the shaft will fit into, and sandwich the shaft between
the block and post and tighten it up with the clamp. The primitive
version is to wrap cord around this arrangement and then tighten
it up by inserting a stick and twisting the whole thing tight.
When you saw the nock, cut across the grain that you will see
on the end of the shaft. This will keep your string from splitting
the shaft. Go slowly and try to keep the cut as vertical as possible.
The tendency is to creep left of right. Just be careful and go
slowly. I cut the nocks as deep as the hacksaw blade is wide.
This serves as a convenient guide.
Finally, I sand and seal the shafts. I use a home made varnish
made of pine pitch dissolved in denatured alcohol. You can use
this or commercial varnish, linseed oil, Tung Oil, or you can
go totally Abo and just rub in fat and heat the shaft until it
absorbs it. The sealing keeps the wood from absorbing moisture
and warping.
At this point the shaft is ready for feathers.
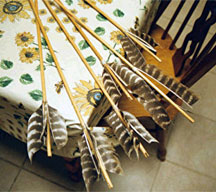
Feathers: In the pictures shown,
I used Wild Turkey feathers. I found these on the ground in woods
near where my mother lives. Those woods are just full of Wild
Turkeys and they drop feathers all over the place. If you are
not so lucky, you can often find Canada Goose feathers down near
parks that have ponds, or at lakes. These feathers are pretty
ideal because they are large and fairly stiff and they are also
legal to possess in the state I live in. You can also buy prepared
fletches from archery suppliers. These are cut (as far as I know)
from feathers from Domestic Geese or Turkeys. You can also order
Goose and Turkey feathers from some suppliers. More about that
later.
If you have natural feathers, the first thing you need to do
is split them in half along the quill. The quill is the stiff
bit up the middle of the feather. First cut off the thick bottom
of the quill where it was stuck in the bird. I do this with scissors
or a sharp kitchen knife on a cutting board. Then I use the knife
and cutting board to split the quill in half lengthwise. The material
inside the quill is a lot like Styrofoam. Once you have the feather
split in half, you want to reduce the quill a bit. I trim it with
scissors or a knife, and work the bottom down flat and smooth
with course sandpaper, a file, or by rubbing it on something abrasive.
Getting this very thin is not that important, except for the very
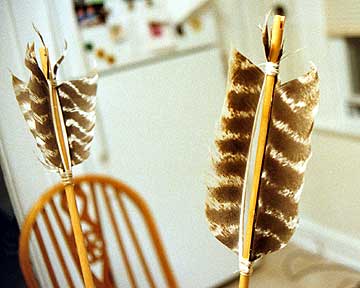
front end. At this point you will cut fetches from the feather.
I can usually get two fletches out of one large feather half,
sometimes three. Make sure they are long enough and allow for
the space front and back where they will be bound onto the shaft.
Note that flight feathers only have one half, and tail feathers
have two. Each half feather has a natural cup to it that will
impart spin to the arrow either clockwise or counter clockwise.
Sort the fletches that you are making into sets of threes all
with the same spin to them. Don't mix clockwise and counter clockwise
feathers on the same arrow shaft.
Sinew: Is my first choice for
binding on fletches. Sinew is the material that makes up the connective
tissue -- the tendons -- of animals. Your tendons are made out
of sinew too. One thing I like about sinew is that it is strong.
Hey, its been holding your feet on all these years, right? The
other two things I like about sinew are that it is more or less
self adhering when its wet (add water, makes its own sauces!),
and as it dries it shrinks. Both characteristics are great when
you are tying on fletches and only have two hands. It is also
really traditional, and you can feel like a real caveman (or cavewoman)
using it.
You can get sinew, from large dead critters, at some Asian
markets in the form of beef tendon (in which case you need to
clean the fat and tissue off it and dry it), or you can order
it dry from some businesses that actually specialize in selling
dead animal parts (more about that later). Any sinew will do.
When I lived in California, I used Emu leg sinew.
To prepare it for use, I pound it with a rock while its dry,
and soak it in water over night and peel off the threads. You
can use it right then or dry the threads and use it later. Dry,
it'll last forever unless something eats it. Wet it attracts ants
and dogs and will start to smell rank in a few days , at which
point it will attract even more enthusiastic dogs.
If you can't stand the thought of sinew, you can use cotton
thread and dip it in hide glue (or Knox Gelatin mixed about 4
times too thick) as you bind on the fletches.
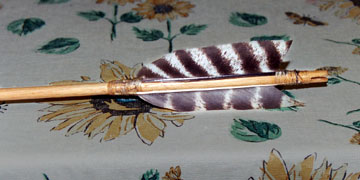
Tying on fletches with sinew:
I soak my sinew threads in water from anything from a few hours
to a few days. This makes them soft and pliable. More than a few
days and they start to smell. You can still use them. The bacteria
making them stink might be a concern. This is animal parts, so
take normal precautions and wash your hands after handling it.

Take a shaft, a fletch, and a sinew thread. Put the fletch
against the shaft to see where it should be positioned. Remember
to leave space for your fingers above the nock. Remember that
you will be trimming all the fletches in the set of three to be
the same length as the shortest fletch in the set. So its good
to start with the shortest fletch. Use the fletch to figure out
where the front end of the fletches will be, and at that point
wrap the sinew once around the shaft. If you mash the end of the
sinew thread a bit it will tend to stay on the shaft and make
your life easier. If it does not want to stay put you may not
have soaked it long enough, or have mashed the end enough.
 Anyway, wrap the sinew
around the shaft once. Then lay the front end of the first fletch
so that it is 90 degrees to the nock, with its front end laying
on the sinew on the bow shaft. Wrap the sinew once or twice over
the front bit of the fletch and around the shaft. Add the next
fletch at about a third of the way around the shaft and repeat.
Then place the last fletch 120 degrees from the two fletches that
are already tied on. Wrap the remainder of the sinew thread around
the shaft totally covering the front edges of the fletching. You
can wet your fingers and smooth it down, and it should all stick
to itself. This will come out better if you have really thinned
down and tapered this front end of the quill. Add another sinew
if you have not covered the fronts of the quill completely. This
covering will keep you from getting feather cuts along the top
of your hand later on when shooting.
Anyway, wrap the sinew
around the shaft once. Then lay the front end of the first fletch
so that it is 90 degrees to the nock, with its front end laying
on the sinew on the bow shaft. Wrap the sinew once or twice over
the front bit of the fletch and around the shaft. Add the next
fletch at about a third of the way around the shaft and repeat.
Then place the last fletch 120 degrees from the two fletches that
are already tied on. Wrap the remainder of the sinew thread around
the shaft totally covering the front edges of the fletching. You
can wet your fingers and smooth it down, and it should all stick
to itself. This will come out better if you have really thinned
down and tapered this front end of the quill. Add another sinew
if you have not covered the fronts of the quill completely. This
covering will keep you from getting feather cuts along the top
of your hand later on when shooting.
Look down the arrow from the butt end. You can make sure that
the fletches are lined up at 120 degree intervals from each other
and that the cock feather is 90 degrees to the nock. If they are
not in the right position, with gentle pressure you can still
move them. This is the beauty of doing it this way.
I will usually tie the fronts of a full set of arrows, let
the sinew dry, and then go and tie the back ends. Again I will
start with the shortest fletch. Some people trim the feathers
at the back end to leave bare quill to wrap the sinew onto. I
just fold the feather fuzz down and wrap it down under the sinew.
Both methods were used by various Native Americans and probably
elsewhere too. The process is more or less the same as at the
front end of the fletch. You wrap the fletches down one at a time.
Again you can adjust them for position and get them laid out right.
I find that I have enough natural sense of proportion to get this
done without resorting to any kind of measuring device and I think
most people are just as capable, so my rule of thumb is to eyeball
it until it looks right.
As the back ties dry, check them periodically and gently pull
the tail ends of the fletches so that they lay as flat as possible
against the shaft. When they dry, you can trim off the ends of
the fletches that stick out from under the sinew in the back and
you can wrap the shaft above the nocks with sinew to reinforce
them.
 The sinews dry hard.
I seal them by painting my pine pitch and alcohol varnish mixture
onto them. This makes them translucent and I think, pretty nice
to look at. The traditional primitive sealer would be conifer
pitch mixed with charcoal, moose dung, or some other combination
of goodies. The basic idea is to keep the sinew from sucking up
moisture and getting damp and coming undone.
The sinews dry hard.
I seal them by painting my pine pitch and alcohol varnish mixture
onto them. This makes them translucent and I think, pretty nice
to look at. The traditional primitive sealer would be conifer
pitch mixed with charcoal, moose dung, or some other combination
of goodies. The basic idea is to keep the sinew from sucking up
moisture and getting damp and coming undone.
Now if you want you can take them out, stick on the point of
your choice, and shoot them.
Gluing down the fletches: If
I was making arrows under primitive conditions for immediate use
I might skip this step, but given my status as only part-time
Neanderthal I usually do it, and so do most of the folks I have
run into or corresponded with.
I paint Weldwood contact cement onto the base of the fletch,
and onto the shaft just under the fletch with a small paint brush
(cleans up with mineral spirits). I do this for all the fletches
on all the arrows. Then I go back and just press the fletch down
against the shaft and I am done. The operation is more or less
the same with hide glue just a lot slower and a lot less convenient.
You can put the hide glue in, wait for it to get tacky and then
tie the middle of the fletches down with a thread.
Trimming the fletches: I trim
the fletches to uniform shape with a sharp pair of large scissors.
These can also be burned to shape with a coal from a fire, a cigarette,
or a wood burner. Scissors are fast and easy and again I measure
by eyeball and it seems good enough.
Remember that like with all things cut or trimmed, its easier
to shorten the feathers than to lengthen them again. Higher fletches
impart greater stability. Shorter ones offer less air resistance
and are faster. Since an arrow shot from a primitive bow has to
bend around the bow itself to fly straight (the Archers Paradox),
more stability is usually required than with modern center shot
bows.
Spine and accuracy: Spine refers
to the stiffness of the arrow shaft. In theory, this should be
matched to the weight of the bow as it facilitates straight flight
and accuracy. There are devices called spine testers. I don't
have one. One way to test is to flex the arrow shafts by hand
and make bundles of them that feel about the same as an arrow
that you know to be accurate. I have happily forged along up until
now ignoring spine. I try to make my arrows in bunches of ten
and as close to each other as I can manage. What I notice is that
most of my arrows are okay, and every once in awhile I have one
or two that fishtail all over the place. I cull these from my
first string arrows and set them aside for doing stupid things
with.
Getting the stuff you need: Our
ancestors just went out and took what they needed from Mother
Nature or pulled it off a passing Mammoth. Gathering raw materials
nowadays takes creativity as well. Here are some ideas to get
you started.
Nature: Pine pitch from the knots of pine trees, hardwood suckers,
reeds, or bamboo shafting material, sinew, charcoal, feathers.
Hardware Store: Dowels, bamboo garden stakes, Weldwood contact
cement, denatured alcohol, mineral spirits, various wood oils,
varnishes, hacksaw blades, C-clamps, files, sandpaper, hide glue.
Supermarket: Scissors, Knox Gelatin (instead of hide glue),
Twinkies and Beer (to keep the fires burning)
Other places to order stuff that you need from nature, but
can't gather (feathers, sinew, etc.):
Moscow Hide and Fur - www.hideandfur.com
Three Rivers Archery - www.3rivers.com

E-mail your comments to "Jon Jeffer" at mudvillejon@yahoo.com
PrimitiveWays
Home Page
We hope the information on the PrimitiveWays website is both instructional and enjoyable. Understand that no warranty or guarantee is included. We expect adults to act responsibly and children to be supervised by a responsible adult. If you use the information on this site to create your own projects or if you try techniques described on PrimitiveWays, behave in accordance with applicable laws, and think about the sustainability of natural resources. Using tools or techniques described on PrimitiveWays can be dangerous with exposure to heavy, sharp or pointed objects, fire, stone tools and hazards present in outdoor settings. Without proper care and caution, or if done incorrectly, there is a risk of property damage, personal injury or even death. So, be advised: Anyone using any information provided on the PrimitiveWays website assumes responsibility for using proper care and caution to protect property, the life, health and safety of himself or herself and all others. He or she expressly assumes all risk of harm or damage to all persons or property proximately caused by the use of this information.
© PrimitiveWays 2013