Introduction
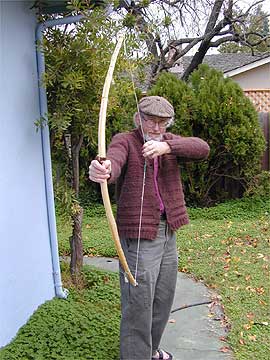
I had always been intrigued by the meticulous workmanship that went into Inuit (Eskimo) cordage backed bows. These hunters of the North put the same craftsmanship into their bows that went into all their hunting weapons. It was part of their way of showing respect for the animals which they killed for survival. Someday I'll make a cordage backed bow. Someday just never got here until one day I read the article in "Bowmen's Bulletin" by Errett Callahan (1). He made a "real" cordage backed bow, copying a museum specimen as closely as possible. That was the nudge, the inspiration that I needed to get busy. My objectives were, I believe, somewhat different from Callahan's. Callahan was trying to make a museum piece which looked exactly like the real thing and could also be demonstrated by shooting. I wanted to see if a cordage backing would act as a cheap insurance policy against bow breakage for stick bows; quickly made, imperfect green wood etc., the sort of thing you learn to make in an outdoor survival class. Furthermore I wanted to learn some of the physical properties of cordage backed bows. I also didn't want to make or buy the 72 feet of sinew string Callahan used. My objective was not to make as authentic a replica as possible of some aboriginal hunting weapon. I wanted to learn something about cordage backed bows, stimulate others to try making cordage backed bows and give people something to argue about.
Historical Background:
The Inuit used cordage backing for 2 reasons. Very little good bow wood was available so it was imperative that whatever material they used for their bows be backed with sinew. Furthermore it was very difficult to make hide glue under Arctic circle conditions. You have to take hide, hooves, gristle, etc. and boil and boil and boil to make glue. If you have a very limited fuel supply and no big container to boil it in then no glue. As a consequence of circumstances such as this the Inuit became masters (mistresses also) of tying things together. The Inuit bows which I have seen in museums and in photographs are marvels of knotcraft.
In the South West several Apache bands made cordage backed bows. The habitat was obviously different so why did they do it? One remote connection is that they are all part of the Athabaskan language group. From there it gets a little fuzzy. Let the anthropologists and archaeologists worry about it.
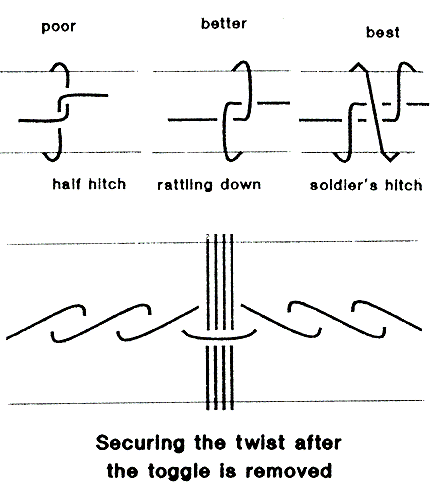
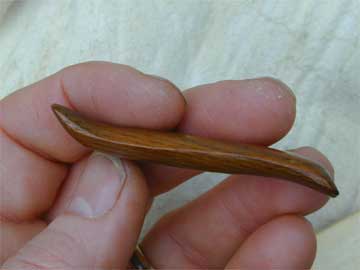
Mason (2) has some fairly detailed drawings of Inuit bows showing the methods used to attach the cordage backing. The main feature to observe is that they had many ways of doing it. Some made the nocks of the bow very deep and then passed the cord back and forth between the nocks. Other examples used "half hitches" about an inch below the nocks. The cord was secured to the bow limbs at several places between the nocks and handle section. Several being from 1 to 20. The one universal factor in all designs, I presume, is that the sinew cordage was tightened to be under great tension when the bow was in use. Typically this was done by inserting some sort of little toggle into the cord and twisting until it was tight. The cord was then bound in place and the toggle removed. After shooting the binding was removed to relieve the tension on the cord. Mason's book shows an ivory toggle which looks very much like the lever used to remove bicycle tires.
What I did
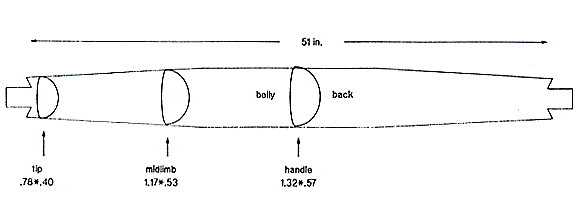
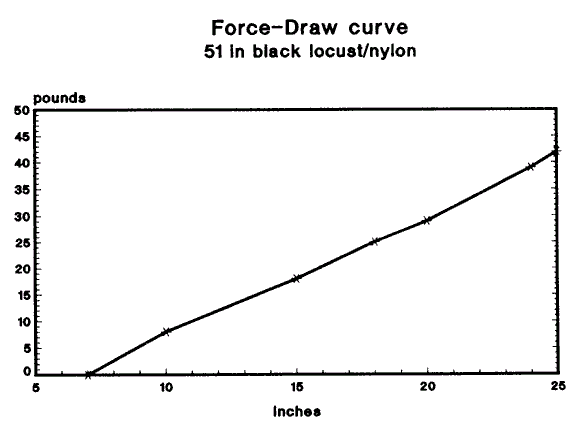
The wood came from a black locust tree cut in early July, about 2 inches diameter at the top end, split in half with a combination of sawing and wedge. The log was peeled, laid on the floor so that the curvature was in the plane of the floor, and marked on both sides with a felt tipped pen. Lacking a bandsaw I used a small pruning saw and a wedge to split it into two staves. The wood was roughly shaped while green and tied to a 2x4 to dry for all of three weeks. The final dimensions were: 51 inches between the knocks, handle: 1.32" x .57", midlimb: 1.17' x .53", tips: .78" x .40". The cross sections were flattened ovals (semi-ellipses) with the belly side considerably flatter than the back. Absolutely nothing was done to the back except bark removal and light sanding. The bow is about 90% sapwood. I did the initial drying between tillerings by sticking the bow in the back window of my car in the direct July sun, an idea suggested by Paul Comstock (3). It dried very quickly that way. The first attempt broke while being strung, maybe because I tried stringing it while it was still very warm from the back window. The second half of the log was successfully tillered at about half draw before putting the cordage backing on. I didn't go to full draw before adding the cordage back because I thought it might break. It now draws 24 pounds at 20 inches before the cordage is cinched up and 29 pounds at 20 inches after cinch-up. At full draw, 25 in. it pulls 42 pounds. A cardinal rule of the traditional American/European bowyer which I broke was to make the bow from essentially green wood.
Often Native American bows were made from green wood, probably a holdover from the days when they had to use stone tools for bowmaking. Greenwood is a lot softer than dry seasoned wood and consequently easier to cut with a stone tool. I would also like to have had more heartwood on the belly of the bow but the tree just wasn't big enough. It was meant to be a stick bow anyway.
Putting on a cordage backing
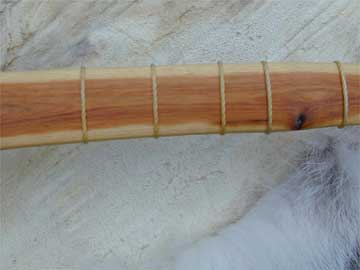
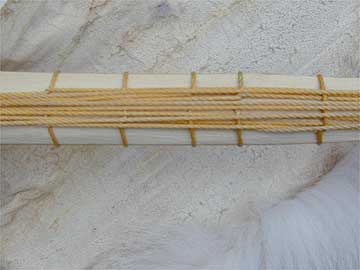
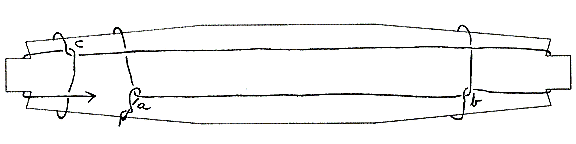
The cord I used was yellow nylon chalk line, about .05 inches in diameter, three strand twisted. My choice was based on what I had at the time plus the fact that nylon has elastic properties similar to sinew. Other sizes or materials could be substituted. Looking at (a) on Figure 3, first tie one end of the cord temporarily near the end of one limb. Next pull the cord to the other end of the bow and tie a knot as shown in (b). Different knots to use are shown in Figure 2. Pull the cord as tight as you can while you do this. Then bring the cord around the nock, pull tight and tie a knot at the other end of the bow (c). Continue doing this until you have six strands on each side.
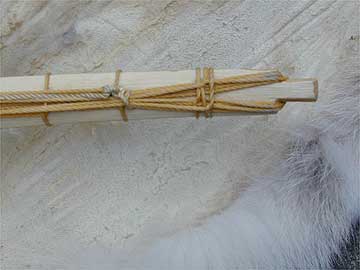
The ends of the cord can be fastened together as in Figure
3 :
a. Untie the timber hitch fastening the first end and tie a bowline
or a figure of eight loop in it.
b. Pass the finish end of the cord through the loop and cinch
it as tight as possible.
c. Secure the finish end with a sheet bend or couple of half hitches.
The net result when all the strands from both sides are bunched
together is a bundle about .2 inches in diameter. As a point of
reference Callahan's bow was copied from an Inuit bow backed with
a .25 inch diameter sinew cord bundle.
Things to look out for
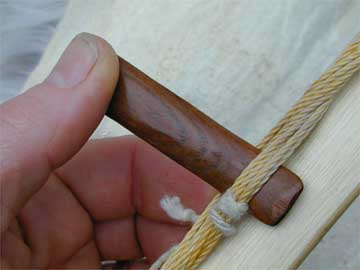
If the nocks aren't deep enough the cord will slip off. This can be remedied by tying the bundle of cord together near each nock, making sure the nocks are deep enough and tying "half hitches" near each end. You don't want any constraint on the cord in the middle 2/3 of the bow so you can twist the cord to make it tight. This puts it at risk from sliding off the back of the bow when it is at full draw. This can be prevented by providing an additional binding around the handle after the cord has been twisted tight. Pass a fairly heavy cord through the gap where the toggle is located several times and tie it around the handle. Then pull the toggle out. The cord should stay twisted and not move from the center of the handle section.
How much cord is enough?
The obvious answer to this question is to see what the Inuit did and do it that way. That attitude must be modified for two reasons: a. We are not using the same materials they are: nylon instead of sinew and different woods instead of the antler, bone or driftwood they were forced to use. Furthermore we don't have a thousand years of tradition to help us. A few engineering calculations ought to tell us a lot about what should work.
Technical details:
The cordage back does several things when tightened. It increases the stiffness of the limbs so it takes more moment to bend them the same amount. It changes the shape of the bow in that it reflexes the bow (the tips are bent opposite to the direction they move when drawing the bow. It also reduces the tensile forces on the wood fibers in the back of the bow. Each of these features can be analyzed separately. According to the calculations outlined in the Appendix the cord stiffens the limbs by about 18% and reflexes the tips by about .4 inch. This should make the full draw weight about 18% higher. Experimentally the increase is 21%.
One of the most common modes of failure of self bows which are made from imperfect wood is rupture of the fibers on the back of the bow. Hence the ancient admonition not to cut through wood fibers on the back of a bow. That rule can be broken if you are going to glue a sinew backing onto a bow. Pope (5), schooled in the ways of traditional American and British bowyers was surprised to see Ishi virtually ignore that rule when making his short (42 in.) sinew backed juniper bows.
Anything which reduces the tensile stresses on the wood fibers on the back of a bow will work. The backing doesn't have to be glued on to reduce the tensile stress. The Inuit knew that a thousand years ago.
Increasing the effectiveness of cordage backing.
This was just one experiment. Other materials could be used instead of nylon. Dacron, hemp, silk and linen would all work. The amount of nylon and the tension I used was probably correct for this particular piece of wood since the bow is starting to show crisaling on the belly, evidence that the limbs can't stand any more compressive force. Since the effectiveness of a given cordage backing depends on its distance from the neutral plane it would be interesting to put little spacers on the back to keep the cord as far away as possible. The idea of spacing the cord as far away as possible was carried to the ultimate in a bow I saw during the mid 60's at some of the field archery tournaments in central California. It consisted of a rigid handle section very similar to what one saw on fiber glass recurved bows of the day, two limbs hinged to the handle extremities and a loop of gum rubber tubing connected between the two limbs. Drawing the bow stretched the gum rubber tubing. As I remember the bow shot fairly well. It was around for a couple of years and then disappeared. My guess is that the gum rubber would be rather fragile and need to be replaced frequently.
Materials
Lacking the desire to make enough sinew cord to do a cordage backed bow I searched for a material which behaved like sinew but was easier to obtain. It should have elastic modulus, density and tensile strength similar to sinew.
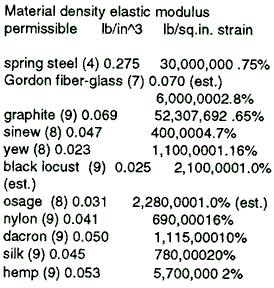
Measurements that I had made on sinew several years earlier showed that it had an elastic modulus of about 400,000 pounds per square inch and could be stretched about 5% before breaking. Hardy (4) claims an elastic modulus of 180,000 pounds per square inch and elongation of 4.1%. Nylon is clearly a good choice for imitation sinew in that its elastic modulus is about the same and it can be stretched even farther. As a side issue, one of the key features of sinew which makes it so superior as a glued bow backing is the fact that when glued to the back of a bow in the wet state it is elongated and as it dries it shrinks, putting it under considerable tension.
Appendix
The following stuff is here because I like to I analyze and do engineering. I'd rather spend some time with my friendly computer figuring out what should happen instead of building a bow which is doomed to failure because I've ignored some basic fact. I have seen a lot of good bows that were made through trial and error but I want to let people know that there are sound mechanical principals which govern bow design.
How much does the added cord increase the stiffness? The physical principals involved are all well known and can be found in just about any mechanical engineering handbook. The factors that matter are the stiffness of the bow limb, the normalized spring constant of the cord and the distance between the center of the cord and the neutral plane of the bow limb. Additional complicating factors are the tapering of the limbs and varying spacing between the cord and neutral plane. The purpose of the calculations is to make sure there are no surprises, everything is as suspected and nothing is being overstressed. Therefore we can just use average values. Now let's make some definitions.
The stiffness of the bow limb = cross-sectional moment of inertia. This is the quality of a limb which causes it to resist bending. In order to compute it one needs to know the dimensions and elastic modulus of the material. I use a somewhat backward approach. Namely, measure the draw weight of the bow, measure the width and thickness of the bow limbs so I know the relative stiffness of each of part of the bow limb and then feed that data into my computer which tells me exactly what the stiffness of each part of the limb has to be in order to achieve the measured full draw weight. (The computer is lgor's friend.) The reason for doing it that way is accuracy. It is easy to measure full draw weight and it is easy to compute relative stiffness of each segment of the limb by measuring thickness, width and shape. It's much harder to measure the elastic modulus of the wood.
The spring constant of the cord is easy to measure. Simply tie a loop in each end of a piece of the cord, secure one end, hang a weight on it and see how much it stretches. The normalized spring constant is: applied force * length of cord/change in length. For the nylon cord which I used, k' = normalized spring constant = 4.4 pounds *63 in./.5 in = 554 pounds/in./in. for a bundle of 12 strands, k' = 12 * 554 = 6648 pounds/in./in.
According to the computer the stiffness of the midlimb section
of a bow with a draw weight of 24 lb at 20 inches, without a rigid
handle section is 8,000 pound inch^2. The added stiffness due
to the cord which is spaced.36 inch from the neutral plane is
6648 pounds * (.36+.1)^2 = 1407.
The predicted fractional increase in draw weight is 1407/8000
= 17.6%.
The measured increase in draw weight at 20 inches is (29-24) lb/24
lb = 20.83%
That's fairly close agreement. We still have not yet included
the reflexing done by the cordage backing.
How does the tension affect the shape of the bow limb?
The above computation neglects the effects of tension in the cord. Tension in the cord will add a reflex to the bow limbs. The amount of reflex produced by the tension depends on the tension in the cord * its distance from the neutral plane divided by the stiffness of the limb. The tension is constant but the stiffness and distance vary. After tightening the cord the tips curve up 0.37 inches. A shot in the dark (just trust the calculus) is to assume constant stiffness equal to that in the handle section:
y" = the amount of curvature in the bow limbs caused by the cord tension.
y" = tension*distance from neutral plane/ stiffness.
tension = y"*stiffness/distance from neutral plane.
dy = tip reflex = 1/2*y"*(limb length)^2
y" = 2*tip reflex/(limb length)^2
y" = 2*.37/(25.5)^2 = 0.00114 per inch
Solving for the tension:
tension=.00114*14,500/(.36+.1) = 40 pounds
In other words cinching up on the cord to a tension of 40 pounds makes the ends curl up by about .37 inch. You can say that a tensioned cord backing increases the stiffness of the bow and it also changes its shape by adding more reflex. Both of those features increase the draw weight and stored energy of the bow. The only way I can think of to calculate the total improvement is with the computer, the subject of a subsequent article. My guess is that .37 inch of reflex on the tips doesn't make much increase in the draw weight and most of the increase is due to the increased stiffness.
References:
(1) "Archery in the Arctic" by Errett Callahan, Bowmen's Bulletin, June 1990, P.O. BOX 267, Harwinton, CT 06791.
(2) "North American Bows, Arrows and Quivers" by Otis Tufton Mason, J.M. Carroll and Company. (A Smithsonian report originally published in 1893)
(3) "The Bent Stick" by Paul Comstock, PO BOX 1102, Delaware, OH 43015.
(4) "Longbow" by Thomas Hardy, Mary Rose Trust, Portsmouth, England.
(5) "American Indian Archery" by Reginald and Gladys Laubin, University of Oklahoma Press.
(6) "Bows and Arrows" by Saxton Pope, University of California Press.
(7) Mike Gordon, Gordon Plastics
(8) Dick Baugh
(9) Materials Engineering, Dec., 1978, Vol. 88, No. 6, Reinhold Publishing Co.
This article was first published in The
Bulletin of Primitive Technology (Vol.1, Spring 1992, #3)
E-mail your comments to "Richard A. Baugh" at richardbaugh@att.net
We hope the information on the PrimitiveWays website is both instructional and enjoyable. Understand that no warranty or guarantee is included. We expect adults to act responsibly and children to be supervised by a responsible adult. If you use the information on this site to create your own projects or if you try techniques described on PrimitiveWays, behave in accordance with applicable laws, and think about the sustainability of natural resources. Using tools or techniques described on PrimitiveWays can be dangerous with exposure to heavy, sharp or pointed objects, fire, stone tools and hazards present in outdoor settings. Without proper care and caution, or if done incorrectly, there is a risk of property damage, personal injury or even death. So, be advised: Anyone using any information provided on the PrimitiveWays website assumes responsibility for using proper care and caution to protect property, the life, health and safety of himself or herself and all others. He or she expressly assumes all risk of harm or damage to all persons or property proximately caused by the use of this information.
© PrimitiveWays 2013